We previously tackled how to deploy your web applications quicker with the Caddy 2 Official Image. This time, we’re turning our attention to Rust applications.
The Rust Foundation introduced developers to the Rust programming language in 2010. Since then, developers have relied on it while building CLI programs, networking services, embedded applications, and WebAssembly apps.
Rust is also the most-loved programming language according to Stack Overflow’s 2021 Developer Survey, and Mac developers’ most-sought language per Git Tower’s 2022 survey. It has over 85,000 dedicated libraries, while our Rust Official Image has over 10 million downloads. Rust has a passionate user base. Its popularity has only grown following 2018’s productivity updates and 2021’s language-consistency enhancements.
That said, Rust application deployments aren’t always straightforward. Why’s this the case?
The Deployment Challenge
Developers have numerous avenues for deploying their Rust applications. While flexibility is good, the variety of options can be overwhelming. Accordingly, your deployment strategies will change depending on application types and their users.
Do you need a fully-managed IaaS solution, a PaaS solution, or something simpler? How important is scalability? Is this application as a personal project or as part of an enterprise deployment? The answers to these will impact your deployment approach — especially if you’ll be supporting that application for a long time.
Let’s consider something like Heroku. The platform provides official support for major languages like PHP, Python, Go, Node.js, Java, Ruby, and others. However, only these languages receive what Heroku calls “first-class” support.
In Rust’s case, Heroku’s team therefore doesn’t actively maintain any Rust frameworks, language features, or updated versioning. You’re responsible for tackling these tasks. You must comb through a variety of unofficial, community-made Buildpacks to extend Heroku effectively. Interestingly, some packs do include notes on testing with Docker, but why not just cut out the middle man?
There are also options like Render and Vercel, which feature different levels of production readiness.
That’s why the Rust Official Image is so useful. It accelerates deployment by simplifying the process. Are you tackling your next Rust project? We’ll discuss common use cases, streamline deployment via the Rust Official Image, and share some important tips.
Why Rust?
Rust’s maintainers and community have centered on system programming, networking, command-line applications, and WebAssembly (AKA “Wasm”). Many often present Rust as an alternative to C++ since they share multiple use cases. Accordingly, Rust also boasts memory safety, strong type safety, and modularity.
You can also harness Rust’s application binary interface (ABI) compatibility with C, which helps Rust apps access lower-level binary data within C libraries. Additionally, helpers like wasm-pack, wasm-bindgen, Neon, Helix, rust-cpython, and cbindgen let you extend codebases written in other languages with Rust components. This helps all portions of your application work seamlessly together.
Finally, you can easily cross compile to static x86 binaries (or non-x86 binaries like Arm), in 32-bit or 64-bit. Rust is platform-agnostic. Its built-in mechanisms even support long-running services with greater reliability.
That said, Rust isn’t normally considered an “entry-level” language. Experienced developers (especially those versed in C or C++) tend to pick up Rust a little easier. Luckily, alleviating common build complexities can boost its accessibility. This is where container images shine. We’ll now briefly cover the basics behind leveraging the Rust image.
To learn more about Rust’s advantages, read this informative breakdown.
Prerequisites and Technical Fundamentals
The Rust Official Image helps accelerate your deployment, and groups all dependencies into one package.
Here’s what you’ll need to get started:
- Your Rust application code
- The latest version of Docker Desktop
- Your IDE of choice (VSCode is recommended, but not required)
In this guide, we’ll assume that you’re bringing your finalized application code along. Ensure that this resides in the proper location, so that it’s discoverable and usable within your upcoming build.
Your Rust build may also leverage pre-existing Rust crates (learn more about packages and crates here). Your package contains one or more crates (or groups of compiled executables and binary programs) that provide core functionality for your application. You can also leverage library crates for applications with shared dependencies.
Some crates contain important executables — typically in the form of standalone tools. Then we have configurations to consider. Like .yaml files, Cargo.toml files — also called the package manifests — form an app’s foundation. Each manifest contains sections. For example, here’s how a [package] section looks:
[package]name = "hello_world" # the name of the packageversion = "0.1.0" # the current version, obeying semverauthors = ["Alice <a@example.com>", "Bob <b@example.com>"]You can define many configurations within your manifests. Rust generates these sectioned files upon package creation, using this
$ cargo newscript:
$ cargo new my-projectCreated binary (application) `my-project` package$lsmy-projectCargo.tomlsrc$lsmy-project/srcmain.rsRust automatically uses
src/main.rsas the binary crate root directory, whereassrc/lib.rsreferences a package with a library crate. The above example from Rust’s official documentation incorporates a simple binary crate within the build.Before moving ahead, we recommend installing Docker Desktop, because it makes managing containers and images much easier. You can view, run, stop, and configure your containers via the Dashboard instead of the CLI. However, the CLI remains available within VSCode — and you can SSH directly into your containers via Docker Desktop’s Container interface.
Now, let’s inspect our image and discuss some best practices. To make things a little easier, launch Docker Desktop before proceeding.
Using the Rust Official Image
The simplest way to use the Rust image is by running it as a Rust container. First, enter the
docker pull rustcommand to automatically grab thelatestimage version. This takes about 45 seconds within VSCode:
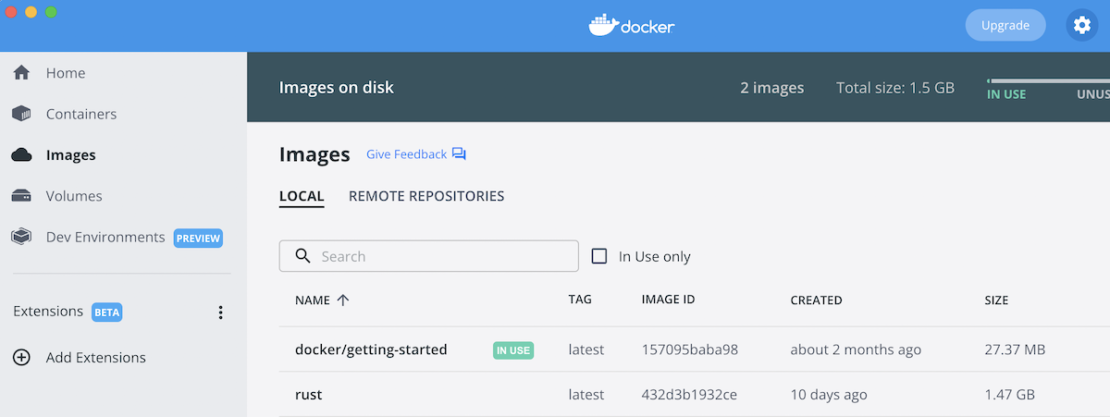
You can confirm that Docker Desktop pulled your image successfully by accessing the Images tab in the sidebar — then locating your
rustimage in the list:
To run this image as a container, hover over it and click the blue “Run” button that appears. Confirm by clicking “Run” again within the popup modal. You can expand the Optional Settings form to customize your container, though that’s not currently necessary.
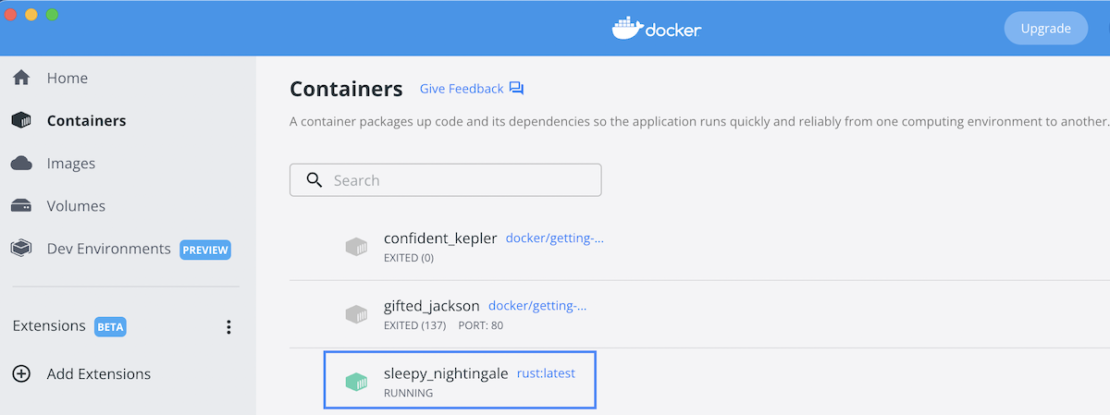
Confirm that your
rustcontainer is running by visiting the Containers tab, and finding it within the list. Since we bypassed the Optional Settings, Docker Desktop will give your container a random name. Note the blue labels beside each container name. Docker Desktop displays the base image’sname:taginfo for each container:
Note: Alternatively, you can pull a specific version of Rust with the tag
:<version>. This may be preferable in production, where predictability and pre-deployment testing is critical. While:latestimages can bring new fixes and features, they may also introduce unknown vulnerabilities into your application.You can stop your container by hovering over it and clicking the square “Stop” button. This process takes 10 seconds to complete. Once stopped, Docker Desktop labels your container as exited. This step is important prior to making any configuration changes.
Similarly, you can (and should) remove your container before moving onward.
Customizing Your Dockerfiles
The above example showcased how images and containers live within Desktop. However, you might’ve noticed that we were working with “bare” containers, since we didn’t use any Rust application code.
Your project code brings your application to life, and you’ll need to add it into your image build. The
Dockerfileaccomplishes this. It helps you build layered images with sequential instructions.Here’s how your basic Rust
Dockerfilemight look:
FROM rust:1.61.0WORKDIR /usr/src/myappCOPY . .RUN cargo install --path .CMD ["myapp"]You’ll see that Docker can access your project code. Additionally, the
cargo installRUN command grabs your packages.To build and run your image with a complete set of Rust tooling packaged in, enter the following commands:
$ docker build -t my-rust-app .$ docker run -it --rm--name my-running-app my-rust-appThis image is 1.8GB — which is pretty large. You may instead need the slimmest possible image builds. Let’s cover some tips and best practices.
Image Tips and Best Practices
Save Space by Compiling Without Tooling
While Rust tooling is useful, it’s not always essential for applications. There are scenarios where just the compiled application is needed. Here’s how your augmented
Dockerfilecould account for this:
FROM rust:1.61.0 as builderWORKDIR /usr/src/myappCOPY . .RUN cargo install --path .FROM debian:buster-slimRUN apt-get update &amp;amp; apt-get install -y extra-runtime-dependencies &amp;amp; rm -rf /var/lib/apt/lists/*COPY --from=builder /usr/local/cargo/bin/myapp /usr/local/bin/myappCMD ["myapp"]Per the Rust Project’s developers, this image is merely 200MB. That’s tiny compared to our previous image. This saves disk space, reduces application bloat, and makes it easier to track layer-by-layer changes. That outcome appears paradoxical, since your build is multi-stage (adding layers) yet shrinks significantly.
Additionally, naming your stages and using those names in each
COPYensures that eachCOPYwon’t break if you reorder your instructions.This solution lets you copy key artifacts between stages and abandon unwanted artifacts. You’re not carrying unwanted components forward into your final image. As a bonus, you’re also building your Rust application from a single
Dockerfile.Note: See the
&&operator used above? This helps compress multipleRUNcommands together, yet we don’t necessarily consider this a best practice. These unified commands can be tricky to maintain over time. It’s easy to forget to add your line continuation syntax (\) as those strings grow.Finally, Rust is statically compiled. You can create your
Dockerfilewith theFROM scratchinstruction and append only the binary to the image. Docker treatsscratchas a no-op and doesn’t create an extra layer. Consequently, Scratch can help you create minuscule builds measuring just a few MB.To better understand each
Dockerfileinstruction, check out our reference documentation.Use Tags to Your Advantage
Need to save even more space? Using the Rust
alpineimage can save another 60MB. You’d instead specify an instruction likeFROM rust:1.61.0-alpine as builder. This isn’t caveat-free, however. Alpine images leveragemusl libcinstead ofglibc and friends, so your software may encounter issues if important dependencies are excluded. You can compare each library here to be safe.There are some other ways to build smaller Rust images:
- The
rust:<version>-slimtag pulls an image that contains just the minimum packages needed to run Rust. This saves plenty of space, but fails in environments that require deployments beyond just yourrustimage - The
rust:<version>-slim-bullseyetag pulls an image built upon Debian 11 branch, which is the current stable distro - The
rust:<version>slim-bustertag also pulls an image built upon the Debian 10 branch, which is even slightly smaller than itsbullseyesuccessor
Docker Hub lists numerous image tags for the Rust Official Image. Each version’s size is listed according to each OS architecture.
Creating the slimmest possible application is an admirable goal. However, this process must have a goal or benefit in mind. For example, reducing your image size (by stripping dependencies) is okay when your application doesn’t need them. You should never sacrifice core functionality to save a few megabytes.
Lastly, you can lean on the cargo-chef subcommand to dramatically speed up your Rust Docker builds. This solution fully leverages Docker’s native caching, and offers promising performance gains. Learn more about it here.
Conclusion
Cross-platform Rust development doesn’t have to be complicated. You can follow some simple steps, and make some approachable optimizations, to improve your builds. This reduces complexity, application size, and build times by wide margins. Moreover, embracing best practices can make your life easier.
Want to jumpstart your next Rust project? Our awesome-compose library features a shortcut for getting started with a Rust backend. Follow our example to build a React application that leverages a Rust backend with a Postgres database. You’ll also learn how Docker Compose can help streamline the process.


