When you need to back up, restore, or migrate data from one Docker host to another, volumes are generally the best choice. You can stop containers using the volume, then back up the volume’s directory (such as /var/lib/docker/volumes/<volume-name>). Other alternatives, such as bind mounts, rely on the host machine’s filesystem having a specific directory structure available, for example /tmp/source on UNIX systems like Linux and macOS and C:/Users/John on Windows.
Normally, if you want to back up a data volume, you run a new container using the volume you want to back up, then execute the tar command to produce an archive of the volume content:
docker run --rm \
      -v "$VOLUME_NAME":/backup-volume \
      -v "$(pwd)":/backup \
      busybox \
      tar -zcvf /backup/my-backup.tar.gz /backup-volume
To restore a volume with an existing backup, you can run a new container that mounts the target volume and executes the tar command to decompress the archive into the target volume.
A quick Google search returns a number of bash scripts that can help you back up volumes, like this one from Docker Captain Bret Fisher. With this script, you can get the job done with the simpler ./vackup export my-volume backup.tar.gz. While scripts like this are totally valid approaches, the Extensions team was wondering: what if we could integrate this tool into Docker Desktop to deliver a better developer experience? Interestingly enough, it all started as a simple demo just the day before going live on Bret’s streaming show!
Now you can back up volumes from Docker Desktop
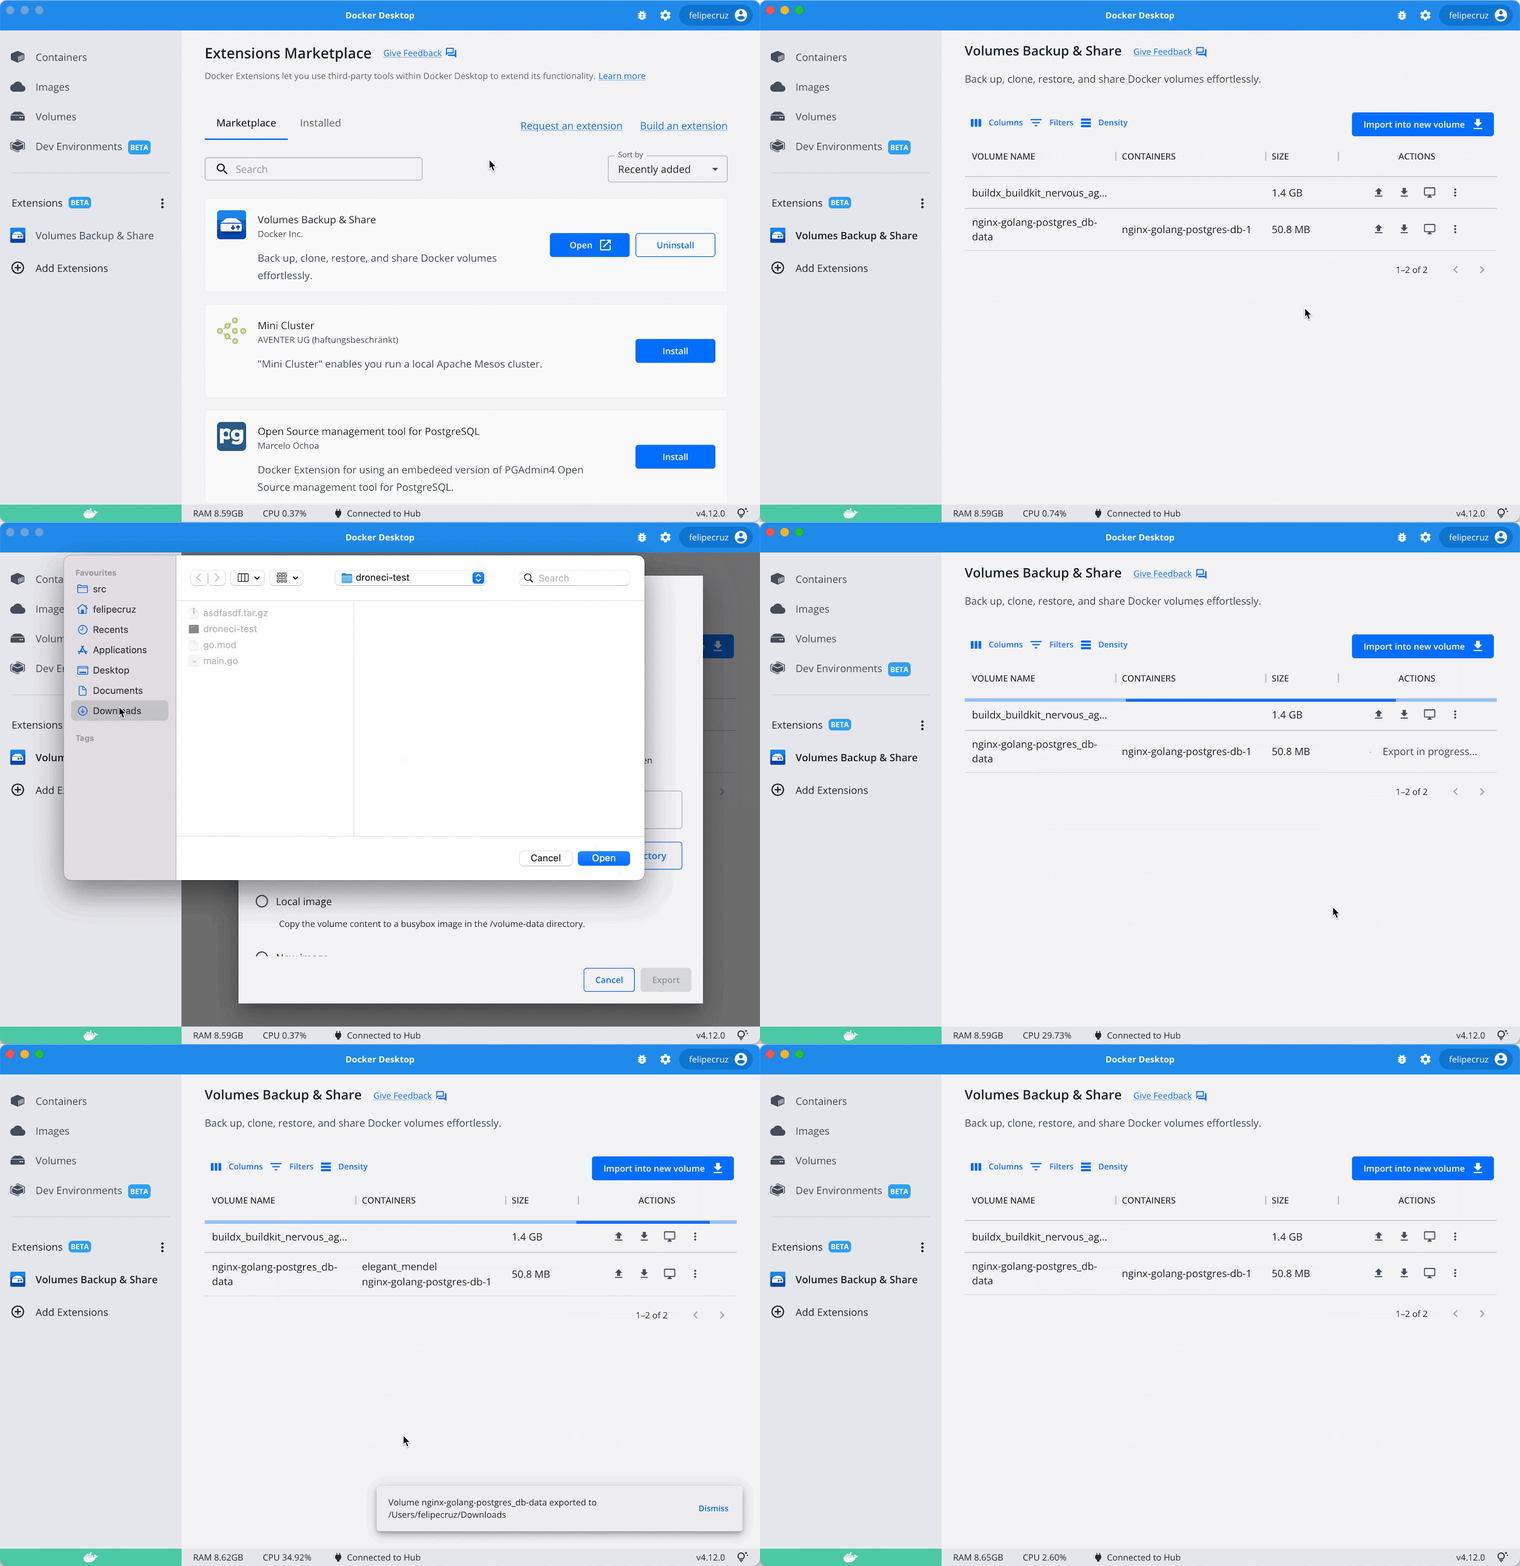
You can now back up volumes with just a few clicks using the new Volumes Backup & Share extension. This extension is available in the Marketplace and works on macOS, Windows, and Linux. And you can check out the OSS code on GitHub to see how the extension was developed.

What can I do with the extension?
The extension allows you to:
- Back up data that is persisted in a volume (for example, database data from Postgres or MySQL) into a compressed file.
- Upload your backup to Docker Hub and share it with anyone.
- Create a new volume from an existing backup or restore the state of an existing volume.
- Transfer your local volumes to a different Docker host (through SSH).
- Other basic volume operations like clone, empty, and delete a volume.
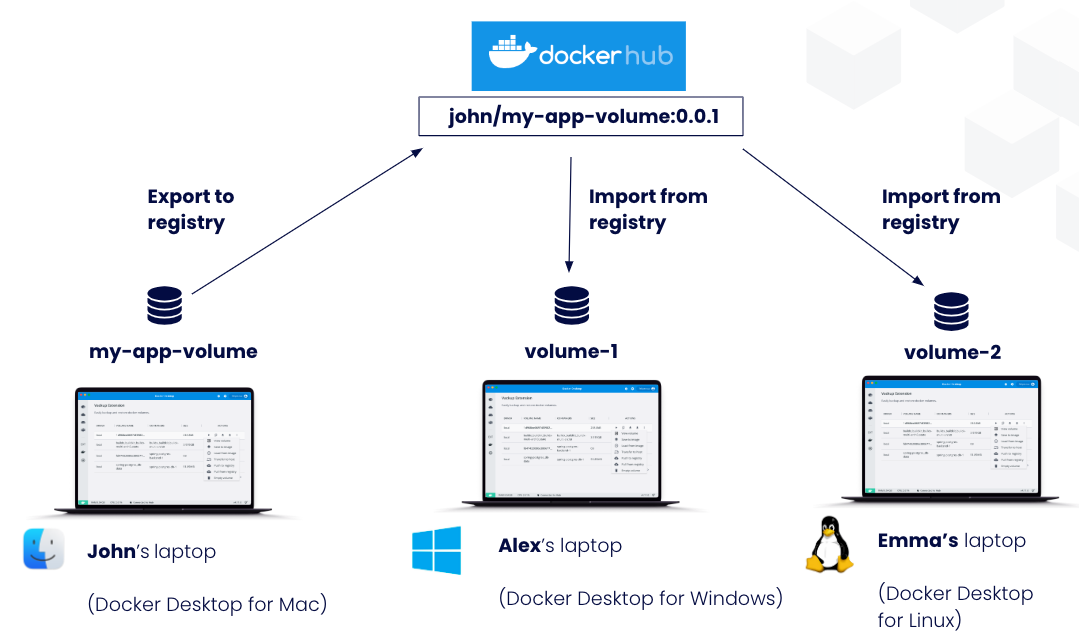
In the scenario below, John, Alex, and Emma are using Docker Desktop with the Volume Backup & Share extension. John is using the extension to share his volume (my-app-volume) with the rest of their teammates via Docker Hub. The volume is uploaded to Docker Hub as an image (john/my-app-volume:0.0.1) by using the “Export to Registry” option. His colleagues, Alex and Emma, will use the same extension to import the volume from Docker Hub into their own volumes by using the “Import from Registry” option.

Create different types of volume backups
When backing up a volume from the extension, you can select the type of backup:
- A local file: creates a compressed file (gzip’ed tarball) in a desired directory of the host filesystem with the content of the volume.
- A local image: saves the volume data into the
/volume-datadirectory of an existing image filesystem. If you were to inspect the filesystem of this image, you will find the backup stored in/volume-data. - A new image: saves the volume data into the
/volume-datadirectory of a newly created image. - A registry: pushes a local volume to any image registry, whether local (such as
localhost:5000) or hosted like Docker Hub or GitHub Container Registry. This allows you to share a volume with your team with a couple clicks.> As of today, the maximum volume size supported to push to Docker Hub by the extension is 10GB. This limit may be changed in future versions of the extension depending on feedback received from users.
Restore or import from a volume
Similarly to the different types of volume backups described above, you can import or restore a backup into a new or an existing volume.
You can also select whether you want to restore a volume from a local file, a local image, a new image, or from a registry.
Transfer a volume to another Docker host
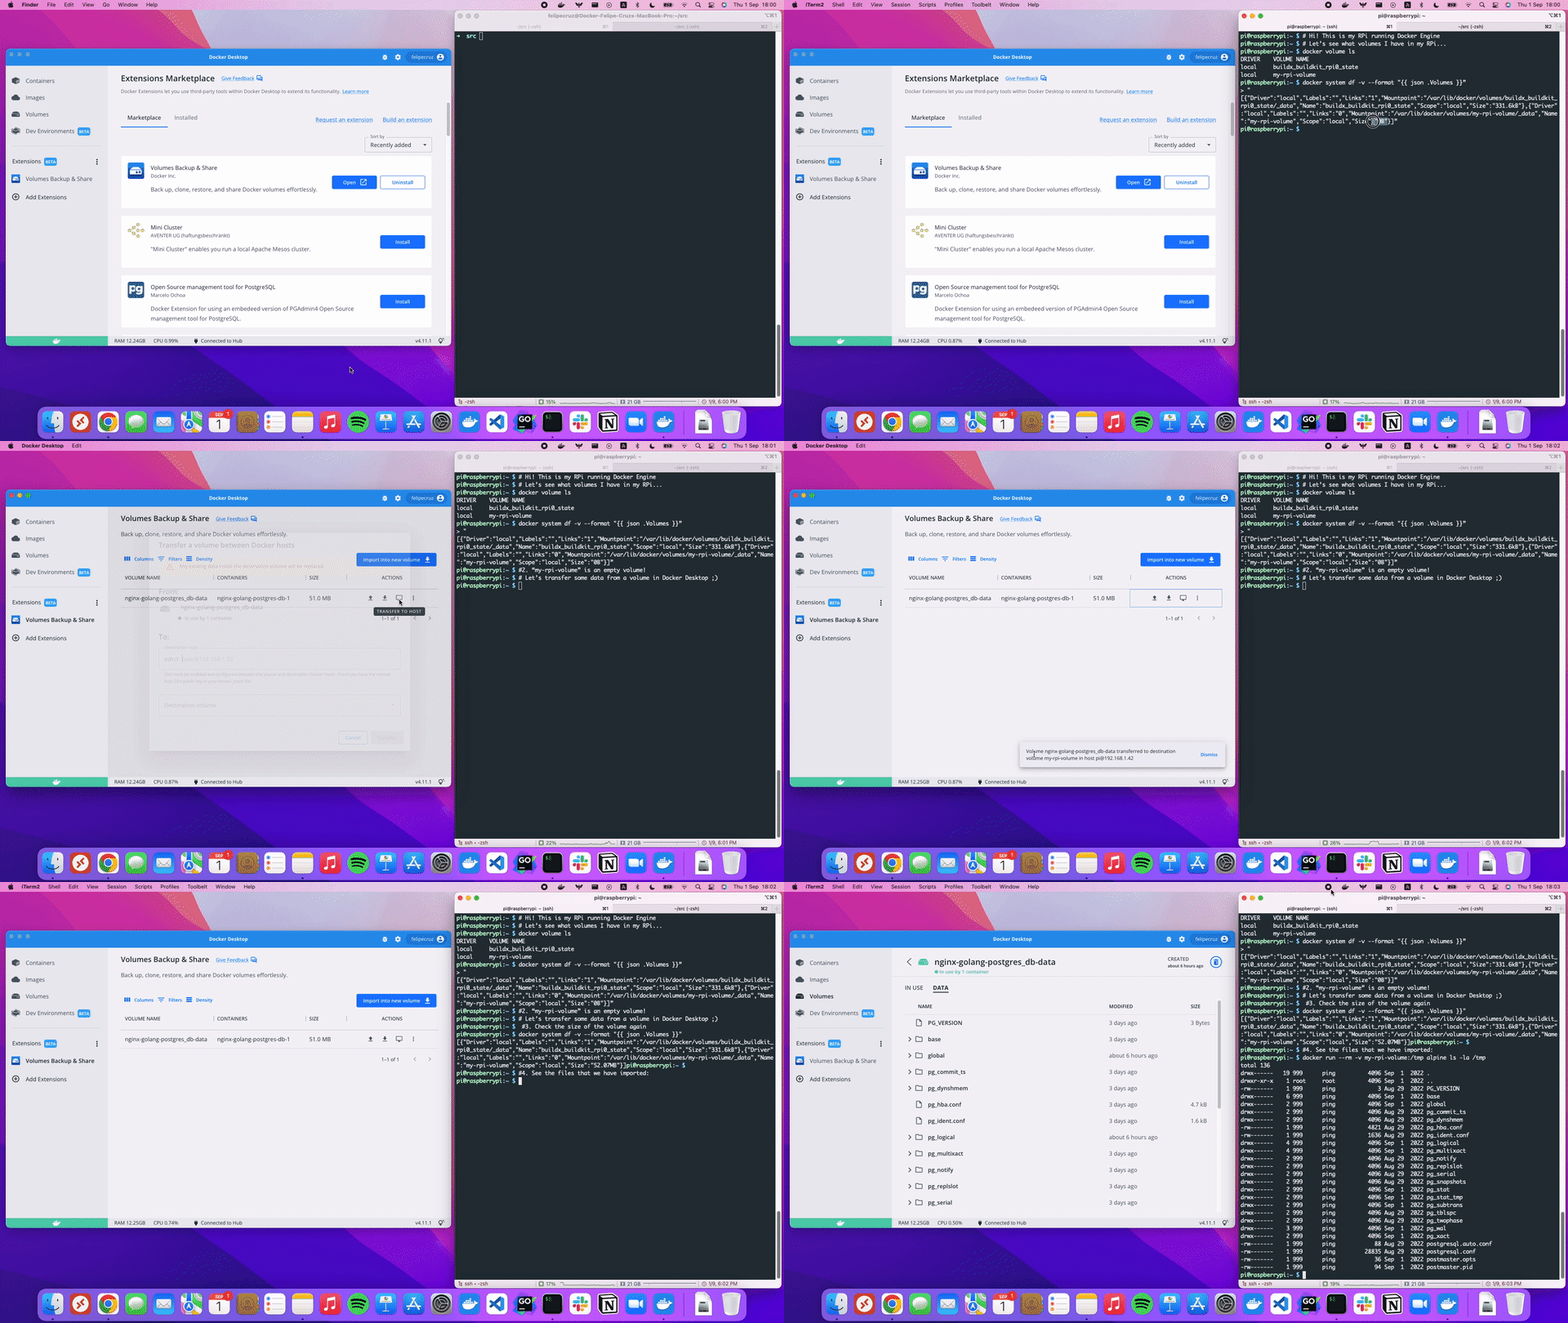
You might also want to copy the content of a volume to another host where Docker is running (either Docker Engine or Docker Desktop), like an Ubuntu server or a Raspberry Pi.
From the extension, you can specify both the destination host the local volume copied to (for example, user@192.168.1.50) and the destination volume.
> SSH must be enabled and configured between the source and destination Docker hosts. Check to make sure you have the remote host SSH public key in your known_hosts file.
Below is an example of transferring a local volume from Docker Desktop to a Raspberry Pi.

Perform other operations
The extension provides other volume operations such as view, clone, empty, or delete.
How does it work behind the scenes?
In a nutshell, when a back up or restore operation is about to be carried out, the extension will stop all the containers attached to the specified volume to avoid data corruption, and then it will restart them once the operation is completed.
These operations happen in the background, which means you can carry out more of them in parallel, or leave the extension screen and navigate to other parts of Docker Desktop to continue with your work while the operations are running.
For instance, if you have a Postgres container that uses a volume to persist the database data (i.e. -v my-volume:/var/lib/postgresql/data), the extension will stop the Postgres container attached to the volume, generate a .tar.gz file with all the files that are inside the volume, then start the containers and put the file on the local directory that you have specified.
Note that for open files like databases, it’s usually better to use their preferred backup tool to create a backup file, but if you stored that file on a Docker volume, this could still be a way you get the Docker volume into an image or tarball for moving to remote storage for safekeeping.
What’s next?
We invite you to try out the extension and give us feedback here.
And if you haven’t tried Docker Extensions, we encourage you to explore the Extensions Marketplace and install some of them! You can also start developing your own Docker Extensions on all platforms: Windows, WSL2, macOS (both Intel and Apple Silicon), and Linux.
To learn more about the Extensions SDK, have a look at the official documentation. You’ll find tutorials, design guidelines, and everything else you need to build an extension.
Once your extension’s ready, you can submit it to the Extensions Marketplace here.
