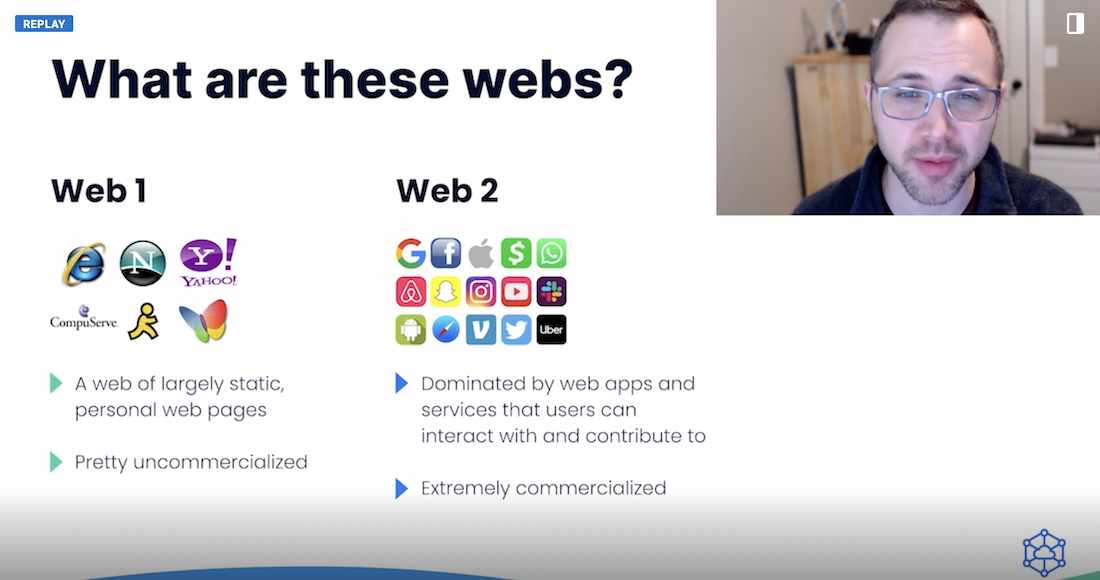
One thing has become increasingly clear: Web 3.0 (AKA “web3”) is coming soon, and some even expect it to fully emerge in 2022. Web 3.0 also promises to alter many of the internet’s core mechanisms. One key ingredient is decentralization. While many of today’s applications are centralized — where authorities serve and manage data through one primary server — Web 3.0 apps will leverage distributed systems.
JT Olio, Marton Elek, and Krista Spriggs analyzed these trends during their presentation, “Docker and Web 3.0 — Using Docker to Utilize Decentralized Infrastructure and Build Decentralized Apps.” Accordingly, they discussed how containerization and tooling have eased this transition.
We also have unique considerations for storage and usage of decentralized data. How do we tap into it? How does that approach work with decentralized nodes or federated systems? We’ll cover one excellent way to approach this, then outline another use case that’s even simpler. Let’s jump in.
Example #1: Using a Storage Bucket as a Directory
The process of deploying your decentralized application (dApp) differs slightly from traditional methods. Your users will access app data that’s distributed across multiple volunteer nodes — or even federated storage nodes. Since it’s distributed, this data doesn’t live on a central server with strictly-delegated access.
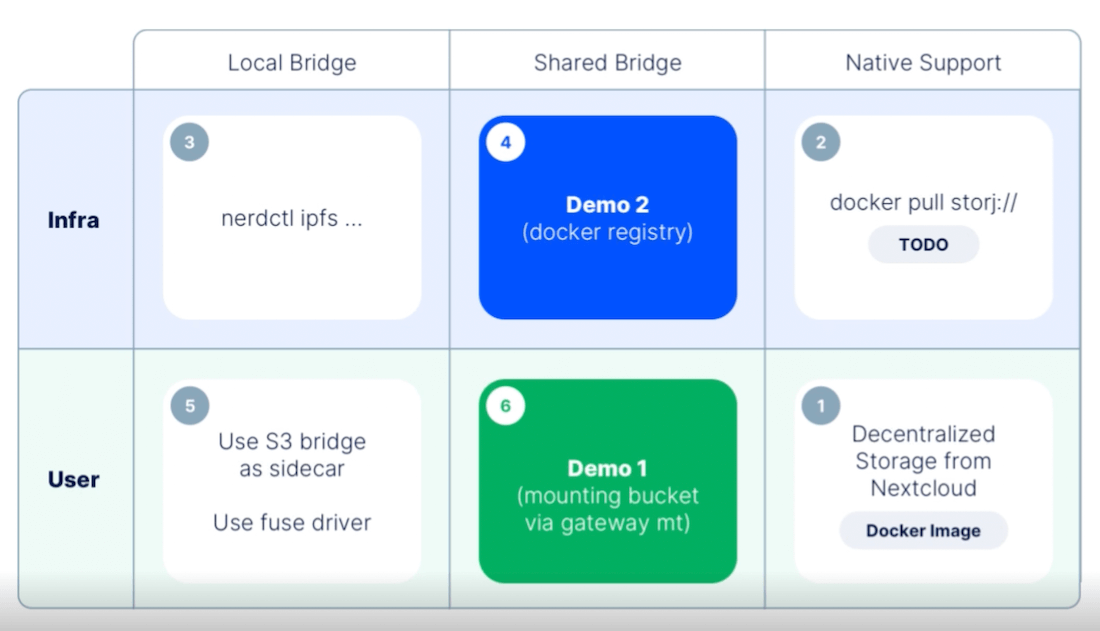
This requires something of a shared gateway bridge between your storage nodes and users themselves. As Marton shared, this shared bridge works well with local bridges and native support. You can even use this solution with Kubernetes, which Krista explained throughout Demo #1. We’ll tackle that example now, and explain how you can achieve similar results with other tooling.
Prerequisites
- An active Kubernetes v1.13+ deployment
- Your database (PostgreSQL, in this instance)
- Your Decentralized Cloud Storage (DCS) solution
- The Container Storage Interface (CSI) for S3 (by ctrox, via GitHub)
Kubernetes 1.13+ is needed for compatibility with the CSI. Using Postgres lets you both store and backup your data to other accessible locations, which can also benefit the user. Your DCS serves as the location for this backup. The best part is that this works for most any application you’re already familiar with.
Mount the DCS Bucket Within Your Kubernetes Container
To help decentralize your storage, you’ll use CSI for S3 to point to your own gateway as opposed to an S3 endpoint. CSI’s key advantage is that it lets you “dynamically allocate buckets and mount them via a fuse mount into any container.”
First, you’ll need a Kubernetes (K8s) StorageClass YAML file. Following Krista’s example, creating a simple configuration file requires you to denote some key fields. While specifying elements like apiVersion and metadata are important, let’s zero in on some key fields:
provisioner– tells K8s which volume plugin to use for provisioning persistent volumes. In this case, you’ll specify ch.ctrox.csi.s3-driver to target CSI for S3. While Kubernetes ships with numerous internal options, you’re able to denote this external provisioner for your project, as it follows the official K8s provisioning specification.mounter– tells K8s to mount a local, cloud, or virtual filesystem as a disk on your machine of choice. Krista advocates for rclone, so we’ll use that here. Rclone is a command-line program for managing cloud-based files, making it quite important while integrating with platforms like Amazon S3 and over 40 others. For example, you might prefer something like Google Cloud, Digital Ocean Spaces, or Microsoft Azure Blob Storage. We’ll stick with S3 in this instance, however.bucket– tells K8s where core objects are stored. Give your bucket a unique name, which can be anything you’d like.
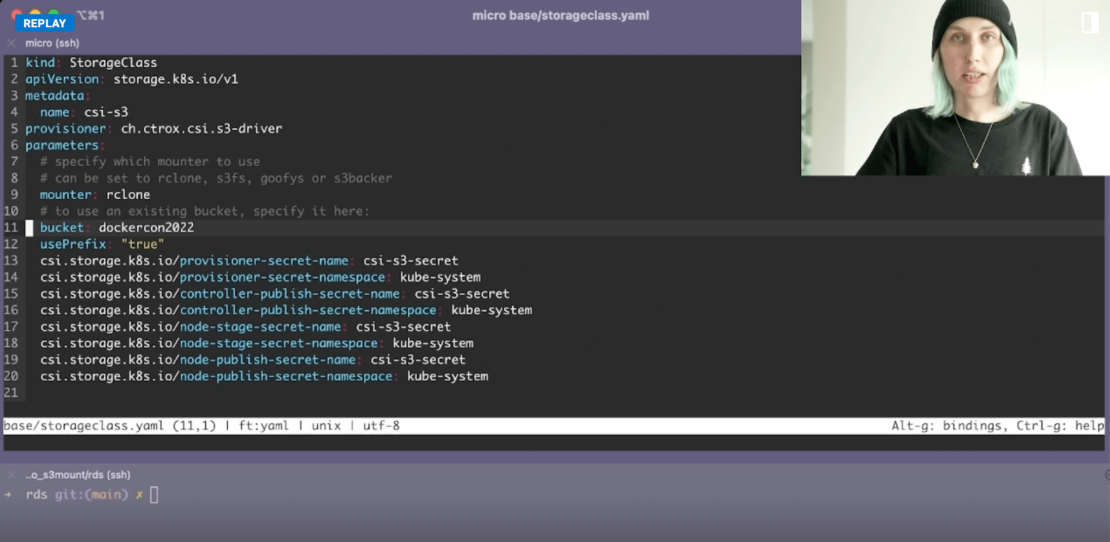
You might’ve also noticed that you’ll have to pull in some secrets. This requires you to create a secrets.yml file (or named something similar) that contains your .envs. Kubernetes’ documentation specifies the following definition formatting:
apiVersion: v1
kind: secret
metadata:
  name: mysecret
type: Opaque
stringData:
  config.yaml:
    apiUrl: "https://my.api.com/api/v1"
    username: <user>
    password: <password>
You can create all specified secrets using the kubectl apply -f ./secret.yaml command. Additionally, you can verify that you’ve created your secret successfully via the kubectl get secret mysecret -o yaml command. This outputs useful details related to creation time, type, namespace, and resource version. Note that mysecret will change to match the metadata name within your config file.
Set Up Your Database Processes
Next, you’ll be using a Postgres database in this exercise. Accordingly, performing a pg_dump transfers all database objects into a backup file. This next critical step helps your application access this data despite it being decentralized. Use the cp (copy) command shown below, in conjunction with your preferred directory, to specify your targeted DCS mount. However, for another project you might opt to use MariaDB, MySQL, or any other leading database technology that you’re comfortable with.
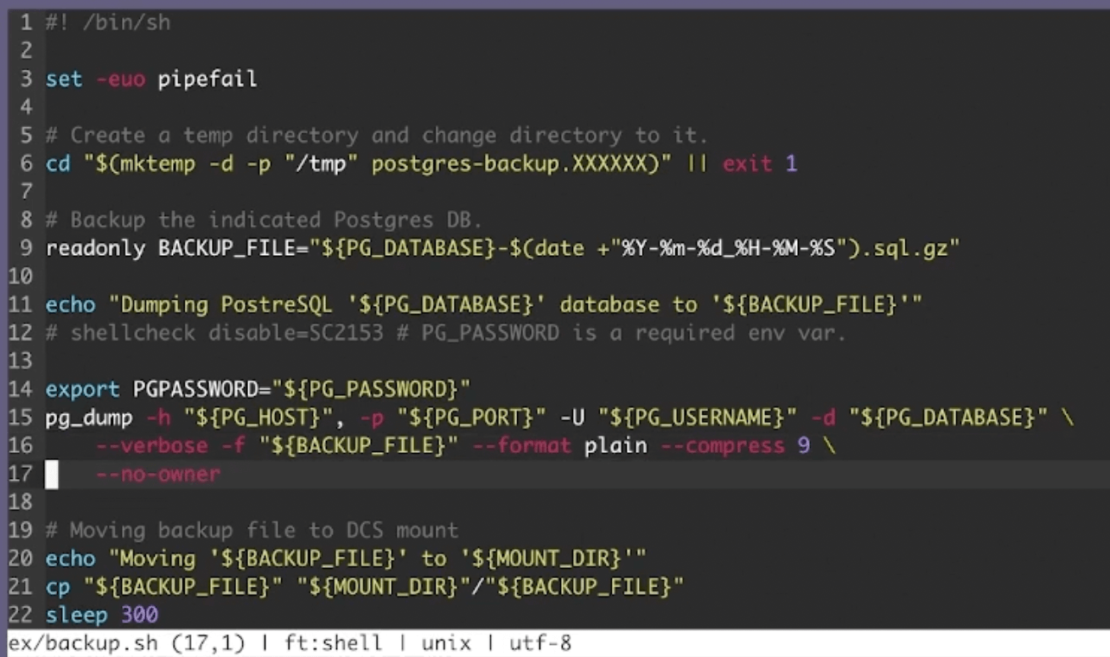
Your application can access the data contained within the DCS volume.
Defining the CronJob
Additionally, your Postgres backup lives as an active container, and therefore runs consistently to ensure data recency. That’s where the CronJob comes in. Here’s how your associated YAML file might partially look:
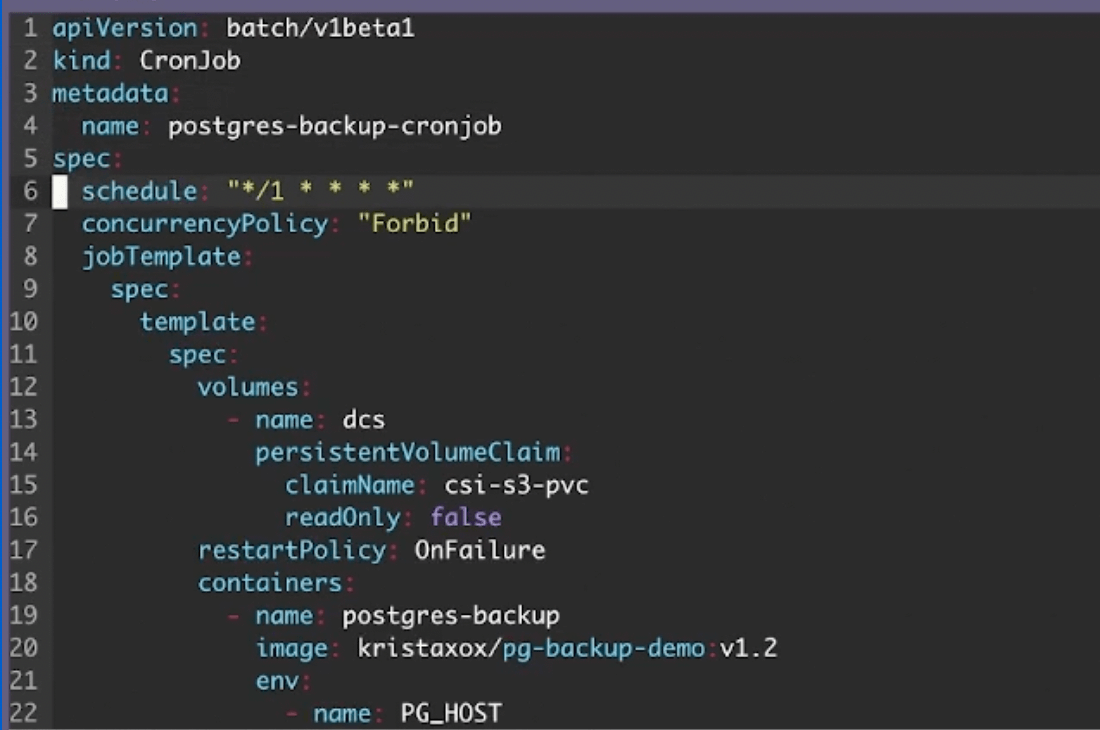
Because a CronJob is a scheduled task, it’s important to specify a frequency at which it runs. You’ll determine this frequency within the schedule field. While Krista has set her job to run at an “aggressive” once-per-minute clip, you may opt for something more conservative. Your policies, your users’ needs, and the relative importance of pushing “fresh” data will help determine this frequency.
Finally, pay special attention to your env fields. You’ll use these to specify DNS entry points for your container, and choose a mount point related to your CSI’s persistent volume claim:
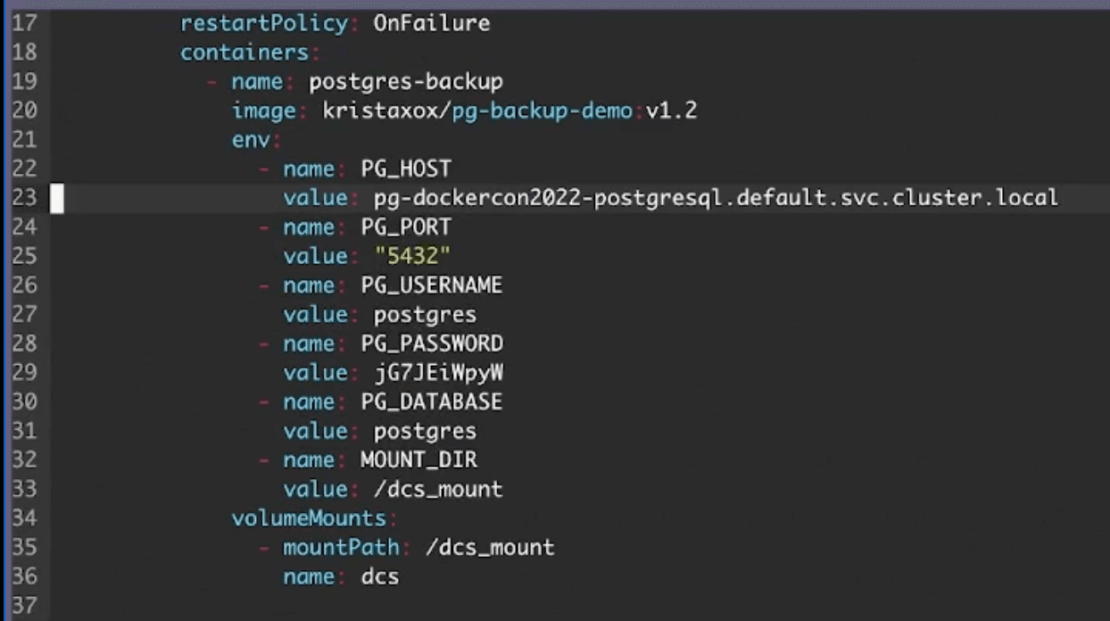
Assign your PG_HOST the appropriate value which points to that DNS entry. You’ll likely have to use an expanded data query like Krista did, as this lets you effectively contact your active Postgres service.
Spin Everything Up
With all dependencies in place, it’s time to run your application and verify that storage is properly connected. To kick off this process, enter the kubectl apply -f base command. This creates your base K8s resources.
Next, apply your sample application — consisting of your StorageClass.yaml file, Postgres backup shell script, and CronJob. Enter the kubectl apply -f ex command to do so.
Your interface will display an output confirming that your CronJob and CSI persistent volume claim (pvc) are created.
Lastly, there are a few more steps you can take:
-
- Tail your Kubernetes events using the
kubectl get events --sort-by=’.metadata.creationTimestamp’ --watchcommand. This confirms that your PVC volume is successfully provisioned, and that the backup job is starting. - Confirm that your containers are running and creating using the
kubectl get podscommand. - Run
kubectl get podsagain to confirm that both containers are running as intended.
- Tail your Kubernetes events using the
As a final layer of confirmation, you can even inspect your logs to ensure that everything is running appropriately. Additionally, the uplink ls --access [accessgrant] command to check on your latest database backups. You’ve successfully connected your application to decentralized storage!
[box type=”shadow”]Quick Tip: If you’d like to shorten your commands, then using an alias is helpful. Instead of typing kubectl each time, you can subsequently type k after entering alias k=kubectl into your CLI.[/box]
This is great — but what if you have another application reliant on native integration? Let’s hop into our second example.
Example #2: Using the Docker Registry
The Docker Registry is a scalable, stateless, server-side application that lets you store and distribute Docker images. It’s useful when you want to share images however you’d like, or tightly control image storage.
Thankfully, setting up the Registry for DCS is pretty straightforward. Within your registry configuration YAML file, specify a storage section with your DCS vendor, access grant, and bucket as shown below:
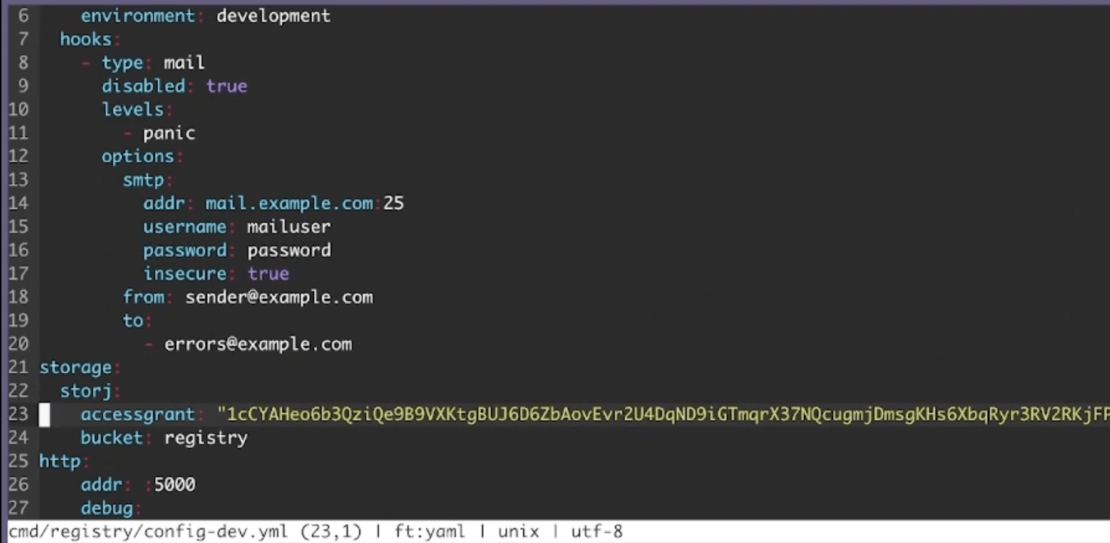
You’ll then want to launch the Registry using the registry serve cmd/registry/config-dev.yml command. Your output looks something like this:

Next, pull your image of choice. For this example, use the following command to pull the latest alpine image:
docker pull alpine:latest
Alpine images are preferable due to their small size and access to complete package repositories. However, you can use another image that fits your project better, as needed. You’ll then want to tag this image with a unique name. This’ll come in handy later. Push that image to the Registry with the docker push image.dcs.localhost:5000/alpine:[tag name] command. This process occurs layer-by-layer until completion.
Now, it’s time to confirm that everything is within the Registry using the Uplink tool. Enter uplink ls --access [accessgrant] sj://registry/docker/registry/v2/repositories/alpine to jumpstart this process — which summons a list of alpine repositories:

Adding / after alpine lists additional items like layers and manifests. Tacking on _manifests/tags parses your tags directory.
Congratulations! You’ve successfully established a decentralized storage solution for your Docker Registry.
Conclusion
Uptake for Web 3.0 is getting stronger. Just last year, over 34,000 developers contributed to open source, Web 3.0 projects. There are therefore numerous industries and use cases that can benefit from decentralized storage. This need will only grow as Web 3.0 becomes the standard. We can even tap into Docker to set up storage mechanisms more easily. Since containers and Web 3.0 decentralization overlap, we’ll see many more applications — both Docker and non Docker-based — adopt similar approaches.
Want to host your resources more simply with no maintenance? Docker Hub provides centralized, collaborative storage for your project’s and team’s images. You can push images to Docker Hub and pull them down. Docker Hub also interfaces directly with Docker Desktop to facilitate seamless management of your deployments. If you’re planning to leverage Docker for your next dApp, Docker Desktop’s GUI simplifies the process of managing your containers and applications.
