This is a guest post from Docker Captain Antonis Kalipetis, a Senior Software Engineer at efood.gr — the leading online food delivery service in Greece. He is a Python lover and developer and helps teams embrace containers and improve their development workflow. He loves automating stuff and sharing knowledge around all things containers, DevOps and developer workflows. You can follow him on Twitter @akalipetis.
WSL 2 (or Windows Subsystem for Linux version 2) is Microsoft’s second take on shipping a Linux Kernel with Windows. The first version was awesome as it translated Linux system calls to the equivalent Windows NT call in real time. The second version includes a full fledged virtual machine.
It was only natural that Docker would embrace this change and ship a Docker Desktop for Windows version that runs on WSL 2 (WSL 1 had issues running the Docker daemon). This is still a Technical Preview, but after using it for a couple of days, I’ve completely switched my local development to take advantage of it and I’m pretty happy with it.
In this blog, I’ll show you an example of how to develop Docker-powered applications using the Docker Desktop WSL 2 Tech Preview.
Why use Docker Desktop WSL 2 Tech Preview over the “stable” Docker Desktop for Windows?
The main advantage of using the technical preview is that you don’t have to manage your Docker VM anymore. More specifically:
- The VM grows and shrinks with your needs in terms of RAM/CPU, so you don’t have to decide its size and preallocate resources. It can shrink to almost zero CPU/RAM if you don’t use it. It works so well that most of the time you forget there’s a VM involved.
- Filesystem performance is great, with support for
inotifyand the VM’s disk size can match the size of your machine’s disk.
Apart from the above, if you love Visual Studio Code like I do, you can use the VS Code Remote WSL plugin to develop Docker-powered applications locally (more on that in a bit). You also get the always awesome Docker developer experience while using the VM.
How does Docker Desktop for WSL 2 Tech Preview work?
When you install it, it automatically installs Docker in a managed directory in your default WSL 2 distribution. This installation includes the Docker daemon, the Docker CLI and the Docker Compose CLI. It is kept up to date with Docker Desktop and you can either access it from within WSL, or from PowerShell by switching contexts — see, Docker developer experience in action!
Developing applications with Docker Desktop for WSL 2 Tech Preview
For this example, we’ll develop a simple Python Flask application, with Redis as its data store. Every time you visit the page, the page counter will increase — say hello to Millennium!
Setting up VS Code Remote – WSL
Visual Studio Code recently announced a new set of tools for developing applications remotely — using SSH, Docker or WSL. This splits Visual Studio Code into a “client-server” architecture, with the client (that is the UI) running on your Windows machine and the server (that is your code, Git, plugins, etc) running remotely. In this example, we’re going to use the WSL version.
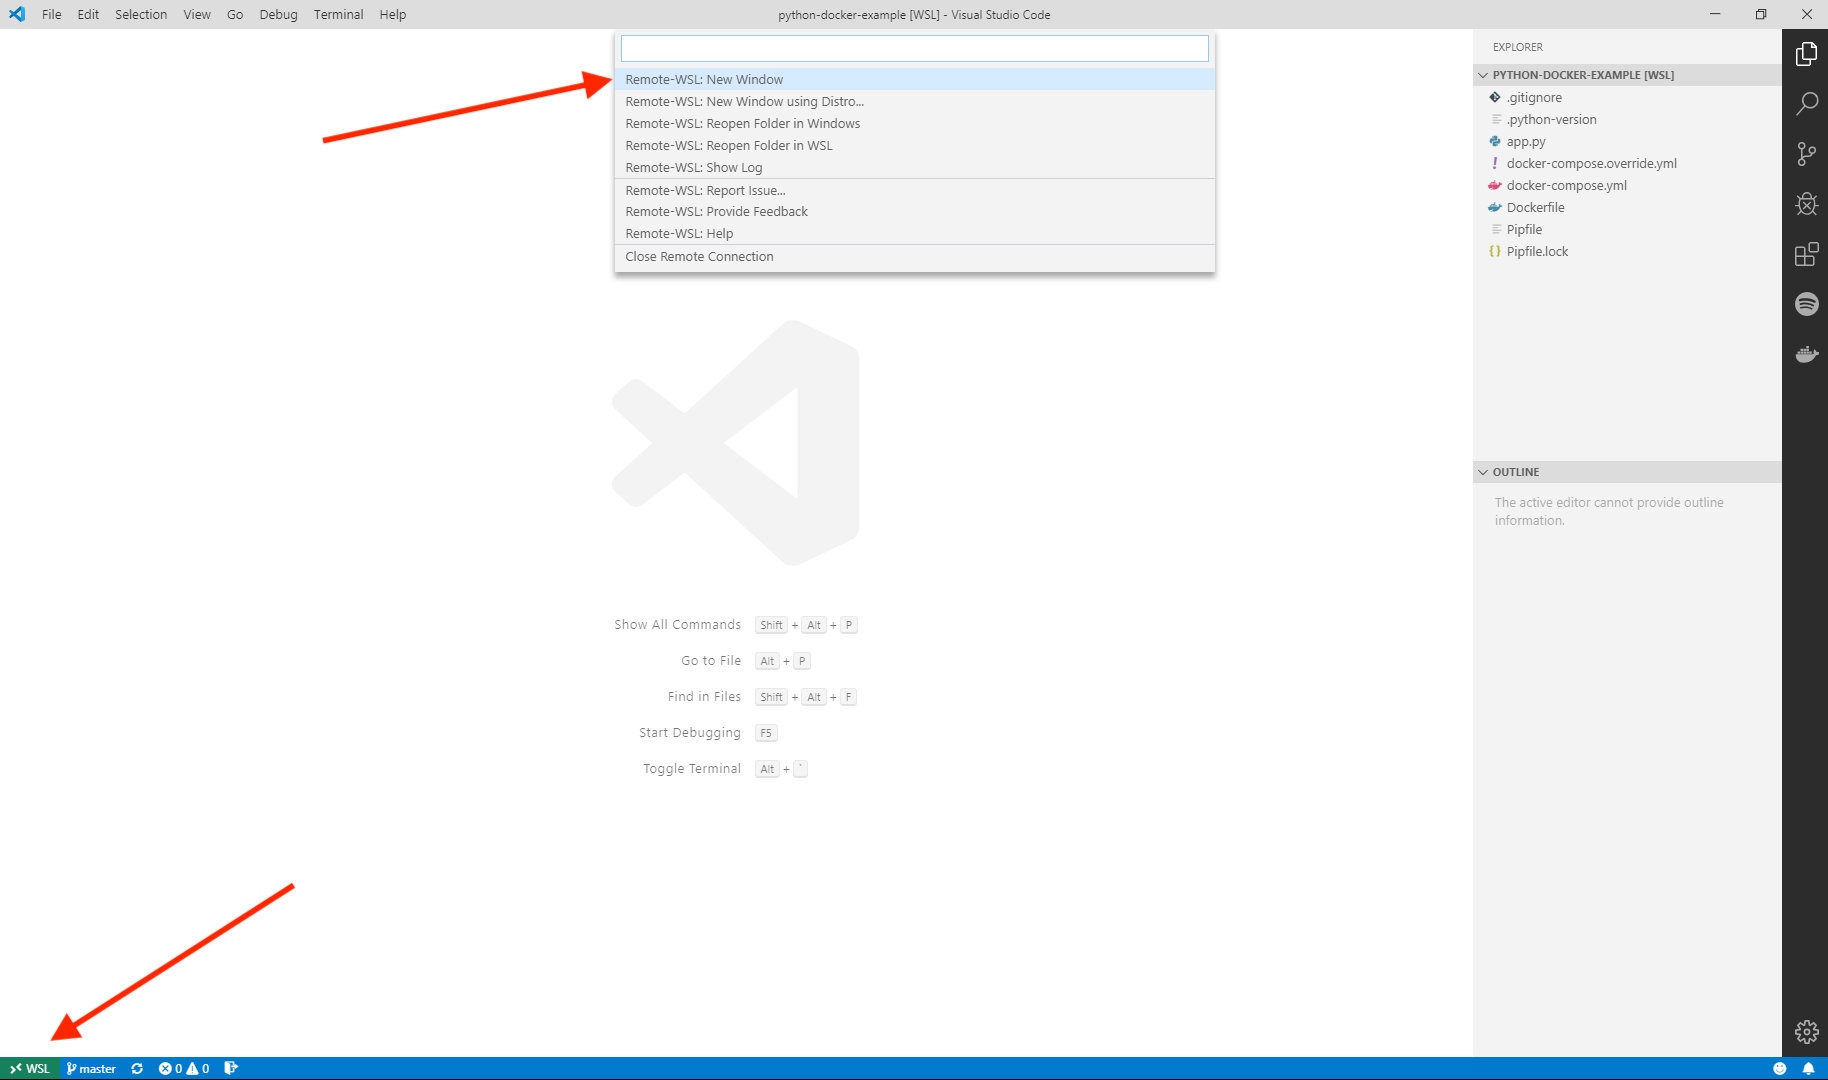
To start, open VS Code and select “Remote-WSL: New Window”. This will install the VS Code Remote server in your default WSL distribution (the one running Docker) and open a new VS Code workspace in your HOME directory.

Getting and Exploring the Code
Clone this Github repository by running git clone https://github.com/akalipetis/python-docker-example. Next, run code -r python-docker-example to open this directory in VS Code and let’s go a quick tour!

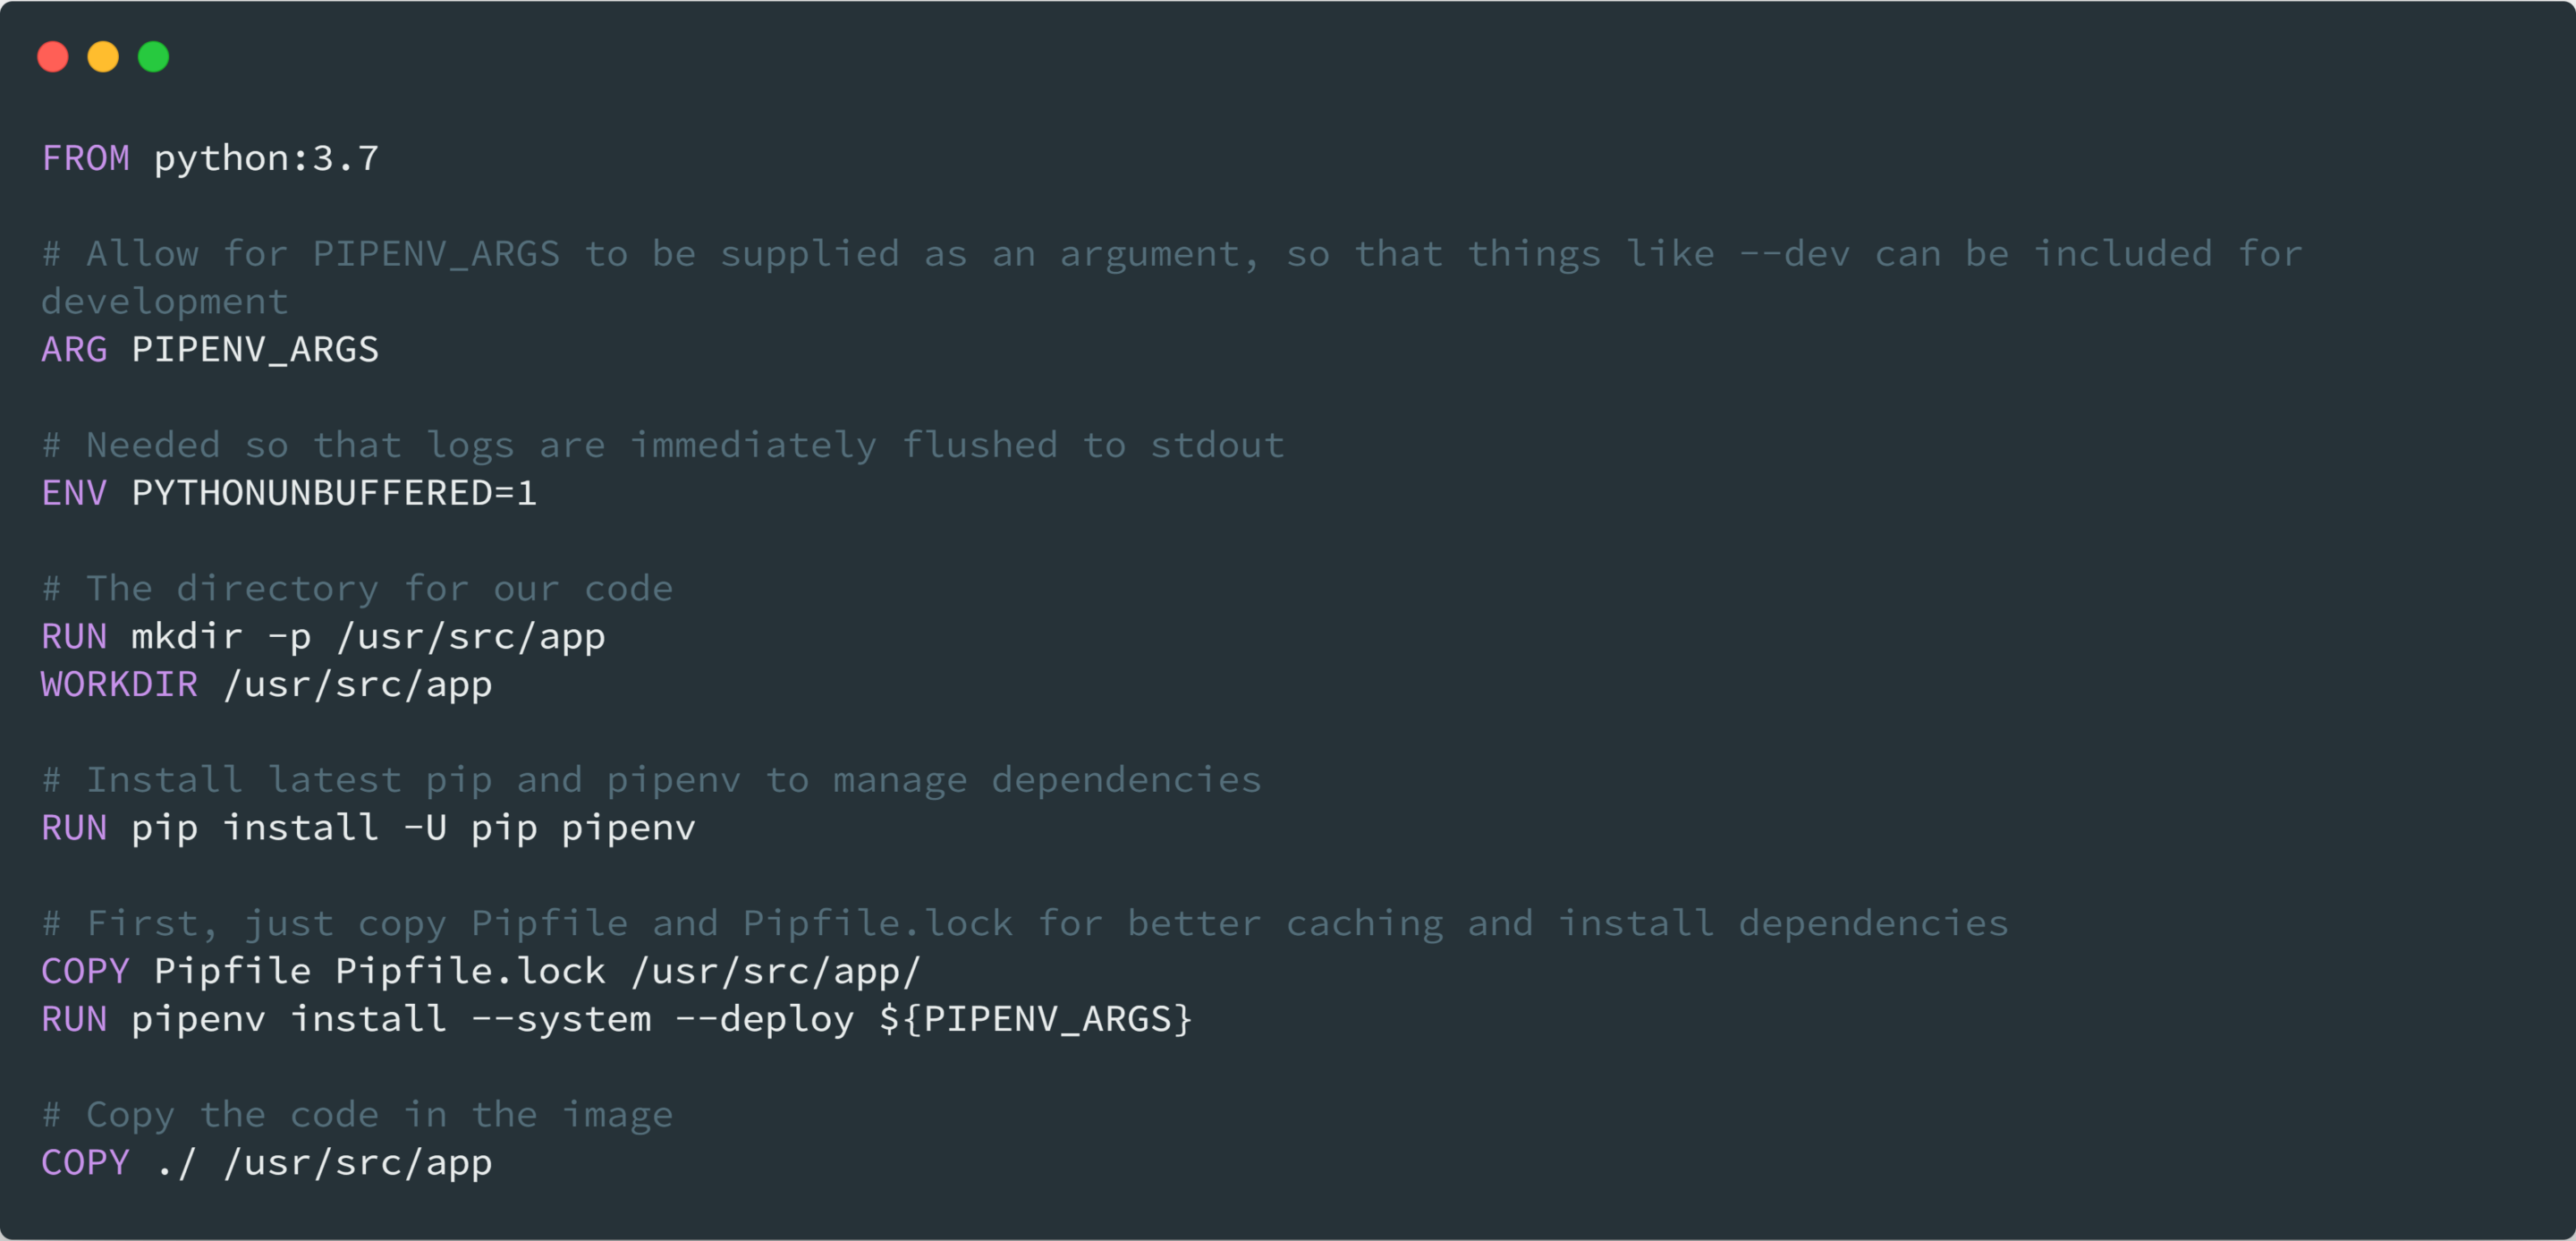
Dockerfile and docker-compose.yml
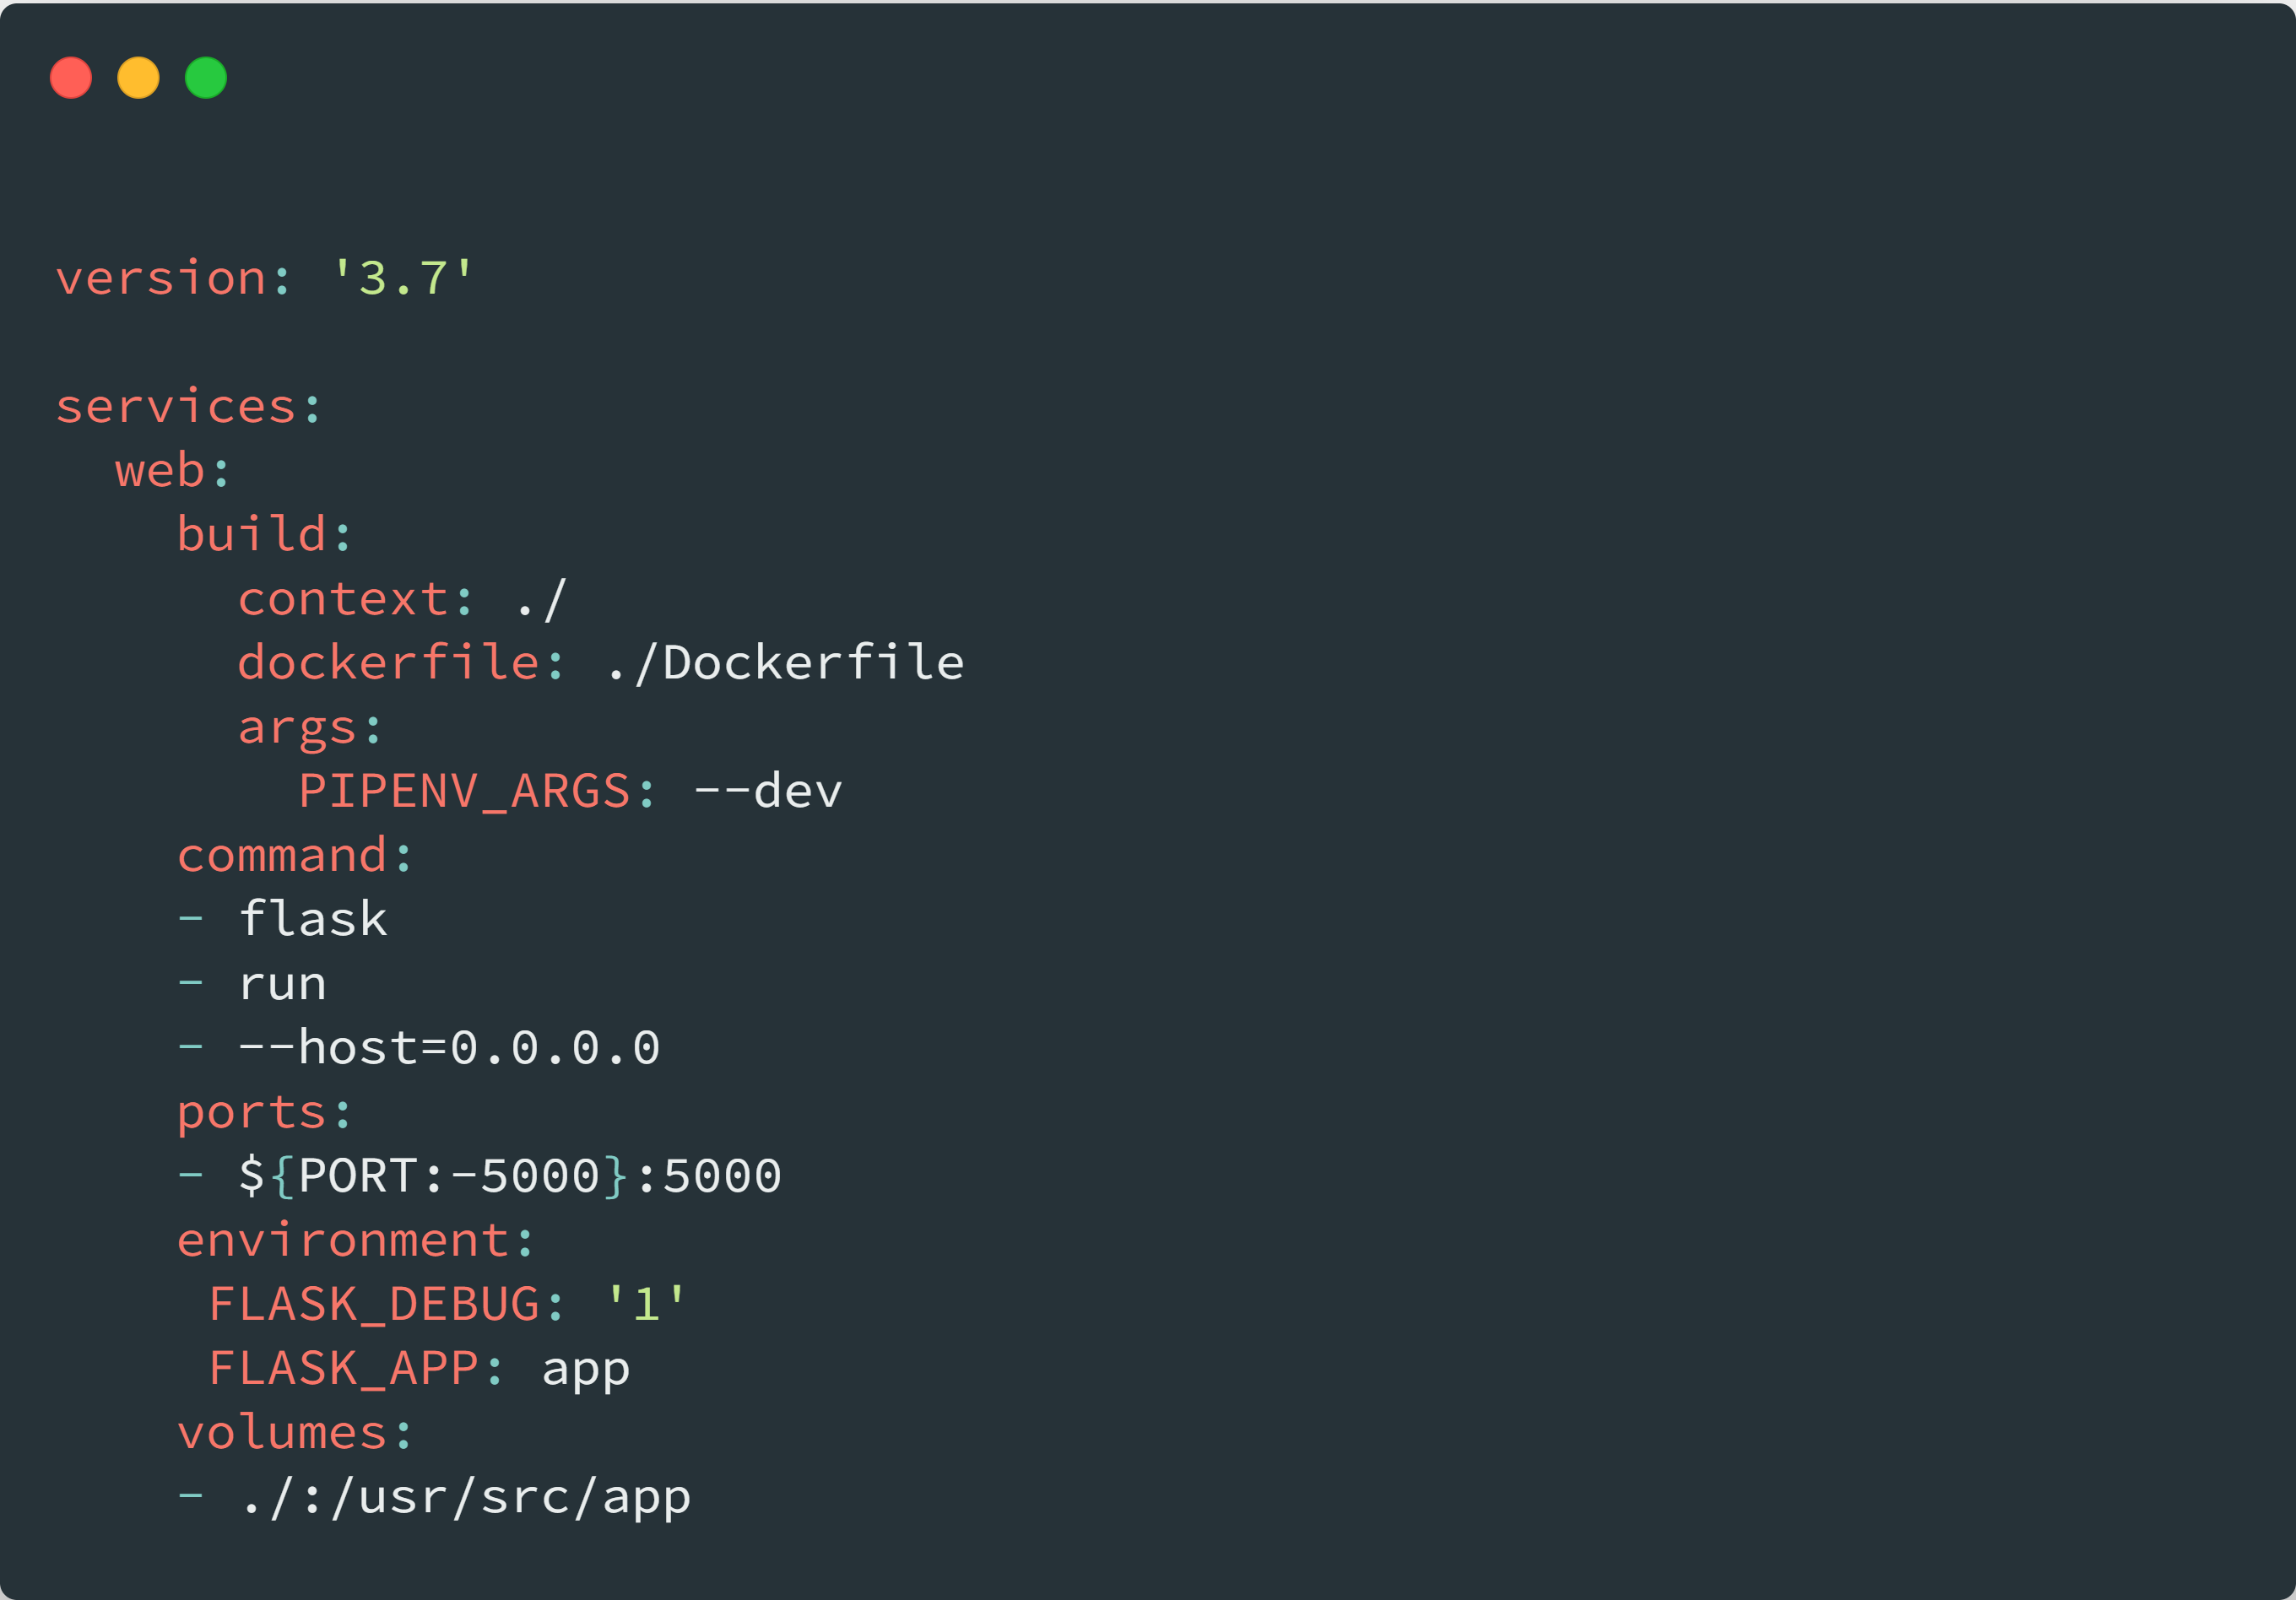
These should look familiar. The Dockerfile is used for building your application container, while docker-compose.yml is the one you could use for deploying it. docker-compose.override.yml contains all the things that are needed for local development.

Pipfile and Pipfile.lock
These include the application dependencies. Pipenv is the tool used to manage them.
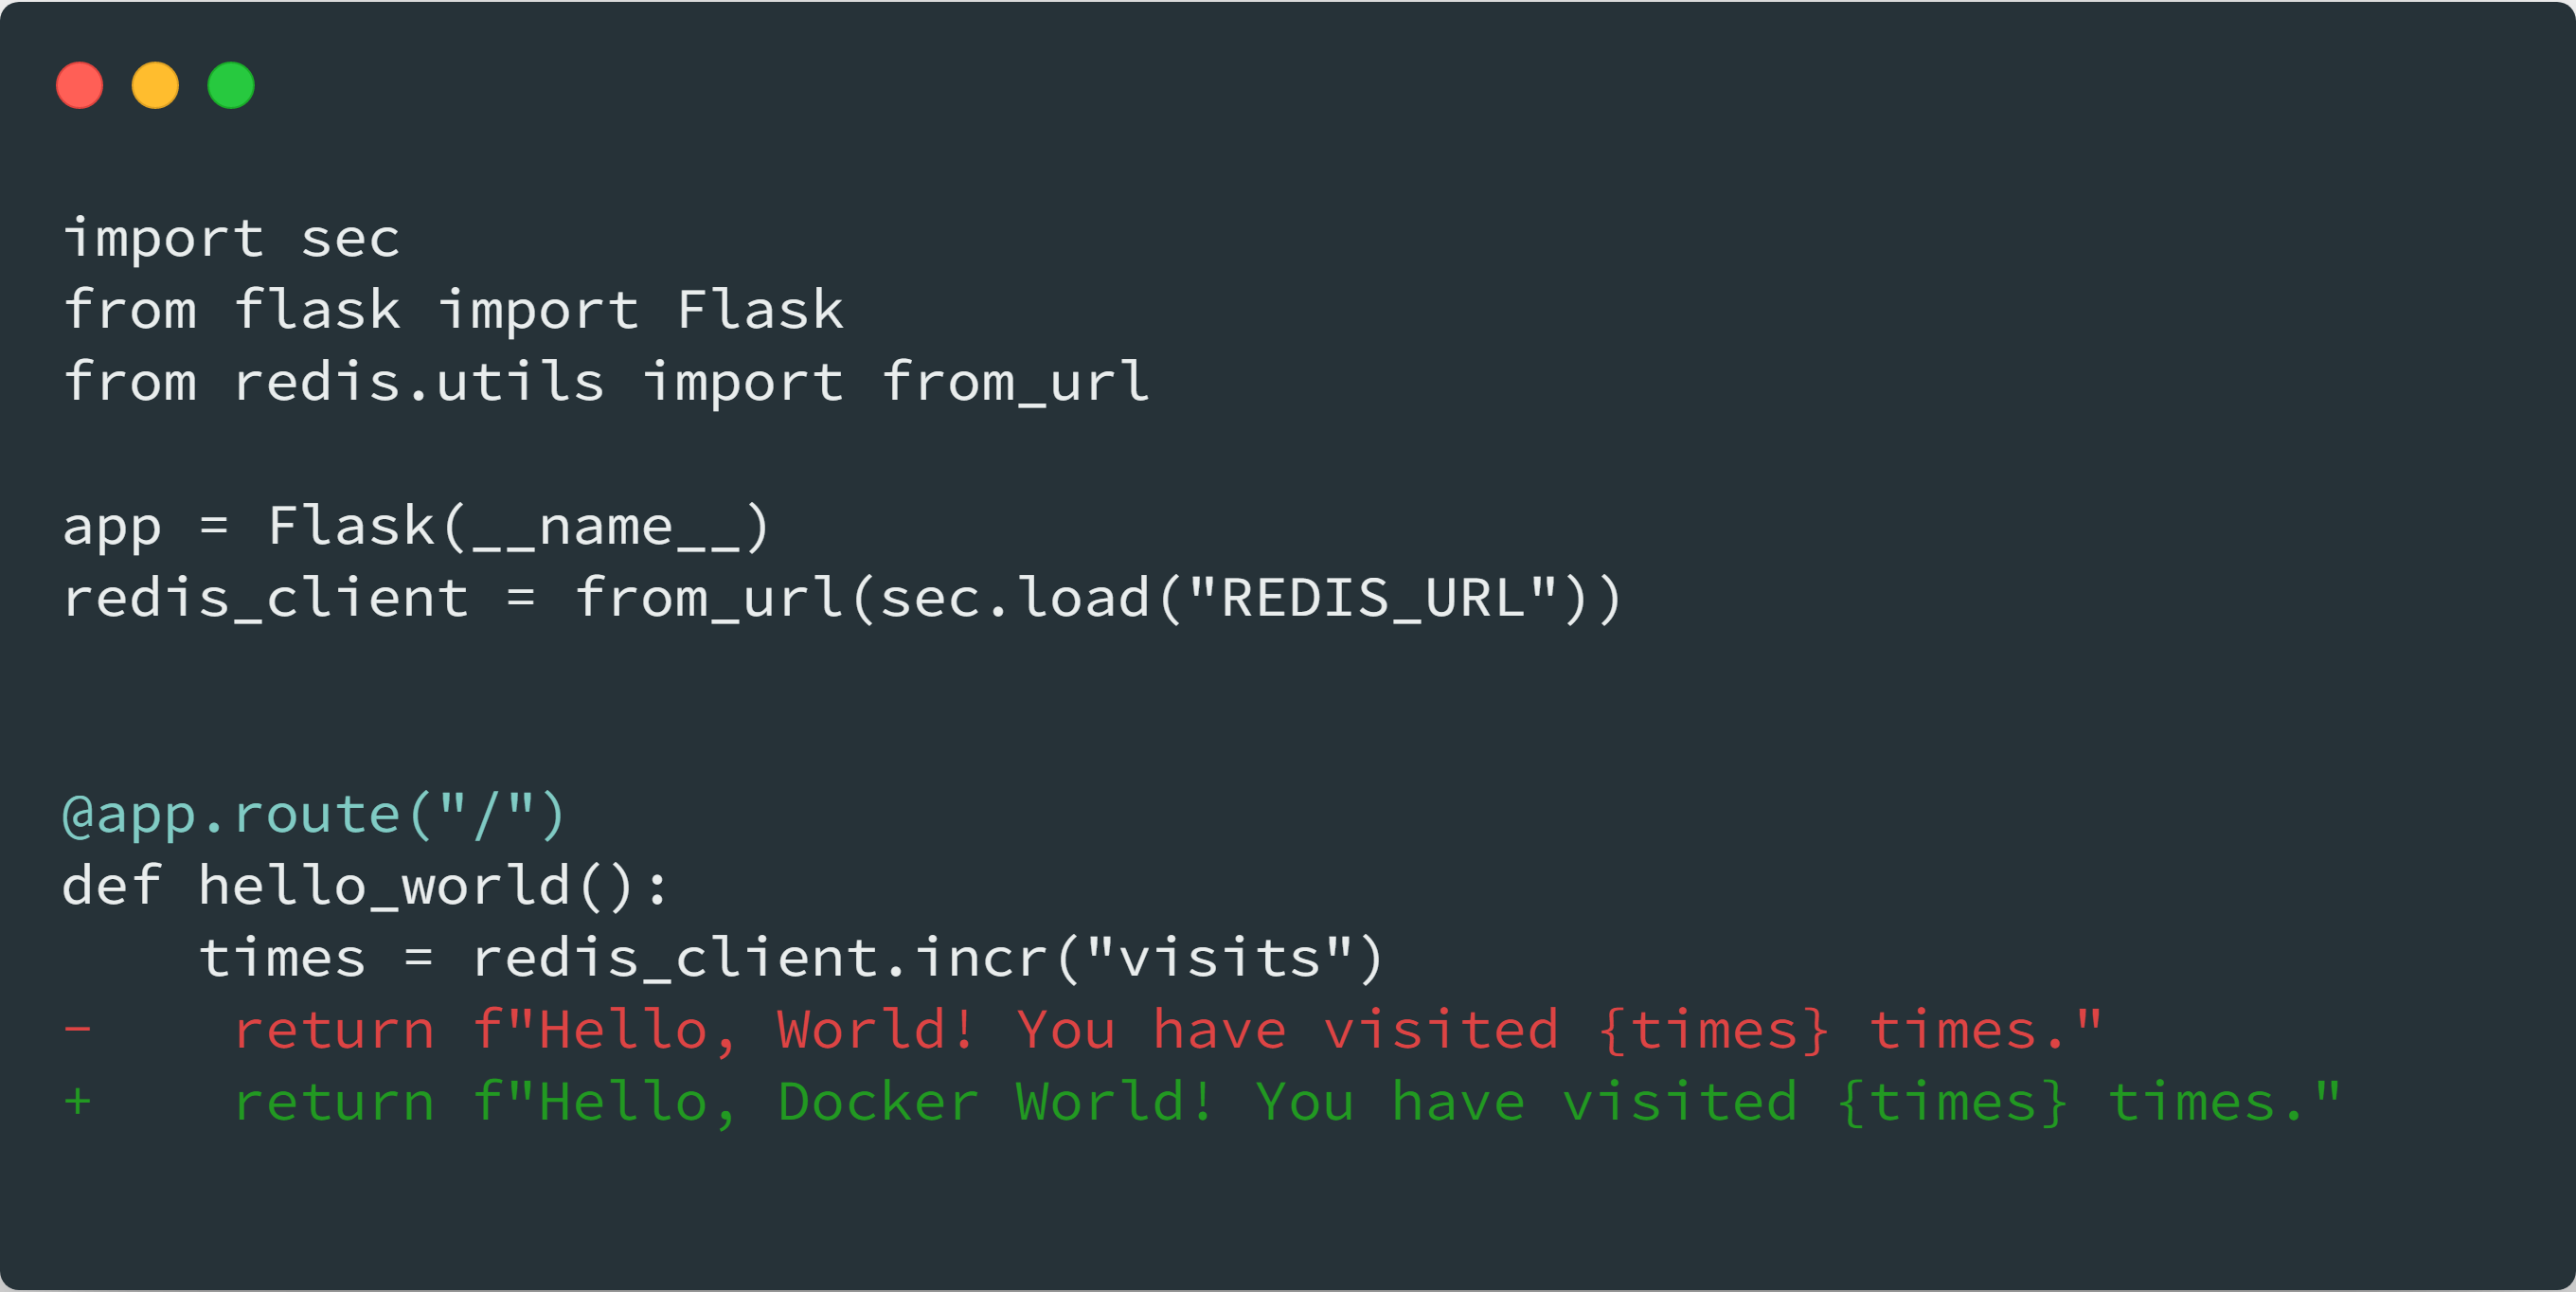
The app.py file contains the Flask application, which we’re just using in this example. Nothing special here!
Running the application and making changes
In order to run the application, open a WSL terminal (this is done using the integrated terminal feature of VS Code) and run docker-compose up. This will start all the containers (in this case, a Redis container and the one running the application). After doing so, visit http://localhost:5000 in your browser and voila — you’ve visited your new application. That’s not development though, so let’s change and see it in action. Open the app.py in VS Code and change the following line:

Refresh the web page and observe that:
- The message was immediately changed
- The visit counter continued counting from the latest value
Under the hood
Let’s see what actually happened.
- We changed a file in VS Code, which is running on Windows.
- Since VS Code is running on a client-server mode with the server running is WSL 2, the change was actually made to the file living inside WSL.
- Since you’re using the Technical Preview of Docker Desktop for WSL 2 and
docker-compose.override.ymlis using Linux workspaces to mount the code from WSL 2 directly into the running container, the change was propagated inside the container.- While this is possible with the “stable” Docker Desktop for Windows, it isn’t as easy. By using Linux workspaces, we don’t need to worry about file system permissions. It’s also super fast, as it’s a local Linux filesystem mount.
- Flask is using an auto-reloading server by default, which — using
inotify— is reloading the server on every file change and within milliseconds from saving your file, your server was reloaded. - Data is stored in Redis using a Docker volume, thus the visits counter was not affected by the restart of the server.
Other tips to help you with Docker Desktop for WSL 2
Here are a few additional tips on developing inside containers using the Technical Preview of Docker Desktop for WSL 2:
- For maximum file system performance, use Docker volumes for your application’s data and Linux Workspaces for your code.
- To avoid running an extra VM, switch to Windows containers for your “stable” Docker Desktop for Windows environment.
- Use
docker context default|wslto switch contexts and develop both Windows and Linux Docker-powered applications easily.
Final Thoughts
I’ve switched to Windows and WSL 2 development for the past two months and I can’t describe how happy I am with my development workflow. Using Docker Desktop for WSL 2 for the past couple of days seems really promising, and most of the current issues of using Docker in WSL 2 seem to be resolved. I can’t wait for what comes next!
The only thing currently missing in my opinion is integration with VS Code Remote Containers (instead of Remote WSL which was used for this blogpost) would allow you to run all your tooling within your Docker container.
Until VS Code Remote Containers support is ready, you can run pipenv install --dev to install the application dependencies on WSL 2, allowing VS Code to provide auto-complete and use all the nice tools included to help in development.
Get the Technical Preview and Learn More
If you’d like to get on board, read the instructions and install the technical preview from the Docker docs.
For more on WSL 2, check out these blog posts:
- 5 Things to Try with Docker Desktop WSL 2 Tech Preview
- Get Ready for the Tech Preview of Docker Desktop for WSL 2
[Tweet “Developing #Docker Powered Apps on Windows with #WSL2 by Docker Captain @akalipetis”]


