Golang is designed to let developers rapidly develop scalable and secure web applications. Go ships with an easy to use, secure, and performant web server alongside its own web templating library. Enterprise users also leverage the language for rapid, cross-platform deployment. With its goroutines, native compilation, and the URI-based package namespacing, Go code compiles to a single, small binary with zero dependencies — making it very fast.
Developers also favor Go’s performance, which stems from its concurrency model and CPU scalability. Whenever developers need to process an internal request, they use separate goroutines, which consume just one-tenth of the resources that Python threads do. Via static linking, Go actually combines all dependency libraries and modules into a single binary file based on OS and architecture.
Why is containerizing your Go application important?
Go binaries are small and self-contained executables. However, your application code inevitably grows over time as it’s adapted for additional programs and web applications. These apps may ship with templates, assets and database configuration files. There’s a higher risk of getting out-of-sync, encountering dependency hell, and pushing faulty deployments.
Containers let you synchronize these files with your binary. They also help you create a single deployable unit for your complete application. This includes the code (or binary), the runtime, and its system tools or libraries. Finally, they let you code and test locally while ensuring consistency between development and production.
We’ll walk through our Go application setup, and discuss the Docker SDK’s role during containerization.
Table of Contents
- Building the Application
- Key Components
- Getting Started
- Define a Task
- Create a Task Runner
- Container Manager
- Sequence Diagram
- Conclusion
Building the Application
In this tutorial, you’ll learn how to build a basic task system (Gopher) using Go.
First, we’ll create a system in Go that uses Docker to run its tasks. Next, we’ll build a Docker image for our application. This example will demonstrate how the Docker SDK helps you build cool projects. Let’s get started.
Key Components
Getting Started
Before getting started, you’ll need to install Go on your system. Once you’ve finished up, follow these steps to build a basic task management system with the Docker SDK.
Here’s the directory structure that we’ll have at the end:
➜ tree gopher
gopher
├── go.mod
├── go.sum
├── internal
│   ├── container-manager
│   │   └── container_manager.go
│   ├── task-runner
│   │   └── runner.go
│   └── types
│       └── task.go
├── main.go
└── task.yaml

4 directories, 7 files
You can click here to access the complete source code developed for this example. This guide leverages important snippets, but the full code isn’t documented throughout.
version: v0.0.1
tasks:
  - name: hello-gopher
    runner: busybox
    command: ["echo", "Hello, Gopher!"]
    cleanup: false
  - name: gopher-loops
    runner: busybox
    command:
      [
        "sh",
        "-c",
        "for i in `seq 0 5`; do echo 'gopher is working'; sleep 1; done",
      ]
    cleanup: false
Define a Task
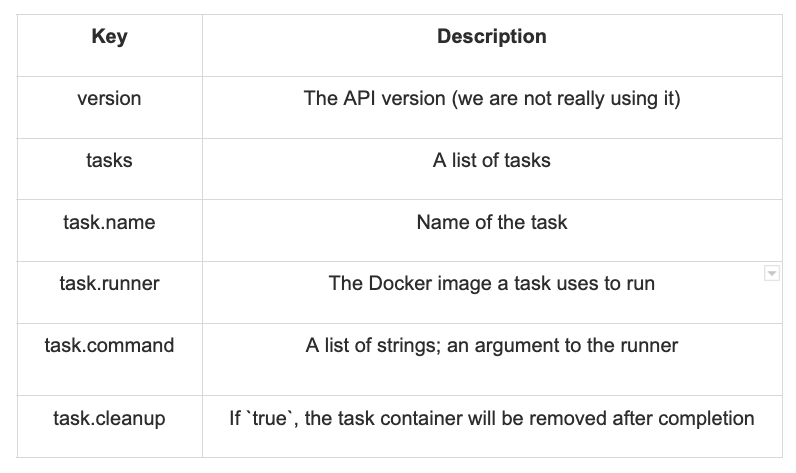
First and foremost, we need to define our task structure. This task is going to be a YAML definition with the following structure:
The following table describes the task definition:

Now that we have a task definition, let’s create some equivalent Go structs.
Structs in Go are typed collections of fields. They’re useful for grouping data together to form records. For example, this Task Task struct type has Name, Runner, Command, and Cleanup fields.
// internal/types/task.go

package types

// TaskDefinition represents a task definition document.
type TaskDefinition struct {
	Version string `yaml:"version,omitempty"`
	Tasks   []Task `yaml:"tasks,omitempty"`
}

// Task provides a task definition for gopher.
type Task struct {
	Name    string   `yaml:"name,omitempty"`
	Runner  string   `yaml:"runner,omitempty"`
	Command []string `yaml:"command,omitempty"`
	Cleanup bool     `yaml:"cleanup,omitempty"`
}
Create a Task Runner
The next thing we need is a component that can run our tasks for us. We’ll use interfaces for this, which are named collections of method signatures. For this example task runner, we’ll simply call it Runner and define it below:
// internal/task-runner/runner.go

type Runner interface {
	Run(ctx context.Context, doneCh chan<- bool)
}
Note that we’re using a done channel (doneCh). This is required for us to run our task asynchronously — and it also notifies us once this task is complete.
You can find your task runner’s complete definition here. In this example, however, we’ll stick to highlighting specific pieces of code:
// internal/task-runner/runner.go

func NewRunner(def types.TaskDefinition) (Runner, error) {
	client, err := initDockerClient()
	if err != nil {
		return nil, err
	}

	return &runner{
		def:              def,
		containerManager: cm.NewContainerManager(client),
	}, nil
}

func initDockerClient() (cm.DockerClient, error) {
	cli, err := client.NewClientWithOpts(client.FromEnv)
	if err != nil {
		return nil, err
	}

	return cli, nil
}
The NewRunner returns an instance of the struct, which provides the implementation of the Runner interface. The instance will also hold a connection to the Docker Engine. The initDockerClient function initializes this connection by creating a Docker API client instance from environment variables.
By default, this function creates an HTTP connection over a Unix socket unix://var/run/docker.sock (the default Docker host). If you’d like to change the host, you can set the DOCKER_HOST environment variable. The FromEnv will read the environment variable and make changes accordingly.
The Run function defined below is relatively basic. It loops over a list of tasks and executes them. It also uses a channel named taskDoneCh to see when a task completes. It’s important to check if we’ve received a done signal from all the tasks before we return from this function.
// internal/task-runner/runner.go

func (r *runner) Run(ctx context.Context, doneCh chan<- bool) {
	taskDoneCh := make(chan bool)
	for _, task := range r.def.Tasks {
		go r.run(ctx, task, taskDoneCh)
	}

	taskCompleted := 0
	for {
		if <-taskDoneCh {
			taskCompleted++
		}

		if taskCompleted == len(r.def.Tasks) {
			doneCh <- true
			return
		}
	}
}

func (r *runner) run(ctx context.Context, task types.Task, taskDoneCh chan<- bool) {
	defer func() {
		taskDoneCh <- true
	}()

	fmt.Println("preparing task - ", task.Name)
	if err := r.containerManager.PullImage(ctx, task.Runner); err != nil {
		fmt.Println(err)
		return
	}

	id, err := r.containerManager.CreateContainer(ctx, task)
	if err != nil {
		fmt.Println(err)
		return
	}

	fmt.Println("starting task - ", task.Name)
	err = r.containerManager.StartContainer(ctx, id)
	if err != nil {
		fmt.Println(err)
		return
	}

	statusSuccess, err := r.containerManager.WaitForContainer(ctx, id)
	if err != nil {
		fmt.Println(err)
		return
	}

	if statusSuccess {
		fmt.Println("completed task - ", task.Name)

		// cleanup by removing the task container
		if task.Cleanup {
			fmt.Println("cleanup task - ", task.Name)
			err = r.containerManager.RemoveContainer(ctx, id)
			if err != nil {
				fmt.Println(err)
			}
		}
	} else {
		fmt.Println("failed task - ", task.Name)
	}
}
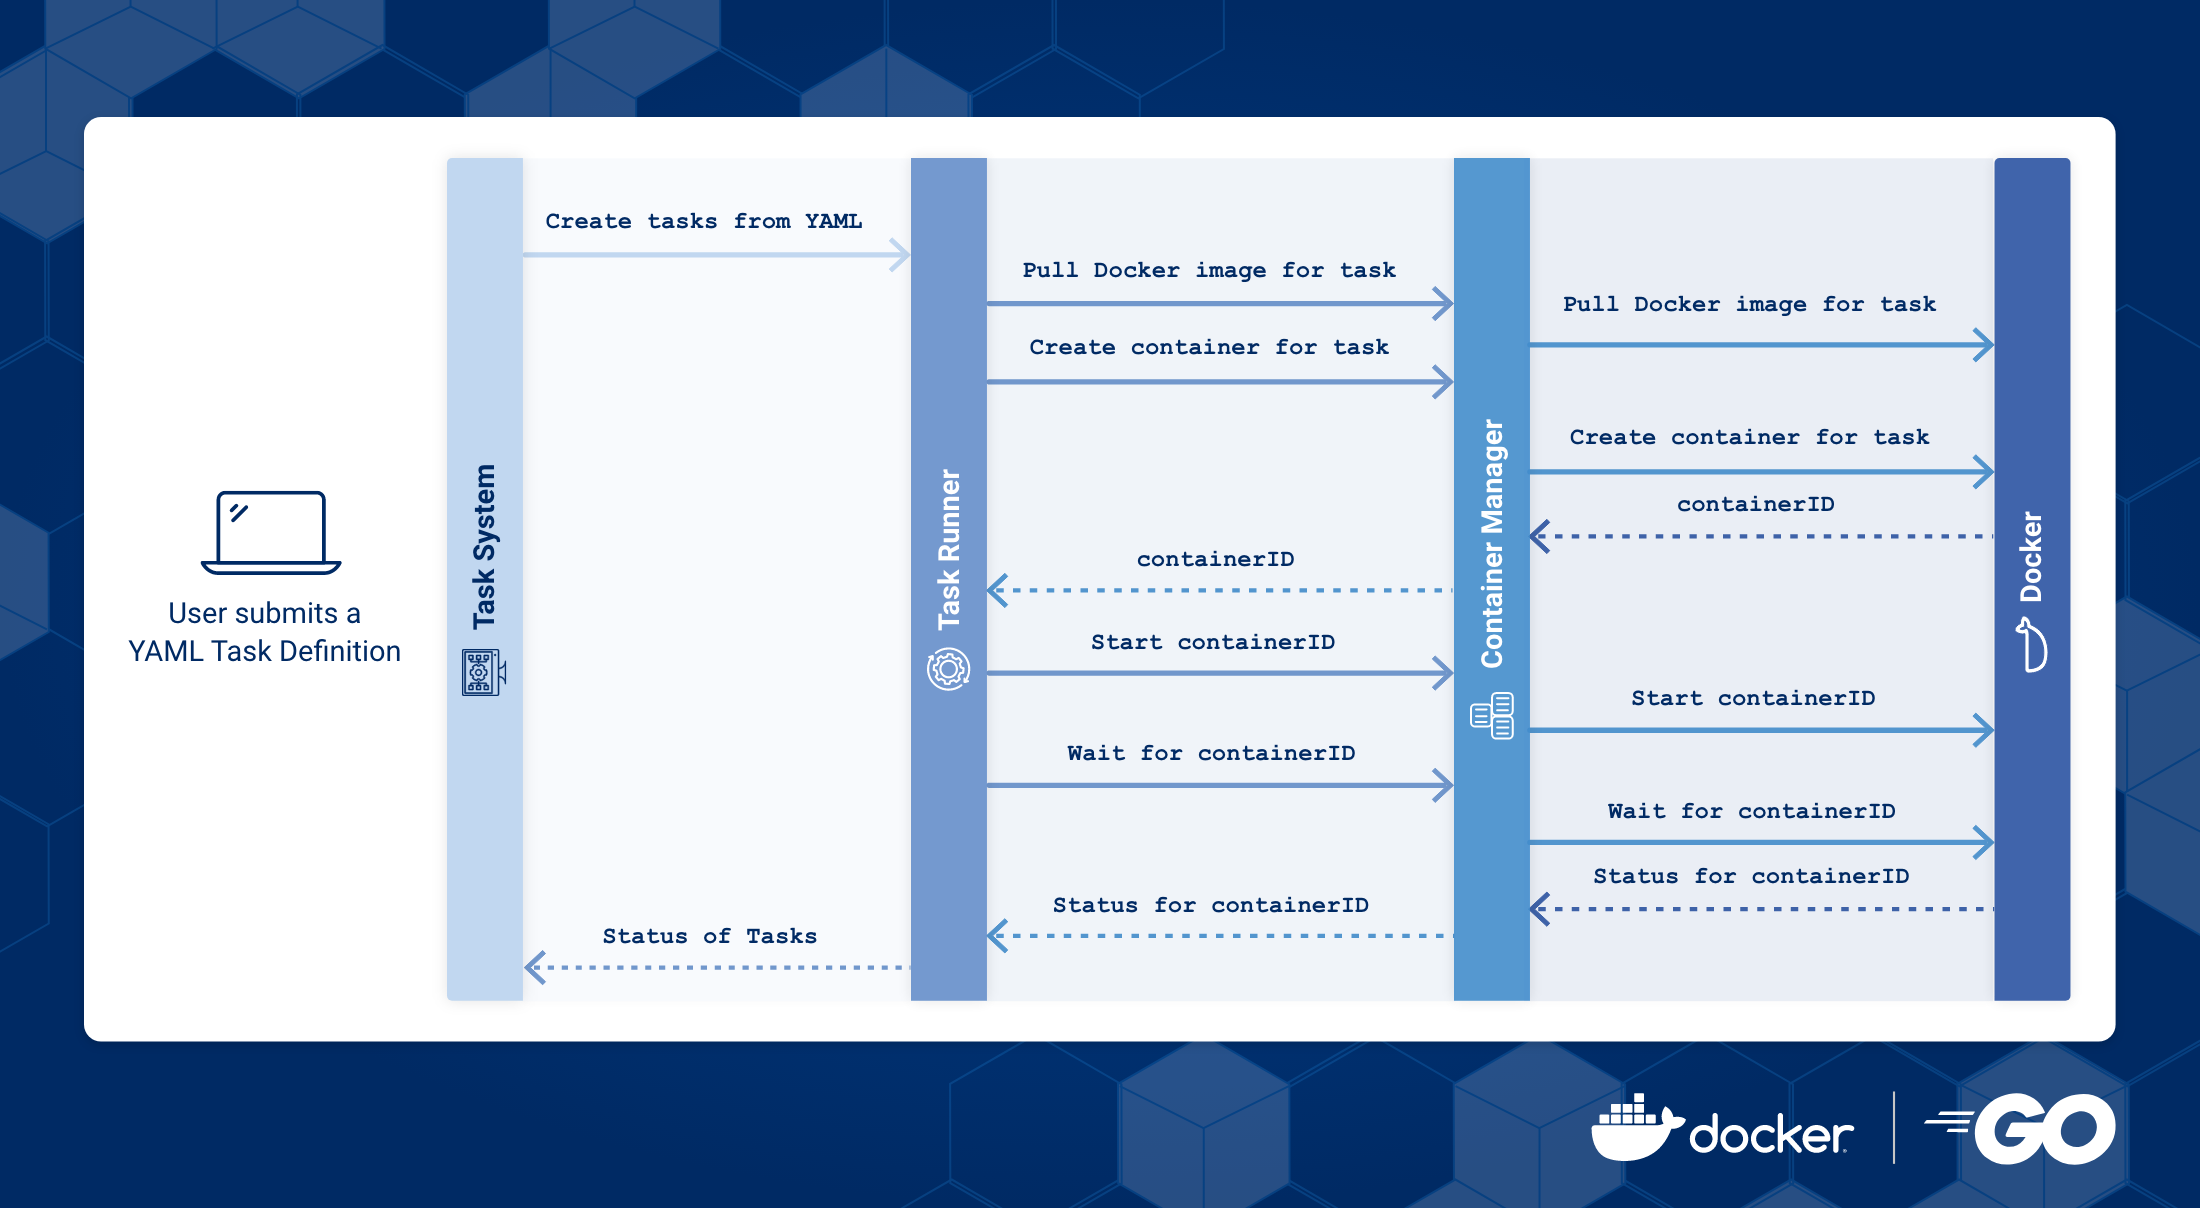
The internal run function does the heavy lifting for the runner. It accepts a task and transforms it into a Docker container. A ContainerManager executes a task in the form of a Docker container.
Container Manager
The container manager is responsible for:
-
Pulling a Docker image for a task
-
Creating the task container
-
Starting the task container
-
Waiting for the container to complete
-
Removing the container, if required
Therefore, with respect to Go, we can define our container manager as shown below:
// internal/container-manager/container_manager.go

type ContainerManager interface {
	PullImage(ctx context.Context, image string) error
	CreateContainer(ctx context.Context, task types.Task) (string, error)
	StartContainer(ctx context.Context, id string) error
	WaitForContainer(ctx context.Context, id string) (bool, error)
	RemoveContainer(ctx context.Context, id string) error
}

type DockerClient interface {
	client.ImageAPIClient
	client.ContainerAPIClient
}

type ImagePullStatus struct {
	Status         string `json:"status"`
	Error          string `json:"error"`
	Progress       string `json:"progress"`
	ProgressDetail struct {
		Current int `json:"current"`
		Total   int `json:"total"`
	} `json:"progressDetail"`
}

type containermanager struct {
	cli DockerClient
}
The containerManager interface has a field called cli with a DockerClient type. The interface in-turn embeds two interfaces from the Docker API, namely ImageAPIClient and ContainerAPIClient. Why do we need these interfaces?
For the ContainerManager interface to work properly, it must act as a client for the Docker Engine and API. For the client to work effectively with images and containers, it must be a type which provides required APIs. We need to embed the Docker API’s core interfaces and create a new one.
The initDockerClient function (seen above in runner.go) returns an instance that seamlessly implements those required interfaces. Check out the documentation here to better understand what’s returned upon creating a Docker client.
Meanwhile, you can view the container manager’s complete definition here.
Note: We haven’t individually covered all functions of container manager here, otherwise the blog would be too extensive.
Entrypoint
Since we’ve covered each individual component, let’s assemble everything in our main.go, which is our entrypoint. The package main tells the Go compiler that the package should compile as an executable program instead of a shared library. The main() function in the main package is the entry point of the program.
// main.go

package main

func main() {
	args := os.Args[1:]

	if len(args) < 2 || args[0] != argRun {
		fmt.Println(helpMessage)
		return
	}

	// read the task definition file
	def, err := readTaskDefinition(args[1])
	if err != nil {
		fmt.Printf(errReadTaskDef, err)
	}

	// create a task runner for the task definition
	ctx := context.Background()
	runner, err := taskrunner.NewRunner(def)
	if err != nil {
		fmt.Printf(errNewRunner, err)
	}

	doneCh := make(chan bool)
	go runner.Run(ctx, doneCh)

	<-doneCh
}
Here’s what our Go program does:
-
Validates arguments
-
Reads the task definition
-
Initializes a task runner, which in turn initializes our container manager
-
Creates a done channel to receive the final signal from the runner
-
Runs our tasks
Building the Task System
1) Clone the repository
The source code is hosted over GitHub. Use the following command to clone the repository to your local machine.
git clone https://github.com/dockersamples/gopher-task-system.git
2) Build your task system
The go build command compiles the packages, along with their dependencies.
go build -o gopher
3) Run your tasks
You can directly execute gopher file to run the tasks as shown in the following way:
$ ./gopher run task.yaml

preparing task -  gopher-loops
preparing task -  hello-gopher
starting task -  gopher-loops
starting task -  hello-gopher
completed task -  hello-gopher
completed task -  gopher-loops
4) View all task containers
You can view the full list of containers within the Docker Desktop. The Dashboard clearly displays this information:

5) View all task containers via CLI
Alternatively, running docker ps -a also lets you view all task containers:
$ docker ps -a
CONTAINER ID   IMAGE     COMMAND                  CREATED         STATUS                     PORTS     NAMES
396e25d3cea8   busybox   "sh -c 'for i in `se…"   6 minutes ago   Exited (0) 6 minutes ago             gopher-loops
aba428b48a0c   busybox   "echo 'Hello, Gopher…"   6 minutes ago   Exited (0) 6 minutes ago
Note that in task.yaml the cleanup flag is set to false for both tasks. We’ve purposefully done this to retrieve a container list after task completion. Setting this to true automatically removes your task containers.
Sequence Diagram

Conclusion
Docker is a collection of software development tools for building, sharing, and running individual containers. With the Docker SDK’s help, you can build and scale Docker-based apps and solutions quickly and easily. You’ll also better understand how Docker works under the hood. We look forward to sharing more such examples and showcasing other projects you can tackle with Docker SDK, soon!
Want to start leveraging the Docker SDK, yourself? Check out our documentation for install instructions, a quick-start guide, and library information.


