At Docker, we are incredibly proud of our vibrant, diverse and creative community. From time to time, we feature cool contributions from the community on our blog to highlight some of the great work our community does. Are you working on something awesome with Docker? Send your contributions to Ajeet Singh Raina (@ajeetraina) on the Docker Community Slack and we might feature your work!
Choosing the right application framework and technology is critical to successfully building a robust, highly responsive web app. Enterprise developers regularly struggle to identify the best application build practices. According to the 2021 Java Developer Productivity Report, 62% of surveyed developers use Spring Boot as their main framework technology. The ever-increasing demand for microservices within the Java community is driving this significant adoption.
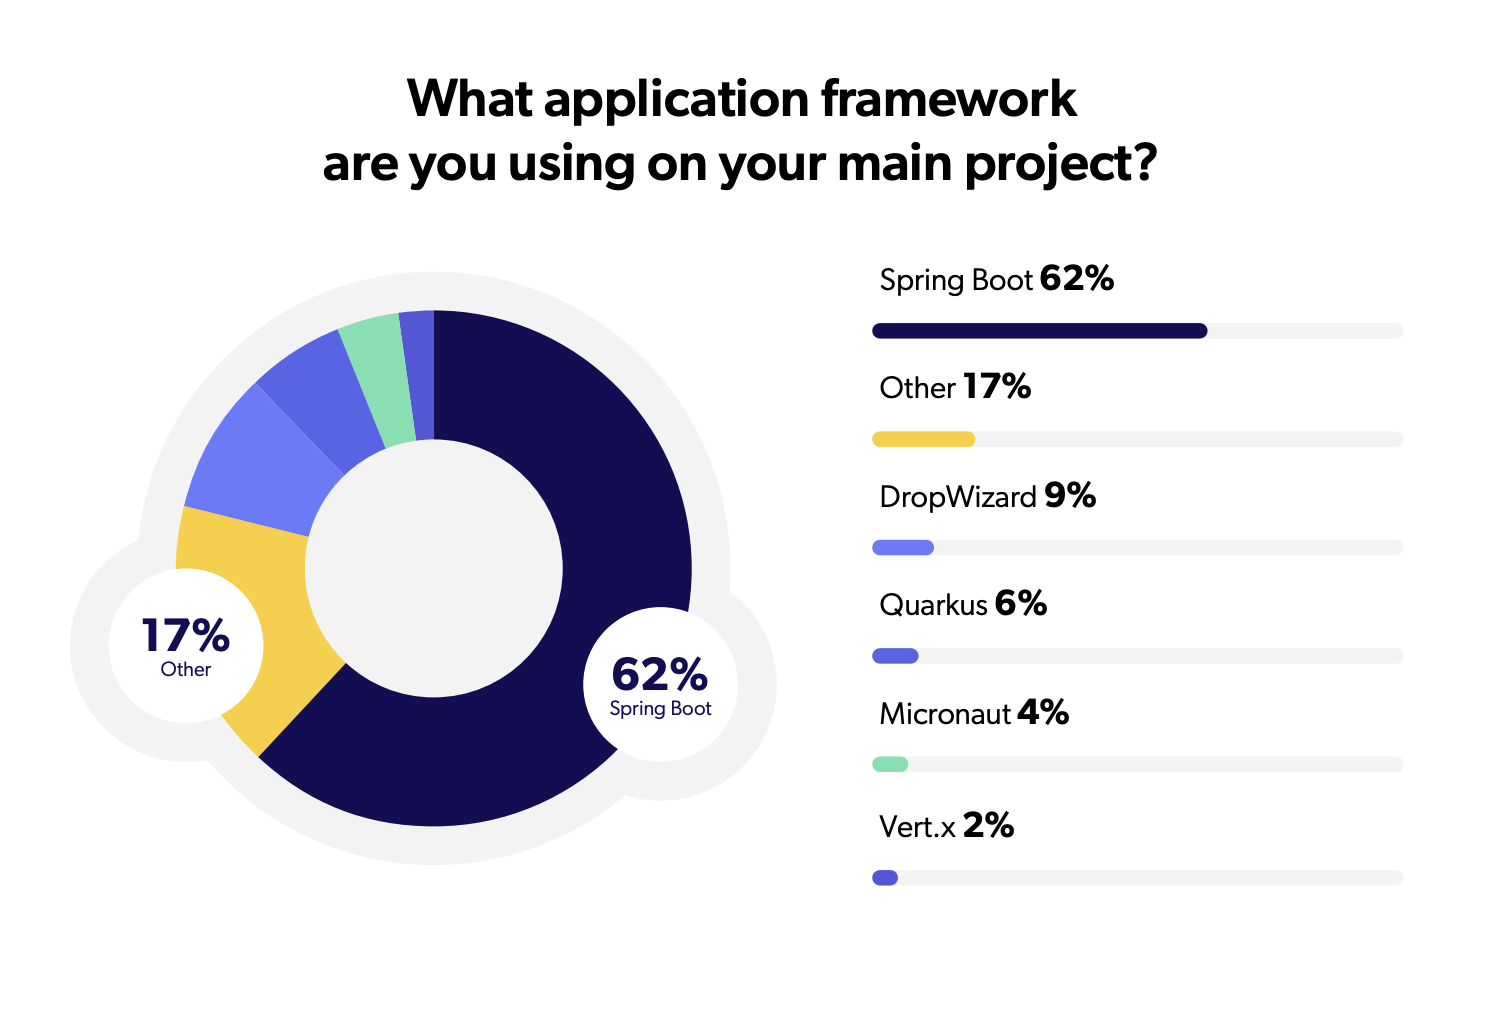 Source ~ The 2021 Java Developer productivity Report
Spring Boot is the world’s leading Java web framework. It’s open source, microservices-based, and helps developers to build scalable Java apps. Developers love Spring because of its auto-configuration, embedded servers, and simplified dependency management. It helps development teams create services faster and more efficiently. Accordingly, users spend very little time on initial setup. That includes downloading essential packages or application servers.
The biggest challenge that developers face with Spring Boot is concurrency — or the need to do too many things simultaneously. Spring Boot may also unnecessarily increase the deployment binary size with unused dependencies. This creates bloated JARs that may increase your overall application footprint while impacting performance. Other challenges include a high learning curve and complexity while building a customized logging mechanism.
How can you offset these drawbacks? Docker simplifies and accelerates your workflows by letting you freely innovate with your choice of tools, application stacks, and deployment environments for each project. You can run your Spring Boot artifact directly within Docker containers. This is useful when you need to quickly create microservices. Let’s see this process in action.
Building Your Application
This walkthrough will show you how to accelerate your application development using Spring Boot.
First, we’ll create a simple web app with Spring Boot, without using Docker. Next, we’ll build a Docker image just for that application. You’ll also learn how Docker Compose can help you rapidly deploy your application within containers. Let’s get started.
Key Components
Getting Started
Once you’ve installed the Maven and OpenJDK package in your system, follow these steps to build a simple web application using Spring Boot.
Starting with Spring Initializr
Spring Initializr is a quickstart generator for Spring projects. It provides an extensible API to generate JVM-based projects with implementations for several common concepts — like basic language generation for Java, Kotlin, and Groovy. Spring Initializr also supports build-system abstraction with implementations for Apache Maven and Gradle. Additionally, It exposes web endpoints to generate an actual project and serve its metadata in a well-known format. This lets third-party clients provide assistance where it’s needed.
Open this pre-initialized project in order to generate a ZIP file. Here’s how that looks:
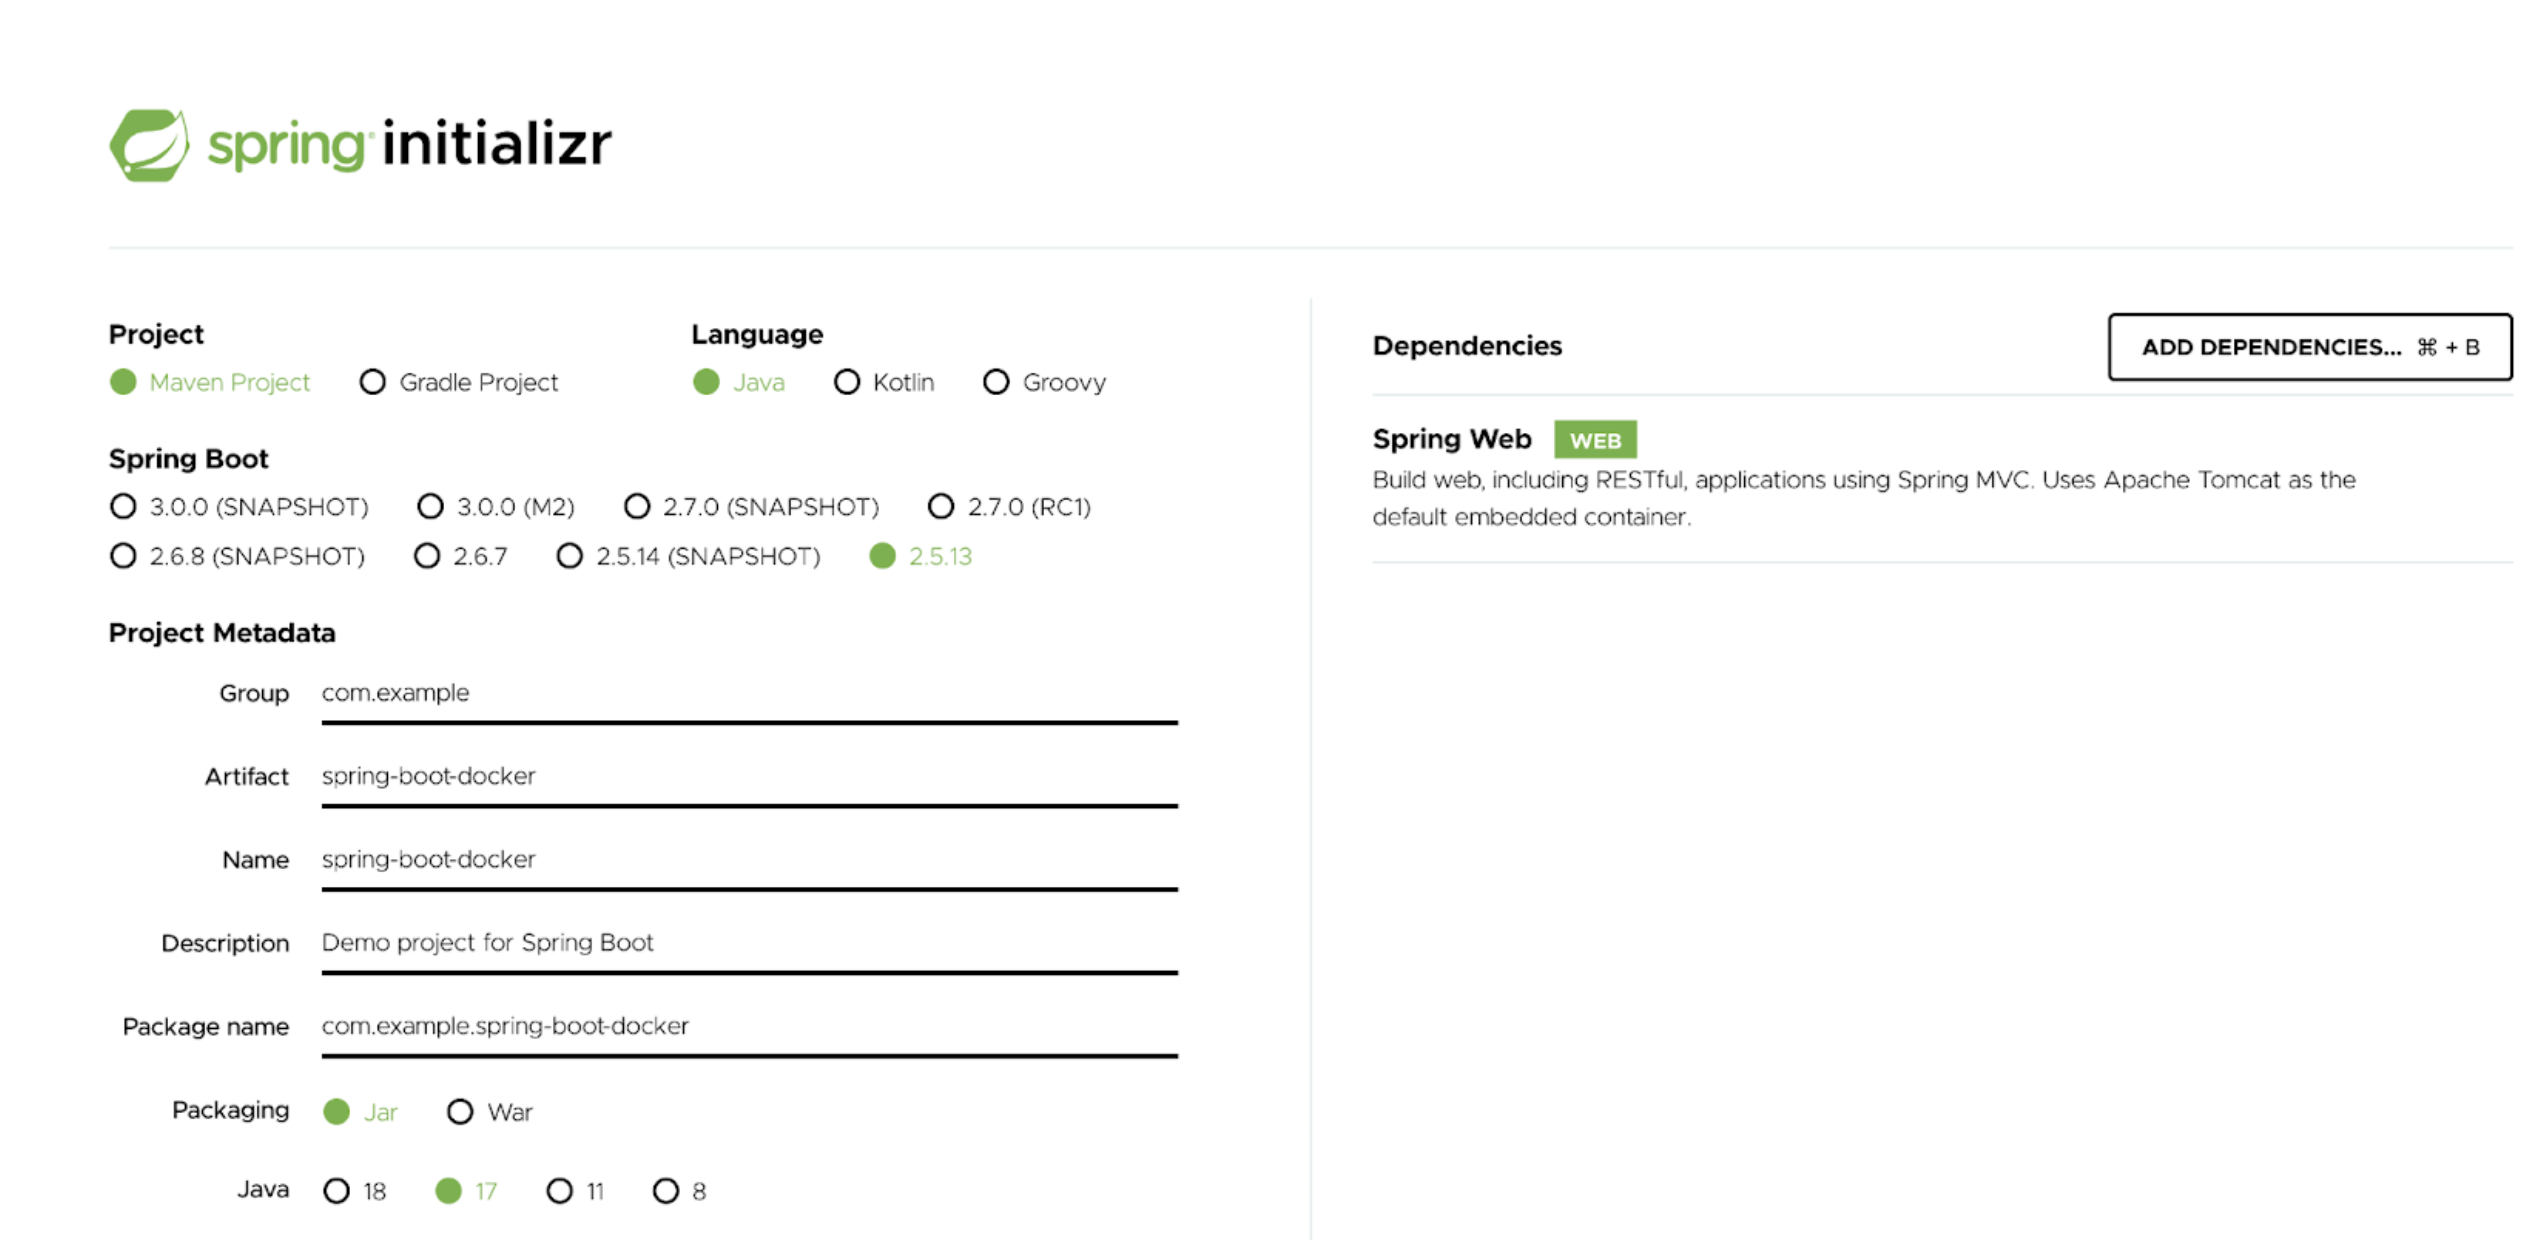
For this demonstration, we’ve paired Maven build automation with Java, a Spring Web dependency, and Java 17 for our metadata.
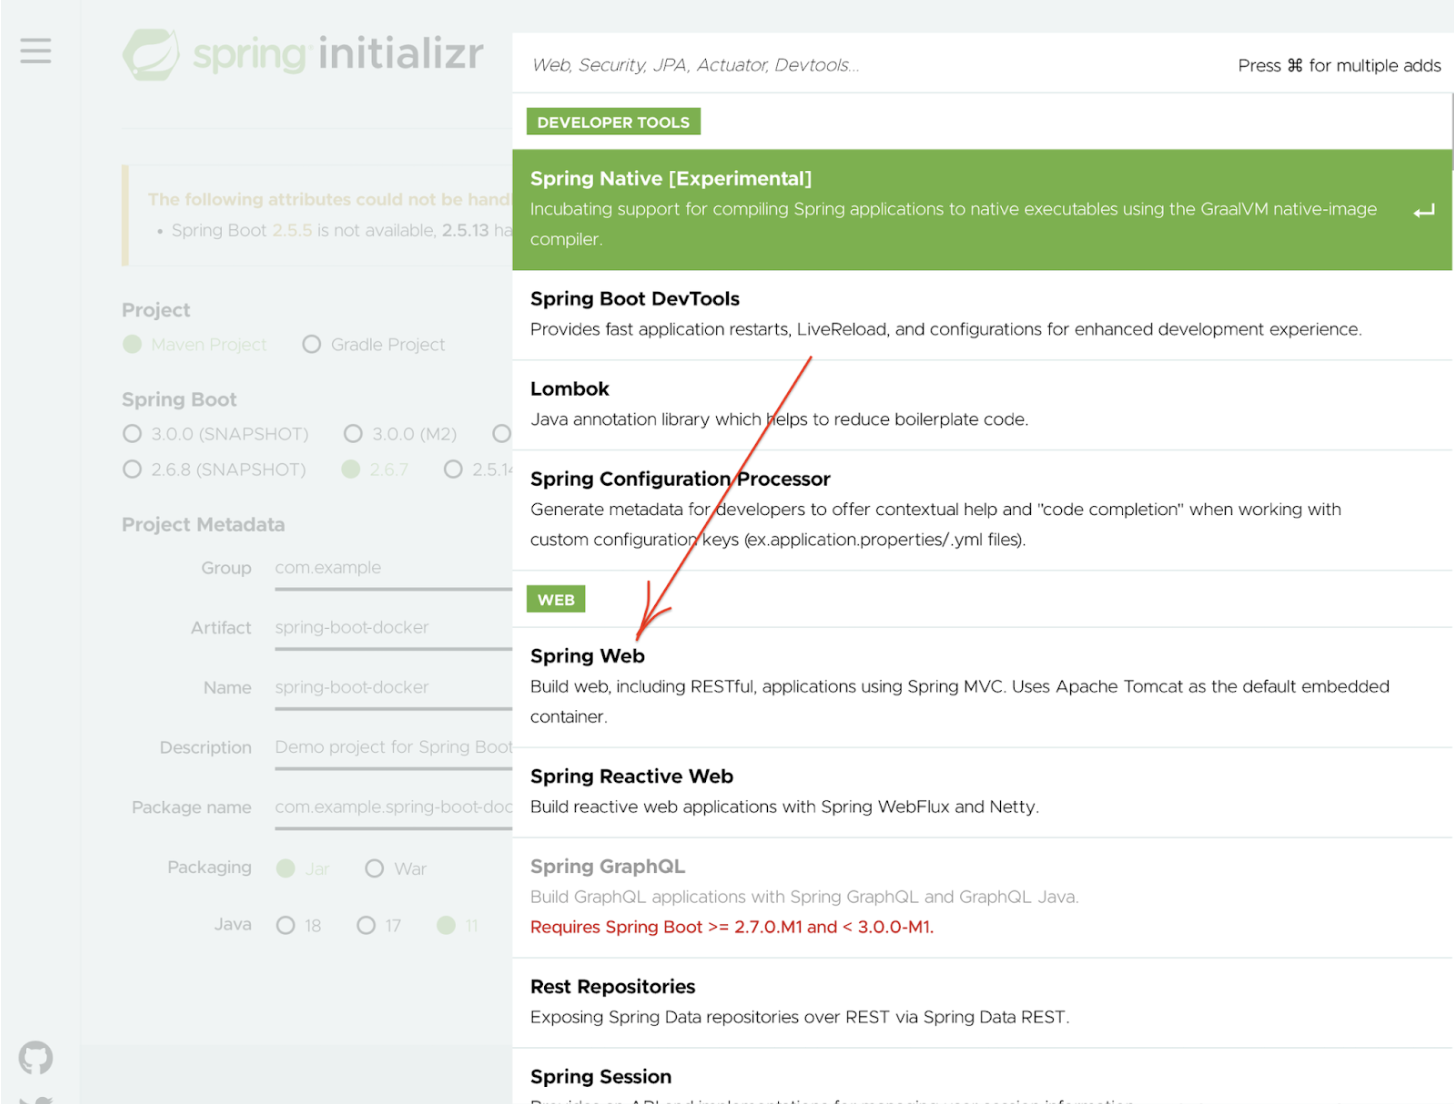
Click “Generate” to download “spring-boot-docker.zip”. Use the unzip command to extract your files.
Project Structure
Once you unzip the file, you’ll see the following project directory structure:
1 2 3 4 5 6 7 8 9 10 11 12 13 14 15 16 17 18 19 20 21 22 23 | tree spring-boot-dockerspring-boot-docker├── HELP.md├── mvnw├── mvnw.cmd├── pom.xml└── src├── main│ ├── java│ │ └── com│ │ └── example│ │ └── springbootdocker│ │ └── SpringBootDockerApplication.java│ └── resources│ ├── application.properties│ ├── static│ └── templates└── test└── java└── com└── example└── springbootdocker└── SpringBootDockerApplicationTests.java |
The src/main/java directory contains your project’s source code, the src/test/java directory contains the test source, and the pom.xml file is your project’s Project Object Model (POM).
The pom.xml file is the core of a Maven project’s configuration. It’s a single configuration file that contains most of the information needed to build a customized project. The POM is huge and can seem daunting. Thankfully, you don’t yet need to understand every intricacy to use it effectively. Here’s your project’s POM:
1 2 3 4 5 6 7 8 9 10 11 12 13 14 15 16 17 18 19 20 21 22 23 24 25 26 27 28 29 30 31 32 33 34 35 36 37 38 39 40 41 | <?xml version="1.0" encoding="UTF-8"?><project xmlns="http://maven.apache.org/POM/4.0.0" xmlns:xsi="http://www.w3.org/2001/XMLSchema-instance" xsi:schemaLocation="http://maven.apache.org/POM/4.0.0 https://maven.apache.org/xsd/maven-4.0.0.xsd"> <modelVersion>4.0.0</modelVersion> <parent> <groupId>org.springframework.boot</groupId> <artifactId>spring-boot-starter-parent</artifactId> <version>2.5.13</version> <relativePath/> <!-- lookup parent from repository --> </parent> <groupId>com.example</groupId> <artifactId>spring-boot-docker</artifactId> <version>0.0.1-SNAPSHOT</version> <name>spring-boot-docker</name> <description>Demo project for Spring Boot</description> <properties> <java.version>17</java.version> </properties> <dependencies> <dependency> <groupId>org.springframework.boot</groupId> <artifactId>spring-boot-starter-web</artifactId> </dependency> <dependency> <groupId>org.springframework.boot</groupId> <artifactId>spring-boot-starter-test</artifactId> <scope>test</scope> </dependency> </dependencies> <build> <plugins> <plugin> <groupId>org.springframework.boot</groupId> <artifactId>spring-boot-maven-plugin</artifactId> </plugin> </plugins> </build></project> |
The SpringbootDockerApplication.java file starts by declaring your com.example.springbootdocker package and importing necessary Spring frameworks. Many Spring Boot developers like their apps to use auto-configuration, component scanning, and extra configuration definitions to their “application class.” You can use a single @SpringBootApplication annotation to enable those features. That same annotation also triggers component scanning for your current package and its sub-packages. You can configure this and even move it elsewhere by manually specifying the base package.
Let’s create a simple RESTful web service that displays “Hello World!” by annotating classic controllers as shown in the following example:.
1 2 3 4 5 6 7 8 9 10 11 12 13 14 15 16 17 18 19 20 21 | package com.example.springbootdocker;import org.springframework.boot.SpringApplication;import org.springframework.boot.autoconfigure.SpringBootApplication;import org.springframework.web.bind.annotation.RequestMapping;import org.springframework.web.bind.annotation.RestController;@RestController@SpringBootApplicationpublic class SpringBootDockerApplication { @RequestMapping("/") public String home() { return "Hello World!"; } public static void main(String[] args) { SpringApplication.run(SpringBootDockerApplication.class, args); }} |
@RestControler and @RequestMapping are two other popular annotations. The @RestController annotation simplifies the creation of RESTful web services. It conveniently combines @Controller and @ResponseBody — which eliminates the need to annotate every request-handling method of the controller class with the @ResponseBody annotation. Meanwhile, the @RequestMapping annotation maps web requests to Spring Controller methods.
First, we can flag a class as a @SpringBootApplication and as a @RestController, letting Spring MVC harness it for web requests. @RequestMapping maps / to the home() method, which sends a Hello World response. The main() method uses Spring Boot’s SpringApplication.run() method to launch an application.
The following command takes your compiled code and packages it into a distributable format, like a JAR:
./mvnw package
1 2 3 4 5 6 7 8 9 10 11 12 13 14 15 16 17 18 19 20 21 22 23 24 25 26 27 28 29 30 31 32 33 34 35 36 37 38 39 40 41 42 43 44 45 | [INFO] Scanning for projects...[INFO][INFO] -------------------&lt; com.example:spring-boot-docker &gt;-------------------[INFO] Building spring-boot-docker 0.0.1-SNAPSHOT[INFO] --------------------------------[ jar ]---------------------------------[INFO][INFO] --- maven-resources-plugin:3.2.0:resources (default-resources) @ spring-boot-docker ---[INFO] Using 'UTF-8' encoding to copy filtered resources.[INFO] Using 'UTF-8' encoding to copy filtered properties files.[INFO] Copying 1 resource[INFO] Copying 0 resource[INFO][INFO] --- maven-compiler-plugin:3.8.1:compile (default-compile) @ spring-boot-docker ---[INFO] Nothing to compile - all classes are up to date[INFO][INFO] --- maven-resources-plugin:3.2.0:testResources (default-testResources) @ spring-boot-docker ---[INFO] Using 'UTF-8' encoding to copy filtered resources.[INFO] Using 'UTF-8' encoding to copy filtered properties files.[INFO] skip non existing resourceDirectory /Users/johangiraldohurtado/Downloads/spring-boot-docker/src/test/resources[INFO][INFO] --- maven-compiler-plugin:3.8.1:testCompile (default-testCompile) @ spring-boot-docker ---[INFO] Changes detected - recompiling the module![INFO] Compiling 1 source file to /Users/johangiraldohurtado/Downloads/spring-boot-docker/target/test-classes[INFO][INFO] --- maven-surefire-plugin:2.22.2:test (default-test) @ spring-boot-docker ---……[INFO] Tests run: 1, Failures: 0, Errors: 0, Skipped: 0, Time elapsed: 4.37 s - in com.example.springbootdocker.SpringBootDockerApplicationTests[INFO][INFO] Results:[INFO][INFO] Tests run: 1, Failures: 0, Errors: 0, Skipped: 0[INFO][INFO][INFO] --- maven-jar-plugin:3.2.2:jar (default-jar) @ spring-boot-docker ---[INFO] Building jar: /Users/johangiraldohurtado/Downloads/spring-boot-docker/target/spring-boot-docker-0.0.1-SNAPSHOT.jar[INFO][INFO] --- spring-boot-maven-plugin:2.5.13:repackage (repackage) @ spring-boot-docker ---[INFO] Replacing main artifact with repackaged archive[INFO] ------[INFO] BUILD SUCCESS[INFO] ------------------------------------------------------------------------[INFO] Total time: 11.461 s[INFO] Finished at: 2022-05-12T12:50:12-05:00[INFO] ------------------------------------------------------------------------ |
Running app Packages as a JAR File
After successfully building your JAR, it’s time to run the app package as a JAR file:
java -jar target/spring-boot-docker-0.0.1-SNAPSHOT.jar
Here are the results:
1 2 3 4 5 6 7 8 9 10 11 12 13 14 15 16 17 | . ____ _ __ _ _/\\ / ___'_ __ _ _(_)_ __ __ _ \ \ \ \( ( )\___ | '_ | '_| | '_ \/ _` | \ \ \ \\\/ ___)| |_)| | | | | || (_| | ) ) ) )' |____| .__|_| |_|_| |_\__, | / / / /=========|_|==============|___/=/_/_/_/:: Spring Boot :: (v2.5.13)2022-05-12 13:02:35.591 INFO 3594 --- [ main] c.e.s.SpringBootDockerApplication : Starting SpringBootDockerApplication v0.0.1-SNAPSHOT using Java 17.0.2 on Johans-MacBook-Air.local with PID 3594 (/Users/johangiraldohurtado/Downloads/spring-boot-docker/target/spring-boot-docker-0.0.1-SNAPSHOT.jar started by johangiraldohurtado in /Users/johangiraldohurtado/Downloads/spring-boot-docker)2022-05-12 13:02:35.597 INFO 3594 --- [ main] c.e.s.SpringBootDockerApplication : No active profile set, falling back to 1 default profile: "default"2022-05-12 13:02:37.958 INFO 3594 --- [ main] o.s.b.w.embedded.tomcat.TomcatWebServer : Tomcat initialized with port(s): 8080 (http)2022-05-12 13:02:37.979 INFO 3594 --- [ main] o.apache.catalina.core.StandardService : Starting service [Tomcat]2022-05-12 13:02:37.979 INFO 3594 --- [ main] org.apache.catalina.core.StandardEngine : Starting Servlet engine: [Apache Tomcat/9.0.62]2022-05-12 13:02:38.130 INFO 3594 --- [ main] o.a.c.c.C.[Tomcat].[localhost].[/] : Initializing Spring embedded WebApplicationContext2022-05-12 13:02:38.130 INFO 3594 --- [ main] w.s.c.ServletWebServerApplicationContext : Root WebApplicationContext: initialization completed in 2351 ms2022-05-12 13:02:39.015 INFO 3594 --- [ main] o.s.b.w.embedded.tomcat.TomcatWebServer : Tomcat started on port(s): 8080 (http) with context path ''2022-05-12 13:02:39.050 INFO 3594 --- [ main] c.e.s.SpringBootDockerApplication : Started SpringBootDockerApplication in 4.552 seconds (JVM running for 5.486) |
You can now access your “Hello World” page through your web browser at http://localhost:8080, or via this curl command:
1 2 | curl localhost:8080Hello World |
Click here to access the code previously developed for this example.
Containerizing the Spring Boot Application
Docker helps you containerize your Java app — letting you bundle together your complete Spring application, runtime, configuration, and OS-level dependencies. This includes everything needed to ship a cross-platform, multi-architecture web application.
Let’s assess how you can easily run this app inside a Docker container using a Docker Official Image. First, you’ll need to download Docker Desktop. Docker Desktop accelerates the image-building process while making useful images more discoverable. Complete the installation process once your download is finished.
Docker uses a Dockerfile to specify each image’s “layers.” Each layer stores important changes stemming from the base image’s standard configuration. Create the following empty Dockerfile in your Spring Boot project.
touch Dockerfile
Use your favorite text editor to open this Dockerfile. You’ll then need to define your base image.
Whenever you are creating a Docker image to run a Java program, it’s always recommended to use a smaller base image that helps in speeding up the build process and launching containers at a faster pace. Also, for executing a simple program, we just need to use JRE instead of JDK since there is no development or compilation of the code required.
The upstream Java JDK doesn’t distribute an official JRE package. Hence, we will leverage the popular eclipse-temurin:17-jdk-focal Docker image available in Docker Hub. The Eclipse Temurin project provides code and processes that support the building of runtime binaries and associated technologies that are high performance, enterprise-caliber & cross-platform.
FROM eclipse-temurin:17-jdk-focalNext, let’s quickly create a directory to house our image’s application code. This acts as the working directory for your application:
WORKDIR /app
The following COPY instruction copies the Maven wrappers and pom file from the host machine to the container image.The pom.xml file contains information of project and configuration information for the maven to build the project such as dependencies, build directory, source directory, test source directory, plugin, goals etc.
COPY .mvn/ ./mvn
COPY mvnw pom.xml ./
The following RUN instructions trigger a goal that resolves all project dependencies including plugins and reports and their dependencies.
RUN ./mvnw dependency:go-offline
Next, we need to copy the most important directory of the maven project – /src. It includes java source code and pre-environment configuration files of the artifact.
COPY src ./src
The Spring Boot Maven plugin includes a run goal which can be used to quickly compile and run your application. The last line tells Docker to compile and run your app packages.
CMD ["./mvnw", "spring-boot:run"]
Here’s your complete Dockerfile:
1 2 3 4 5 6 7 8 9 10 11 | FROM eclipse-temurin:17-jdk-focalWORKDIR /appCOPY .mvn/ .mvnCOPY mvnw pom.xml ./RUN ./mvnw dependency:go-offlineCOPY src ./srcCMD ["./mvnw", "spring-boot:run"] |
Building Your Docker Image
Next, you’ll need to build your Docker image. Enter the following command to kickstart this process, which produces an output soon after:
docker build --platform linux/amd64 -t spring-helloworld .
1 2 3 | docker image lsREPOSITORY TAG IMAGE ID CREATED SIZEspring-helloworld latest 4cf762a7b96d 4 minutes ago 124MB |
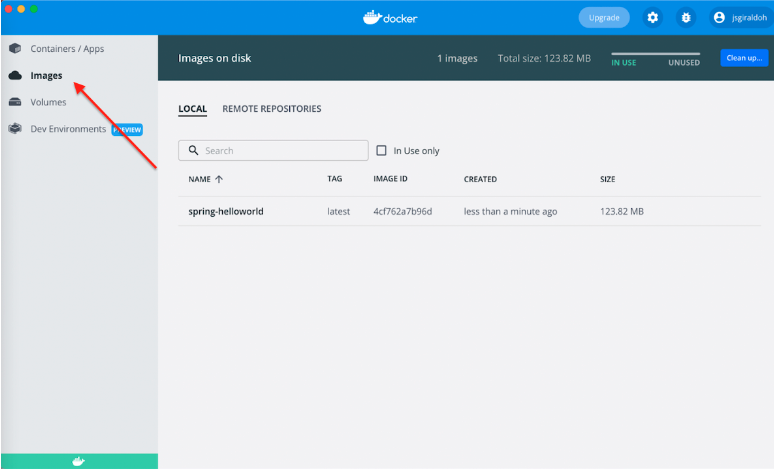
Docker Desktop’s intuitive dashboard lets you manage your containers, applications, and images directly from within Docker Desktop. The GUI enables this with only a few clicks. While still possible, you won’t need to use the CLI to perform these core actions.
Select Dashboard from the top whale menu icon to access the Docker Dashboard:
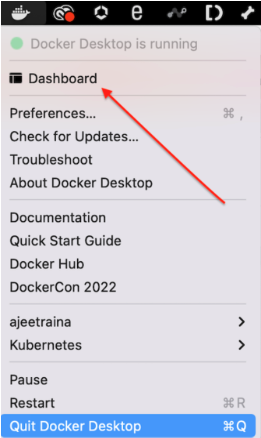
Click on Images. The Images view displays a list of your Docker images, and lets you run images as functional containers.
Additionally, you can push your images directly to Docker Hub for easy sharing and collaboration.
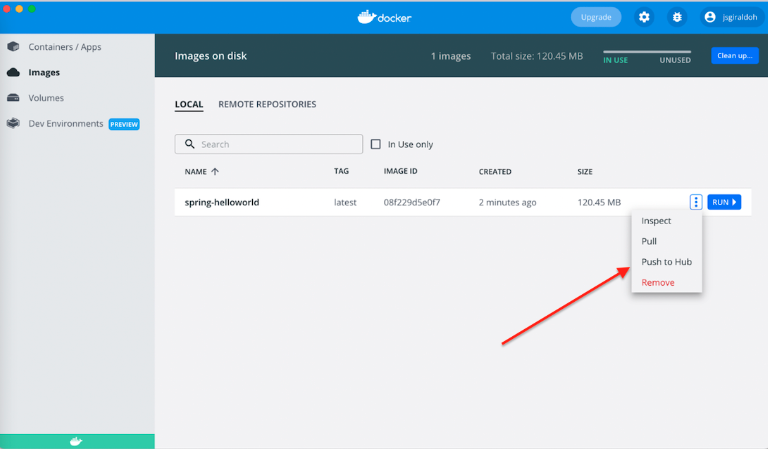
The Image view also includes the Inspect option. This unveils environmental variables, port information, and more. Crucially, the Image view lets you run your container directly from your image. Simply specify the container’s name, exposed ports, and mounted volumes as required.
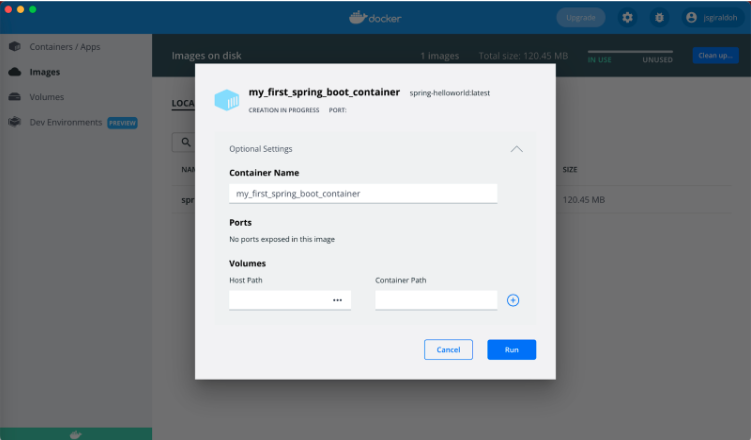
Run Your Spring Boot Docker Container
Docker runs processes in isolated containers. A container is a process that runs on a host, which is either local or remote. When an operator executes docker run, the container process that runs is isolated with its own file system, networking, and separate process tree from the host.
The following docker run command first creates a writeable container layer over the specified image, and then starts it.
docker run -p 8080:8080 -t spring-helloworld
Here’s your result:
1 2 3 4 5 6 7 8 9 10 11 12 13 14 15 16 17 | . ____ _ __ _ _/\\ / ___'_ __ _ _(_)_ __ __ _ \ \ \ \( ( )\___ | '_ | '_| | '_ \/ _` | \ \ \ \\\/ ___)| |_)| | | | | || (_| | ) ) ) )' |____| .__|_| |_|_| |_\__, | / / / /=========|_|==============|___/=/_/_/_/:: Spring Boot :: (v2.5.13)2022-05-12 18:31:38.770 INFO 1 --- [ main] c.e.s.SpringBootDockerApplication : Starting SpringBootDockerApplication v0.0.1-SNAPSHOT using Java 17.0.2 on 3196593a534f with PID 1 (/app.jar started by root in /)2022-05-12 18:31:38.775 INFO 1 --- [ main] c.e.s.SpringBootDockerApplication : No active profile set, falling back to 1 default profile: "default"2022-05-12 18:31:39.434 INFO 1 --- [ main] o.s.b.w.embedded.tomcat.TomcatWebServer : Tomcat initialized with port(s): 8080 (http)2022-05-12 18:31:39.441 INFO 1 --- [ main] o.apache.catalina.core.StandardService : Starting service [Tomcat]2022-05-12 18:31:39.442 INFO 1 --- [ main] org.apache.catalina.core.StandardEngine : Starting Servlet engine: [Apache Tomcat/9.0.62]2022-05-12 18:31:39.535 INFO 1 --- [ main] o.a.c.c.C.[Tomcat].[localhost].[/] : Initializing Spring embedded WebApplicationContext2022-05-12 18:31:39.535 INFO 1 --- [ main] w.s.c.ServletWebServerApplicationContext : Root WebApplicationContext: initialization completed in 682 ms2022-05-12 18:31:39.797 INFO 1 --- [ main] o.s.b.w.embedded.tomcat.TomcatWebServer : Tomcat started on port(s): 8080 (http) with context path ''2022-05-12 18:31:39.805 INFO 1 --- [ main] c.e.s.SpringBootDockerApplication : Started SpringBootDockerApplication in 1.365 seconds (JVM running for 1.775) |
Go to Docker Dashboard and open your app in your browser:
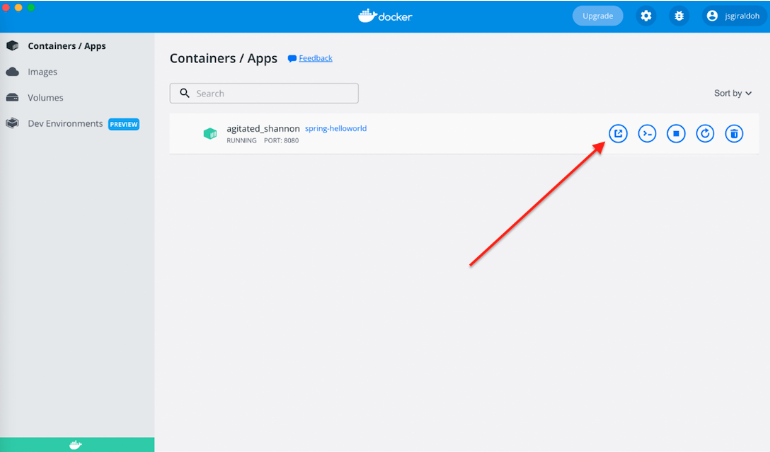
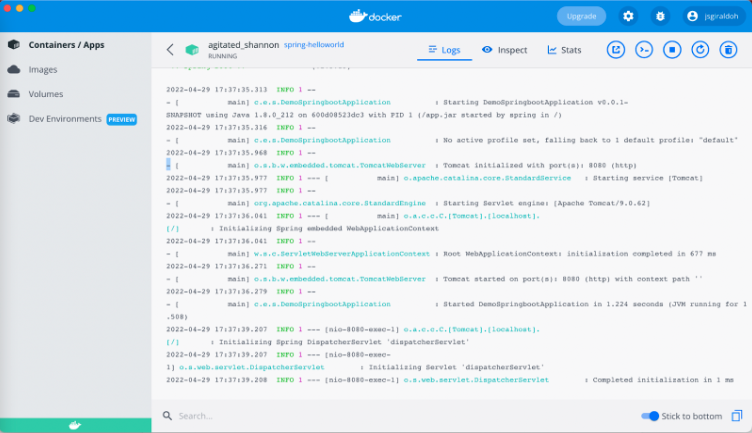
Next, click Logs to observe your app’s behavior:
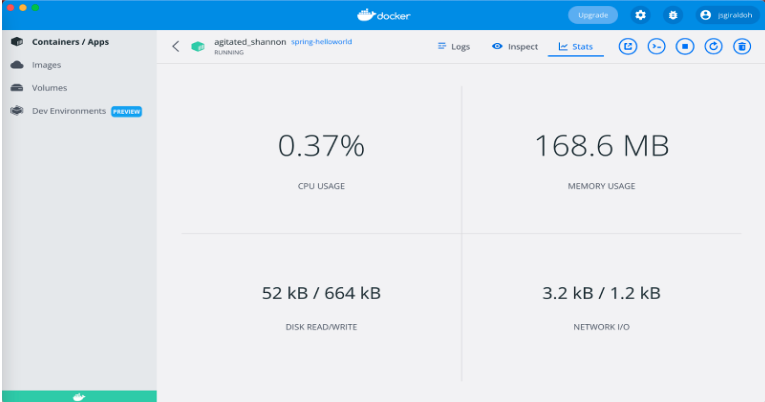
Docker Dashboard’s Stats tab lets you view CPU consumption, memory usage, disk read vs. write, and network use:
You can also confirm your containerized application’s functionality via the URL http://localhost:8080:
1 2 | curl localhost:8080Hello Developers From Docker! |
Want to explore alternative ways to get started with Spring Boot? Check out this Docker image built for developers like you.
Building Multi-Container Spring Boot Apps with Docker Compose
We’ve effectively learned how to build a sample Spring Boot app and create associated Docker images. Next, let’s build a multi-container Spring Boot app using Docker Compose.
For this demonstration, you’ll leverage the popular awesome-compose repository.
Cloning the Repository
1 | git clone https://github.com/docker/awesome-compose |
Change your directory to match the spring-postgres project and you’ll see the following project directory structure:
1 2 3 4 5 6 7 8 9 10 11 12 13 14 15 16 17 18 19 20 21 22 23 24 25 26 27 28 29 | .├── README.md├── backend│ ├── Dockerfile│ ├── pom.xml│ └── src│ └── main│ ├── java│ │ └── com│ │ └── company│ │ └── project│ │ ├── Application.java│ │ ├── controllers│ │ │ └── HomeController.java│ │ ├── entity│ │ │ └── Greeting.java│ │ └── repository│ │ └── GreetingRepository.java│ └── resources│ ├── application.properties│ ├── data.sql│ ├── schema.sql│ └── templates│ └── home.ftlh├── db│ └── password.txt└── docker-compose.yaml13 directories, 13 files |
Let’s also take a peak at our docker compose file:
1 2 3 4 5 6 7 8 9 10 11 12 13 14 15 16 17 18 19 20 21 22 23 24 25 26 27 28 29 30 | services: backend: build: backend ports: - 8080:8080 environment: - POSTGRES_DB=example networks: - spring-postgres db: image: postgres restart: always secrets: - db-password volumes: - db-data:/var/lib/postgresql/data networks: - spring-postgres environment: - POSTGRES_DB=example - POSTGRES_PASSWORD_FILE=/run/secrets/db-password expose: - 5432volumes: db-data:secrets: db-password: file: db/password.txtnetworks: spring-postgres: |
The compose file defines an application with two services: backend and db. While deploying the application, docker compose maps port 8080 of the backend service container to port 8080 of the host, per your file. Make sure port 8080 on the host isn’t already in use.
Through your compose file, it’s possible to determine environment variables. For example, you can specify connected databases in the backend service. With a database, you can define the name, password, and parameters of your database.
Thanks to our compose file’s behavior — which lets us recreate containers from indicated services — it’s important to define volumes that store critical information.
Start your application by running docker compose command:
docker compose up -d
Your container list should show two containers running and their port mappings, as seen below:
1 2 3 4 5 | docker compose psName Command State Ports-------------------------------------------------------------------------------------------spring-postgres_backend_1 java -cp app:app/lib/* com ... Up 0.0.0.0:8080-&gt;8080/tcpspring-postgres_db_1 docker-entrypoint.sh postgres Up 5432/tcp |
After the application starts, navigate to http://localhost:8080 in your web browser. You can also run the following curl to form your webpage:
1 2 3 4 5 6 7 8 9 10 | $ curl localhost:8080<!DOCTYPE HTML><html><head> <title>Getting Started: Serving Web Content</title> <meta http-equiv="Content-Type" content="text/html; charset=UTF-8" /></head><body> <p>Hello from Docker!</p></body> |
Stop and Remove Your Containers
You’ve successfully built your sample application—congratulations! However, it’s now time to take things offline. You can do this quickly and easily with the following command:
1 2 3 4 5 6 | $ docker compose downStopping spring-postgres_db_1 ... doneStopping spring-postgres_backend_1 ... doneRemoving spring-postgres_db_1 ... doneRemoving spring-postgres_backend_1 ... doneRemoving network spring-postgres_default |
Alternatively, navigate to the Containers / Apps section from Docker Desktop’s sidebar, hover over each active container, and click the square Stop button. The process takes roughly 10 seconds — shutting your containers down elegantly.
Conclusion
We’ve demonstrated how to containerize our Spring Boot application, and why that’s so conducive to smoother deployment. We’ve also harnessed Docker Compose to construct a simple, two-layered web application. This process is quick and lets you devote precious time to other development tasks — especially while using Docker Desktop. No advanced knowledge of containers or even Docker is needed to succeed.
References:

