This post was written in collaboration with Docker AI/ML Hackathon participants Gitanshu Sankhla and Vijay Barma.
In this AI/ML Hackathon post, we’ll share another interesting winning project from last year’s Docker AI/ML Hackathon. This time, we will dive into ReadMeAI, one of the honorable mention winners.
For many developers, planning and writing code is the most enjoyable part of the process. It’s where creativity meets logic, and lines of code transform into solutions. Although some developers find writing documentation equally fulfilling, crafting clear and concise code instructions isn’t for everyone.
Imagine you’re a developer working on a complex project with a team. You just pushed your final commit with a sign of relief, but the clock is ticking on your deadline. You know that clear documentation is crucial. Your teammates need to understand your code’s intricacies for smooth integration, but writing all that documentation feels like another project entirely, stealing your precious time from bug fixes and testing. That’s where ReadMeAI, an AI-powered README generator fits in.
What makes ReadMeAI unique?
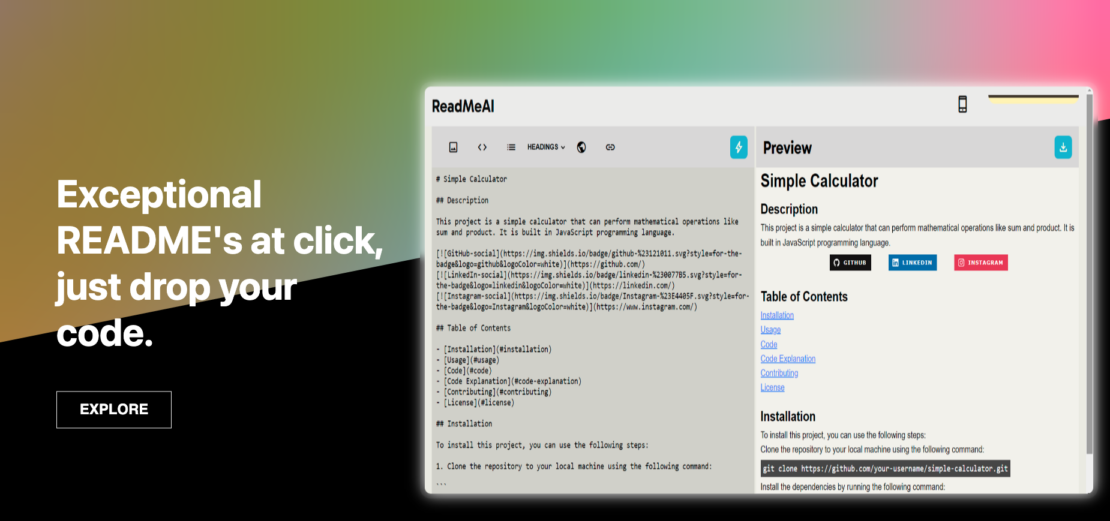
The following demo, which was submitted to the AI/ML Hackathon, provides an overview of ReadMeAI (Figure 1).
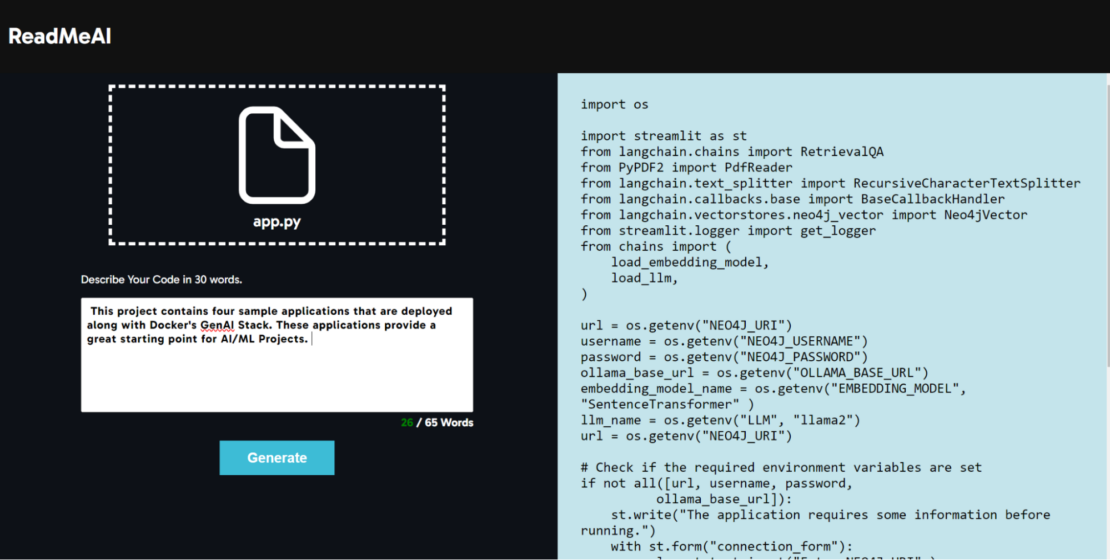
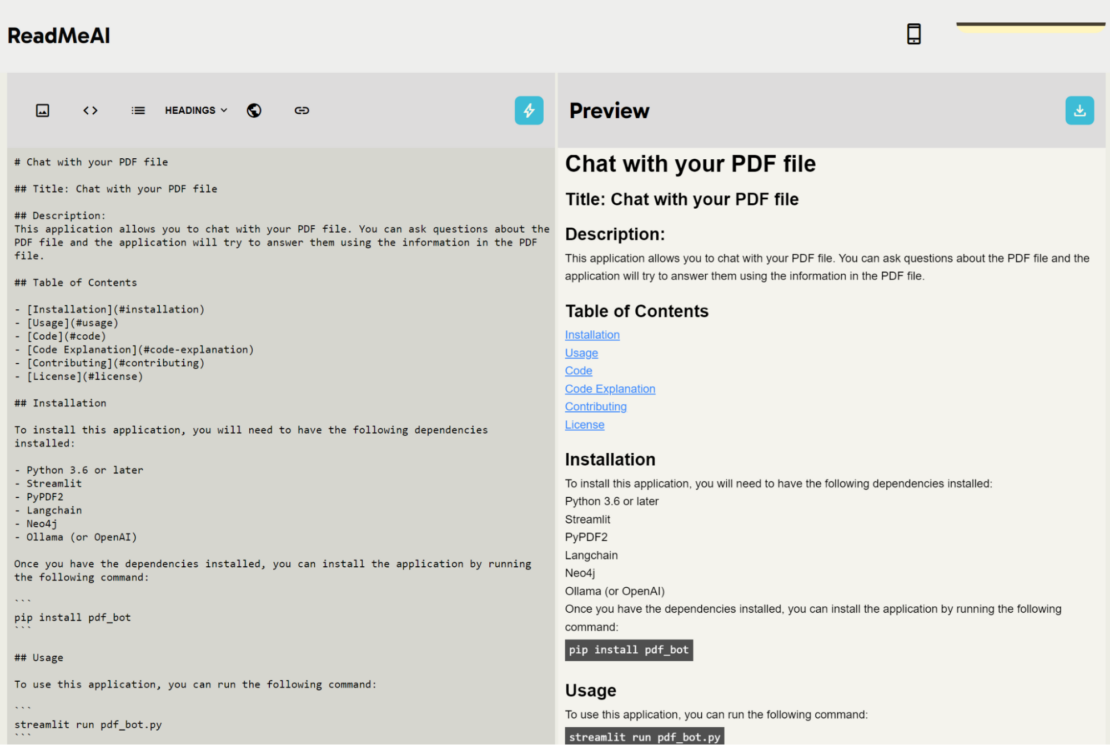
The ReadMeAI tool allows users to upload a code file and describe their project. The tool generates Markdown code, which can be edited in real-time using a code editor, and the changes are previewed instantly.
The user interface of ReadmeAI is designed to be clean and modern, making the application easy to use for all users.
Benefits of ReadMeAI include:
- Effortless documentation: Upload your code, provide a brief description, and let ReadMeAI generate a comprehensive markdown file for your README seamlessly.
- Seamless collaboration: ReadMeAI promotes well-structured READMEs with essential sections, making it easier for your team to understand and contribute to the codebase, fostering smoother collaboration.
- Increased efficiency: Stop wasting time on boilerplate documentation. ReadMeAI automates the initial draft of your README, freeing up valuable developer time for coding, testing, and other crucial project tasks.
Use cases include:
- API documentation kick-off: ReadMeAI provides a solid foundation for your API documentation. It generates an initial draft outlining API endpoints, parameters, and expected responses. This jumpstarts your process and lets you focus on the specifics of your API’s functionality.
- Rapid prototyping and documentation: During rapid prototyping, functionality often takes priority over documentation. ReadMeAI bridges this gap. It quickly generates a basic README with core information, allowing developers to have documentation in place while focusing on building the prototype.
- Open source project kick-off: ReadMeAI can jumpstart the documentation process for your open source project. Simply provide your codebase and a brief description, and ReadMeAI generates a well-structured README file with essential sections like installation instructions, usage examples, and contribution guidelines. This saves you time and ensures consistent documentation across your projects.
Focus on what you do best — coding. Let ReadMeAI handle the rest.
How does it work?
ReadMeAI converts code and description into a good-looking README file. Users can upload code files and describe their code in a few words, and ReadMeAI will generate Markdown code for your README. You will get a built-in editor to format your README according to your needs, and then you can download your README in Markdown and HTML format.
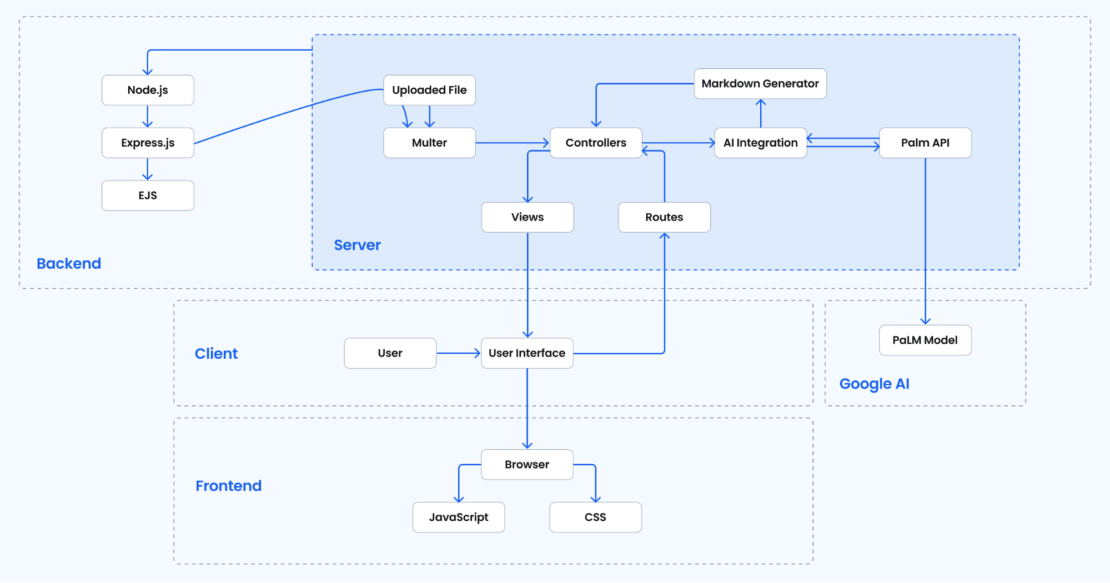
Figure 2 shows an overview of the ReadMeAI architecture.
Technical stack
The ReadMeAI tech stack includes:
- Node.js: A server-side runtime that handles server-side logic and interactions.
- Express: A popular Node.js framework that handles routing, middleware, and request handling.
- Google PaLM API: Google’s Pathways Language Model (PaLM) is a 540-billion parameter transformer-based large language model. It is used in the ReadMeAI project to generate a Markdown README based on the uploaded code and user description.
- Embedded JavaScript (EJS): A templating engine that allows you to render and add dynamic content to the HTML on the server side.
- Cascading Style Sheets (CSS): Add styling to the generated Markdown content.
- JavaScript: Add interactivity to the front end, handle client-side logic, and communicate with the server side.
AI integration and markdown generation
The AI integration is handled by the controllers/app.js file (as shown below), specifically in the postApp function. The uploaded code and user description are passed to the AI integration, which uses the Google Palm API to generate a Markdown README.
The Markdown generator is implemented in the postApp function. The AI-generated content is converted into Markdown format using the showdown library.
const fs = require('fs');
const path = require('path');

const showdown = require('showdown');
const multer = require('multer');
const zip = require('express-zip');

const palmApi = require('../api/fetchPalm');

// showdown converter
const converter = new showdown.Converter();
converter.setFlavor('github');


// getting template
let template;
fs.readFile('./data/template.txt', 'utf8', (err, data) => {
    if (err) {
        console.error(err)
        return
    }
    template = data;
});


// getting '/'
exports.getApp = (req, res)=>{
    res.render('home', {
        pageTitle: 'ReadMeAI - Home'
    })
}

exports.getUpload = (req, res)=>{
    res.render('index', {
        pageTitle: 'ReadMeAI - Upload'
    })
}

// controller to sent generate readme from incoming data
exports.postApp = (req, res)=>{
    let html, dt;
    const code = req.file.filename;
    const description = req.body.description;

    try {
        dt = fs.readFileSync(`uploads/${code}`, 'utf8');
      } catch (err) {
        console.error("read error",err);
      }

    palmApi.getData(template, dt, description)
        .then(data => {
            html = converter.makeHtml(data);
            res.render('editor', {
                pageTitle: 'ReadMeAI - Editor',
                html: html,
                md: data
            });
            //deleting files from upload folder
            fs.unlink(`uploads/${code}`, (err) => {
                if (err) {
                  console.error(err);
                  return;
                }
                console.log('File deleted successfully');
              });

        }).catch(err => console.log('error occured',err));

}

exports.postDownload = (req, res) => {
    const html = req.body.html;
    const md = req.body.markdown;

    const mdFilePath = path.join(__dirname, '../downloads/readme.md');
    const htmlFilePath = path.join(__dirname, '../downloads/readme.html');

    fs.writeFile(mdFilePath, md, (err) => {
      if (err) console.error(err);
      else console.log('Created md file successfully');
    });

    fs.writeFile(htmlFilePath, html, (err) => {
      if (err) console.error(err);
      else console.log('Created html file successfully');
    });

    res.zip([
      { path: mdFilePath, name: 'readme.md' },
      { path: htmlFilePath, name: 'readme.html' }
    ]);
}
The controller functions (gettApp, getUpload, postApp, postDownload) handle the incoming requests and interact with the AI integration, markdown generator, and views. After generating the Markdown content, the controllers pass the generated content to the appropriate views.
These controller functions are then exported and used in the routes defined in the routes/app.js file.
Views
The views are defined in the views/ directory. The editor.ejs file is an Embedded JavaScript (EJS) file that is responsible for rendering the editor view. It is used to generate HTML markup that is sent to the client.
<%- include('includes/head.ejs') %>
<!-- google fonts -->
<link rel="stylesheet" href="https://fonts.googleapis.com/css2?family=Material+Symbols+Outlined:opsz,wght,FILL,GRAD@24,400,0,0" />
<!-- stylesheets -->
<link rel="stylesheet" href="/css/edistyles.css">
<link rel="stylesheet" href="/css/output.css">

</head>
<body>
    <header class="header-nav">
            <h1 class="logo">ReadMeAI</h1>
            <div class="light-container">
                <div class="phone">
                    <span class="material-symbols-outlined" id="rotate-item">
                    phone_iphone</span>
                </div>
                <div class="tubelight">
                    <div class="bulb"></div>
                </div>
            </div>
        </header>
        <main class="main">
        <div class="mobile-container">
            <p>Sorry but the editor is disable on mobile device's, but it's best experienced on a PC or Tablet </p>
.....
                <button class="btn-containers" id="recompile">
                    <span class="material-symbols-outlined">bolt</span>
                </button>
            </header>
            <textarea name="textarea" id="textarea" class="sub-container output-container  container-markdown" ><%= md %></textarea>
        </div>
.....
    <!-- showdown cdn -->
    <script src="https://cdnjs.cloudflare.com/ajax/libs/showdown/2.1.0/showdown.min.js" integrity="sha512-LhccdVNGe2QMEfI3x4DVV3ckMRe36TfydKss6mJpdHjNFiV07dFpS2xzeZedptKZrwxfICJpez09iNioiSZ3hA==" crossorigin="anonymous" referrerpolicy="no-referrer"></script>
    <!-- ionicons cdn -->
    <script type="module" src="https://unpkg.com/ionicons@7.1.0/dist/ionicons/ionicons.esm.js"></script>
    <script nomodule src="https://unpkg.com/ionicons@7.1.0/dist/ionicons/ionicons.js"></script>

    <script src="/scripts/edi-script.js"></script>
    <script src="/scripts/tubelightBtn.js"></script>
</body>
Rendering the view
The controllers render the appropriate views with the generated content or serve API responses. The editor.ejs view is rendered with the generated Markdown content (html: html, md: data).
exports.postApp = (req, res) => {
    //...
    // Generate Markdown content
    //...

    res.render('editor', {
        pageTitle: 'ReadMeAI - Editor',
        html: html,
        md: data
    });
};
When the postApp function is called, the palmApi.getData function is used to fetch data from the Palm API based on the template, the incoming Markdown content, and the provided description. Once the data is fetched, the converter.makeHtml function is used to convert the Markdown content to HTML.
The res.render function is then used to render the editor view with the generated HTML content and Markdown content. The editor.ejs view should have the necessary code to display the HTML content and Markdown content in the desired format.
This approach allows for the dynamic generation of README content based on the incoming Markdown content and the provided template. The generated HTML content then gets rendered into the web page for the user to view.
Sending the response
The rendered view is sent as a response to the client using the res.render function. This function is used to render a view. This process ensures that the generated Markdown content is dynamically rendered into a web page using the provided template, and the web page is then sent as a response to the client.
Getting started
To get started, ensure that you have installed the latest version of Docker Desktop.
Clone the repository
Open a terminal window and run the following command to clone the sample application:
git clone https://github.com/Gitax18/ReadMeAI
You should now have the following files in your ReadMeAI directory:
ReadMeAI
├── CONTRIBUTING.md
├── Dockerfile
├── LICENSE
├── README.md
├── api
│   └── fetchPalm.js
├── controllers
│   └── app.js
├── data
│   ├── output.md
│   └── template.txt
├── downloads
│   ├── readme.html
│   └── readme.md
├── package-lock.json
├── package.json
├── public
│   ├── css
│   │   ├── edistyles.css
│   │   ├── home.css
│   │   ├── index.css
│   │   └── output.css
│   ├── images
│   │   ├── PaLM_API_Graphics-02.width-1200.format-webp.webp
│   │   ├── logos
│   │   │   ├── dh.png
│   │   │   ├── dp.png
│   │   │   └── gh.png
│   │   ├── pre.png
│   │   └── vscode.jpg
│   └── scripts
│       ├── edi-script.js
│       ├── home.js
│       ├── index.js
│       └── tubelightBtn.js
├── routes
│   └── app.js
├── server.js
├── uploads
│   ├── 1699377702064#Gradient.js
│   └── important.md
└── views
    ├── 404.ejs
    ├── editor.ejs
    ├── home.ejs
    ├── includes
    │   └── head.ejs
    └── index.ejs

14 directories, 35 files
Understanding the project directory structure
Here’s an overview of the project directory structure and the purpose of each folder and file:
api/: Contains code to connect to third-party APIs, such as Google PaLM 2.controllers/: Includes all the business logic for handling POST/GET requests.views/: Contains files for rendering on the client side.data/: Holds the ‘template’ for the output and ‘output.md’ for the generated markdown.public/: Contains client-side CSS and scripts.routes/: Manages routes and calls the respective controller functions for each route.uploads/: Temporarily stores files received from the client side, which are deleted once the session ends.server.js: The main Express server file, executed when starting the server.- Dockerfile: Contains the script to containerize the project.
Building the app
Run the following command to build the application.
docker build -t readmeai .
Run the app:
docker run -d -p 3333:3333 readmeai
You will see log output similar to the following:
> readme-ai-generator@1.0.0 start
> node server.js

server is listening at http://localhost:3333

Alternatively, you can pull and run the ReadMeAI Docker image directly from Docker Hub (Figure 3) using the following command:
docker run -it -p 3333:3333 gitax18/readmeai
You should be able to access the application at http://localhost:3333 (Figure 4).
Select Explore and upload your source code file by selecting Click to upload file (Figure 5).
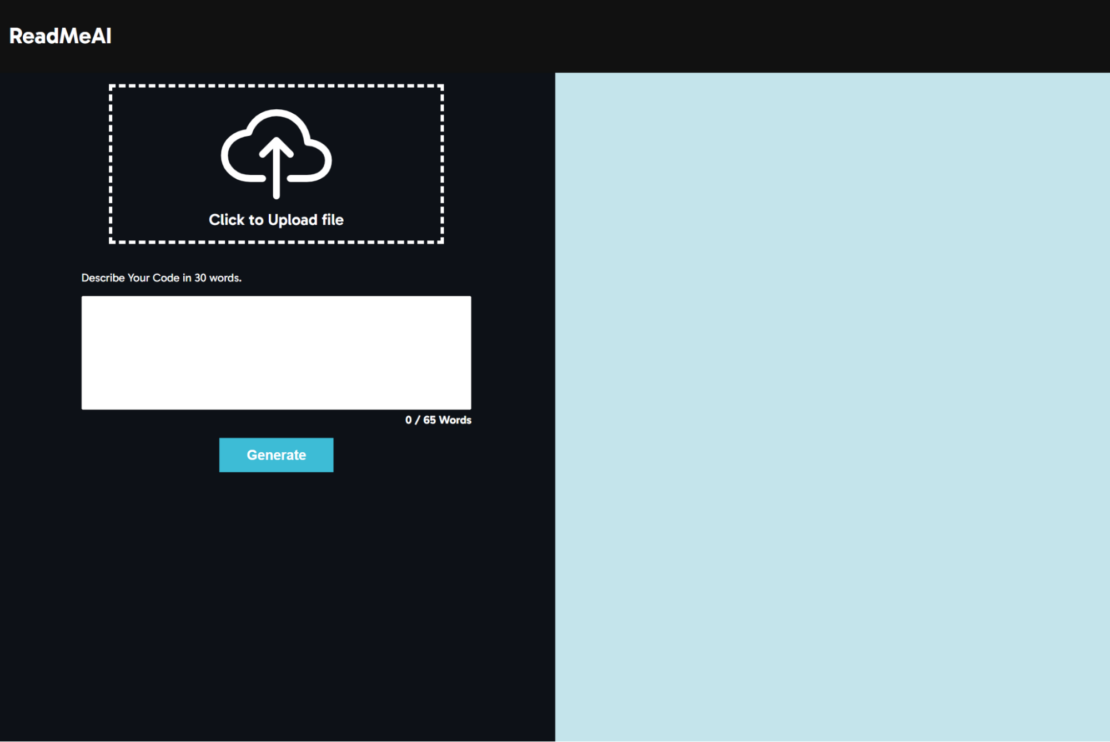
Once you finish describing your project, select Generate (Figure 6).
ReadMeAI utilizes Google’s Generative Language API to create draft README files based on user-provided templates, code snippets, and descriptions (Figure 7).
What’s next?
ReadMeAI was inspired by a common problem faced by developers: the time-consuming and often incomplete task of writing project documentation. ReadMeAI was developed to streamline the process, allowing developers to focus more on coding and less on documentation. The platform transforms code and brief descriptions into comprehensive, visually appealing README files with ease.
We are inspired by the ingenuity of ReadMeAI, particularly in solving a fundamental issue in the developer community.
Looking ahead, the creators plan to enhance ReadMeAI with features like GitHub integration, custom templates, and improved AI models such as Llama. By adopting newer technologies and architectures, they plan to make ReadMeAI even more powerful and efficient.
Join us in this journey to improve ReadMeAI making it an indispensable tool for developers worldwide.
Learn more
- Subscribe to the Docker Newsletter.
- Get the latest release of Docker Desktop.
- Vote on what’s next! Check out our public roadmap.
- Have questions? The Docker community is here to help.
- New to Docker? Get started.


