最新の BuildKit リリースである v0.13.0,には、実験的な Windows コンテナーのサポートが含まれています。 BuildKit は何年も前から存在しており、Docker Engine 23以来、Linux のデフォルトのビルド エンジンとなっています。0.0.
BuildKit は、ソースコードを変換してアーティファクト (コンテナーイメージなど) を効率的で表現力豊か、かつ反復可能な方法でビルドするためのツールキットです。 BuildKit では、以前の Docker Builder と比較して、次の利点が導入されました。
- 独立したビルドステージの構築を並列化し、未使用のステージをスキップします。
- ビルド間でビルド コンテキストで変更されたファイルのみを増分転送し、ビルド コンテキスト内の未使用ファイルの転送もスキップします。
- 多くの新機能を備えた Dockerfile フロントエンド実装を使用します。
- 残りの API (中間イメージとコンテナー) の副作用を回避します。
- 自動プルーニングのためにビルドキャッシュに優先順位を付けます。
2018年以来、Windows コンテナーの顧客は、BuildKit リポジトリと Windows コンテナー リポジトリに見られるように、BuildKit の Windows サポートを求めており、何百もの反応とコメントが寄せられています。この 1 年間、ユーザーの声に耳を傾け、リソースを集中させて、BuildKit での Windows コンテナーのサポートを強化しました。
これまでは、Linux イメージと、クロスコンパイルを使用して 非常に限定された Windows イメージをビルドするための Windows 上の Buildx クライアントのみを出荷していました。 本日は、BuildKit での Windows コンテナーの実験的なサポートを導入し、標準の Docker ビルドで間もなく利用できるようにする予定です。

次は何ですか?
今後数か月で、次のようなさらなる改善に取り組んでいきます。
- 一般提供 (GA) 対応: ガイドやドキュメントを含むリリース資料の改善。
- Docker Engine との統合: だからあなたはただ走ることができます
docker build。 - OCIワーカーのサポート: Linuxでは、OCIワーカーを使用してruncのみでBuildKitを実行するオプションがあります。 現在、Windows では containerd ワーカーのみがサポートされています。
- コンテナドライバ: コンテナー ドライバーでの実行のサポートを追加します。
- 画像出力: Linuxでサポートされている一部の画像出力はWindowsでは機能しない場合があり、テストと評価が必要です。 これには、複数のレジストリへのイメージのエクスポート、イメージ出力のキーがサポートされているかどうかの確認、マルチプラットフォームのイメージ構築サポートのテストが含まれます。
- 他のアーティファクトのビルド: BuildKit を使用して、コンテナーイメージ以外のアーティファクトをビルドできます。 この領域では、バイナリ、ライブラリ、ドキュメントなどの他の成果物が Linux と同様に Windows でもサポートされているかどうかをクロスチェックする必要があります。
- buildkitd の実行に管理者は必要ありません: 現在、Windows で buildkitd を実行するには管理者権限が必要です。 buildkitdを低い権限、別名「ルートレス」で実行することを検討します。
- キャッシュのエクスポート: 特定のキャッシュ エクスポーター (inline、registry、local、gha [GitHub Actions]、 3、azblob) が Windows でもサポートされているかどうかを確認するには、調査を行う必要があります。
- Linux パリティ: Windows と Linux 間の機能パリティのギャップを特定し、アクセスし、埋めます。
チュートリアル — BuildKit と Windows コンテナーを使用して基本的な "Hello World" イメージをビルドする
ここでは、必要な依存関係を含む BuildKit のセットアップ プロセスについて説明し、基本的な Windows イメージをビルドする方法を示しましょう。 フィードバックや問題については、Issues · moby/buildkit (github.com) でチケットを提出してください。 タグ付き エリア/ウィンドウズ.
プラットフォームの要件を以下に示します。 このシナリオでは、 AMD64で基本イメージを実行しますnanoserver:ltsc2022。
- アーキテクチャ:AMD64、Arm64(バイナリは利用可能ですが、まだ公式にテストされていません)。
- サポートされているオペレーティングシステム:Windows Server 2019、Windows Server 2022、Windows 11。
- 基本イメージ:
servercore:ltsc2019、、nanoserver:ltsc2022servercore:ltsc2022。互換性マップを参照してください。
このワークフローでは、次の手順について説明します。
- Windows コンテナーを有効にします。
- containerd をインストールします。
- BuildKit をインストールします。
- 単純な "Hello World" イメージを作成します。
1. Windows コンテナーを有効にする
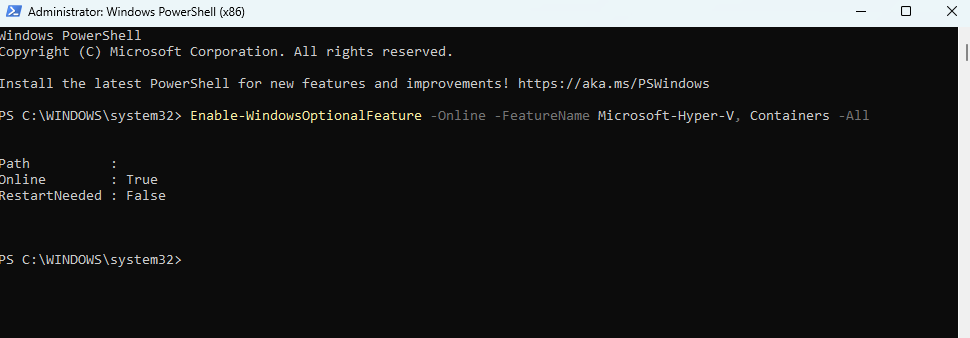
PowerShell ターミナルを管理者権限モードで起動します。 次のコマンドを実行して、コンテナー機能が有効になっていることを確認します。
Enable-WindowsOptionalFeature -Online -FeatureName Microsoft-Hyper-V, Containers -All
セットアップで RestartNeeded が True と表示される場合は、マシンを再起動し、管理者の PowerShell ターミナルを再度開きます (図 1)。 それ以外の場合は、次の手順に進みます。

2. containerd のインストール
次に、コンテナとイメージを管理するためのコンテナランタイムとして使用される containerdをインストールする必要があります。
手記: 現在、containerd ワーカーのみがサポートされています。 将来的には、runcを使用するOCIワーカーのサポートを追加する予定であるため、この依存関係は削除されます
次のスクリプトを実行して、最新の containerd リリースをインストールします。 containerd が既にインストールされている場合は、以下のスクリプトをスキップして実行 Start-Service containerd し、containerd サービスを開始します。
注: containerd v1.7.7+ は必須です。
# If containerd previously installed run:
Stop-Service containerd

# Download and extract desired containerd Windows binaries
$Version="1.7.13" # update to your preferred version
curl.exe -L https://github.com/containerd/containerd/releases/download/v$Version/containerd-$Version-windows-amd64.tar.gz -o containerd-windows-amd64.tar.gz
tar.exe xvf .\containerd-windows-amd64.tar.gz

# Copy and configure
Copy-Item -Path ".\bin" -Destination "$Env:ProgramFiles\containerd" -Recurse -Container:$false -Force
cd $Env:ProgramFiles\containerd\
.\containerd.exe config default | Out-File config.toml -Encoding ascii

# Copy
Copy-Item -Path .\bin\* -Destination (New-Item -Type Directory $Env:ProgramFiles\containerd -Force) -Recurse -Force

# add the binaries (containerd.exe, ctr.exe) in $env:Path
$Path = [Environment]::GetEnvironmentVariable("PATH", "Machine") + [IO.Path]::PathSeparator + "$Env:ProgramFiles\containerd"
[Environment]::SetEnvironmentVariable( "Path", $Path, "Machine")
# reload path, so you don't have to open a new PS terminal later if needed
$Env:Path = [System.Environment]::GetEnvironmentVariable("Path","Machine") + ";" + [System.Environment]::GetEnvironmentVariable("Path","User")

# configure
containerd.exe config default | Out-File $Env:ProgramFiles\containerd\config.toml -Encoding ascii
# Review the configuration. Depending on setup you may want to adjust:
# - the sandbox_image (Kubernetes pause image)
# - cni bin_dir and conf_dir locations
Get-Content $Env:ProgramFiles\containerd\config.toml

# Register and start service
containerd.exe --register-service
Start-Service containerd
3. BuildKit のインストール
手記: Docker Desktop を最新バージョンに更新したことを確認します。
次のスクリプトを実行して、最新の BuildKit リリースをダウンロードして抽出します。
$version = "v0.13.0" # specify the release version, v0.13+
$arch = "amd64" # arm64 binary available too
curl.exe -LO https://github.com/moby/buildkit/releases/download/$version/buildkit-$version.windows-$arch.tar.gz
# there could be another `.\bin` directory from containerd instructions
# you can move those
mv bin bin2
tar.exe xvf .\buildkit-$version.windows-$arch.tar.gz
## x bin/
## x bin/buildctl.exe
## x bin/buildkitd.exe
次に、次のコマンドを実行して BuildKit バイナリ Program Files をディレクトリに追加し、直接 PATH 呼び出せるようにします。
# after the binaries are extracted in the bin directory
# move them to an appropriate path in your $Env:PATH directories or:
Copy-Item -Path ".\bin" -Destination "$Env:ProgramFiles\buildkit" -Recurse -Force
# add `buildkitd.exe` and `buildctl.exe` binaries in the $Env:PATH
$Path = [Environment]::GetEnvironmentVariable("PATH", "Machine") + `
    [IO.Path]::PathSeparator + "$Env:ProgramFiles\buildkit"
[Environment]::SetEnvironmentVariable( "Path", $Path, "Machine")
$Env:Path = [System.Environment]::GetEnvironmentVariable("Path","Machine") + ";" + `
    [System.Environment]::GetEnvironmentVariable("Path","User")
を実行します buildkitd.exe。 図 2に示すようなものが表示されることが予想されます。

これで、buildKit インスタンスを使用するように buildx (BuildKit クライアント) を設定できます。 ここでは、起動したばかりの Buildkit インスタンスを指す Builder アイテムを、以下を実行して作成します。
docker buildx create --name buildkit-exp --use --driver=remote npipe:////./pipe/buildkitd
ここでは、ビルダーの新しいインスタンスを作成し、それを BuildKit インスタンスにポイントしています。 BuildKit は .npipe:////./pipe/buildkitd
ビルダーにも名前を付けますが、ここでは buildkit-expと呼んでいますが、好きな名前を付けることができます。 これを現在のビルダーとして設定することを忘れないでください --use 。
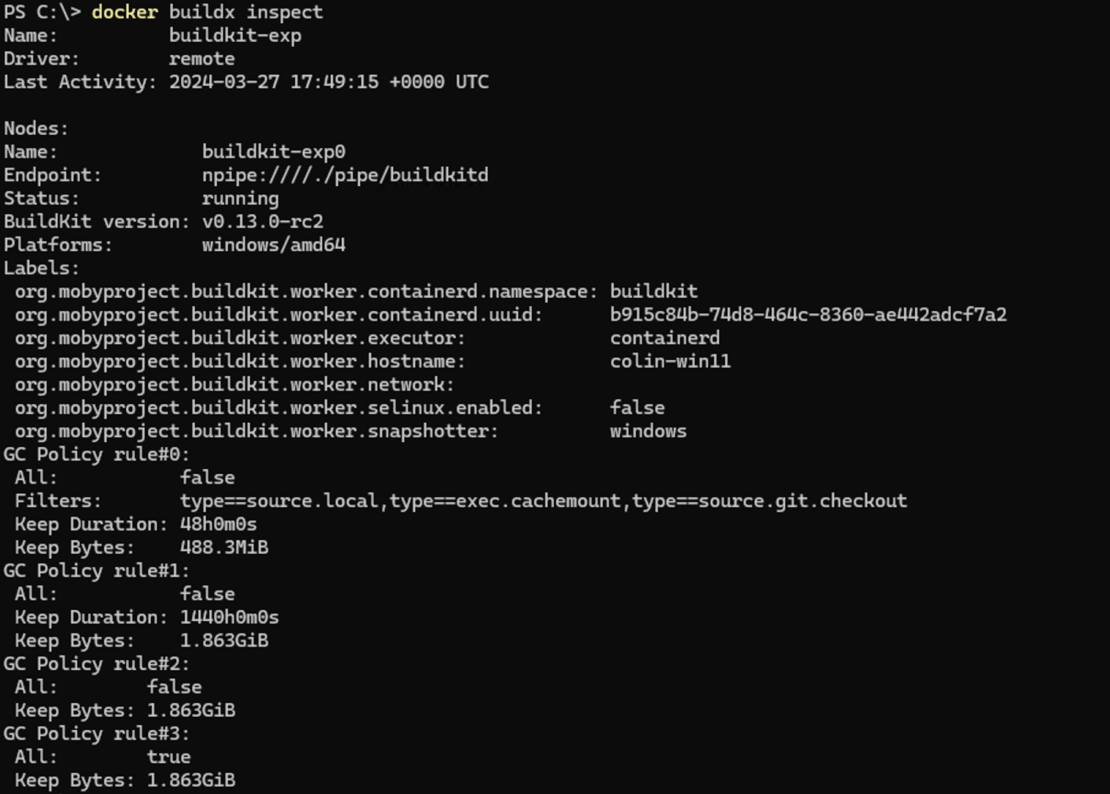
実行 docker buildx inspect して接続をテストしてみましょう(図 3)。

よし!
また、ビルダーを一覧表示して 管理することもできます。 を実行します docker buildx ls (図 4)。

docker buildx ls を実行して、すべてのビルダーとノードのリストを返します。 ここでは、新しいビルダーがリストに追加されていることがわかります。4. "Hello World" イメージのビルド
次の Dockerfile に示すように、 単純な "hello world" イメージ を構築します。
FROM mcr.microsoft.com/windows/nanoserver:ltsc2022
COPY hello.txt C:
CMD ["cmd", "/C", "type C:\\hello.txt"]
次のコマンドを実行してディレクトリを作成し、ディレクトリを sample_dockerfileに変更します。
mkdir sample_dockerfile
cd sample_dockerfile
次のスクリプトを実行して、上記の hello.txt sample_dockerfile Dockerfile をディレクトリに追加します。
Set-Content Dockerfile @"
FROM mcr.microsoft.com/windows/nanoserver:ltsc2022
USER ContainerAdministrator
COPY hello.txt C:/
RUN echo "Goodbye!" >> hello.txt
CMD ["cmd", "/C", "type C:\\hello.txt"]
"@

Set-Content hello.txt @"
Hello from buildkit!
This message shows that your installation appears to be working correctly.
"@
これで、を使用して buildx イメージをビルドし、レジストリにプッシュできます (図 5を参照)。
docker buildx build --builder buildkit-exp --push -t <your_username>/hello-buildkit .

Docker Hub をレジストリとして使用している場合は、実行buildx build前に実行docker loginしてください (図 6)。

万丈! これで、標準 docker runのコンテナを実行できます。
docker run <HUB ACCOUNT NAME>/hello-buildkit
BuildKit を使ってみる
リリースされた実験的な Windows BuildKit サポート v0.13.0.まず、 ドキュメント やブログで、BuildKit を使用して簡単な Windows イメージを構築する方法を順を追って説明してください。 フィードバックと課題は Issues · moby/buildkit (github.com) で報告してください。 タグ付き エリア/ウィンドウズ.
さらに詳しく
- Docker Newsletter を購読してください。
- Docker デスクトップの最新リリースを入手します。
- 質問がありますか? Docker コミュニティがお手伝いします。
- ドッカーは初めてですか? 始めましょう。
ありがとうございます
@gabriel-samfiraさん、@TBBleさん、@tonistiigiさん、@AkihiroSudaさん、@クレイジーマックス、 @jedevc、 @thaJeztah、 @profnandaa、@イアンキンゴリ[LX11] 、および BuildKit での Windows コンテナー サポートの有効化に貢献した他の多くの主要なコミュニティ メンバー。 また、貴重なフィードバックと分析情報を引き続き提供してくださる Windows コンテナー開発者にも感謝します。


