複雑なシステムをテストする場合、特定できるエッジケースが多ければ多いほど、ソフトウェアは現実世界でのパフォーマンスが向上します。 しかし、隠れたバグを明らかにする何百、何千もの有意義なテストを効率的に生成するにはどうすればよいでしょうか。 モデルベーステスト(MBT)は、ソフトウェアの期待される動作をモデル化することでテストケースの生成を自動化する手法です。
このデモでは、単純な REST API で回帰テストを実行するためのモデルベースのテスト手法について説明します。
JUnit 5 で jqwik テストエンジンを使用して、プロパティベーステストとモデルベーステストを実行します。さらに、 Testcontainers を使用して、アプリケーションのさまざまなバージョンでDockerコンテナをスピンアップします。

モデルベースのテスト
モデルベース テストは、テストされたコンポーネントをシステムの予想される動作を表すモデルと比較することで、ステートフル ソフトウェアをテストする方法です。 テストケースを手動で作成する代わりに、次のようなテストツールを使用します。
- アプリケーションでサポートされている可能なアクションの一覧を実行します
- これらのアクションからテストシーケンスを自動的に生成し、潜在的なエッジケースをターゲットにします
- これらのテストをソフトウェアとモデルで実行し、結果を比較します
この場合、アクションは単にアプリケーションのAPIによって公開されるエンドポイントです。 デモのコード例では、次のことを可能にする CRUD REST API を備えた基本的なサービスを使用します。
- 一意の従業員番号で従業員を検索する
- 従業員の名前を更新する
- 部門からすべての従業員のリストを取得する
- 新しい従業員を登録する

すべてが構成され、最終的にテストを実行すると、2つのステートフルサービスに数百の要求が迅速に送信されることが期待できます。

Docker Compose
データベースをPostgresからMySQLに切り替える必要があり、サービスの動作の一貫性を確保したいと仮定します。 これをテストするには、両方のバージョンのアプリケーションを実行し、それぞれに同一の要求を送信し、応答を比較します。
Docker Composeを使用して、アプリの2つのバージョンを実行する環境を設定できます。
- モデル(
mbt-demo:postgres):現在のライブバージョンと真実の源。 - テスト済みバージョン (
mbt-demo:mysql): テスト対象の新しい機能ブランチ。
services:
  ## MODEL
  app-model:
      image: mbt-demo:postgres
      # ...
      depends_on:
          - postgres
  postgres:
      image: postgres:16-alpine
      # ...

  ## TESTED
  app-tested:
    image: mbt-demo:mysql
    # ...
    depends_on:
      - mysql
  mysql:
    image: mysql:8.0
    # ...
テストコンテナ
この時点で、テストのためにアプリケーションとデータベースを手動で開始することもできますが、これは面倒です。 代わりに、Testcontainers の ComposeContainer を使用して、テスト フェーズ中に Docker Compose ファイルでこれを自動化しましょう。
この例では、JUnit 5 テストランナーとして jqwik を使用します。 まず、 jqwik と Testcontainers と jqwik-testcontainers の依存関係を次のように追加 pom.xmlしましょう。
<dependency>
    <groupId>net.jqwik</groupId>
    <artifactId>jqwik</artifactId>
    <version>1.9.0</version>
    <scope>test</scope>
</dependency>
<dependency>
    <groupId>net.jqwik</groupId>
    <artifactId>jqwik-testcontainers</artifactId>
    <version>0.5.2</version>
    <scope>test</scope>
</dependency>
<dependency>
    <groupId>org.testcontainers</groupId>
    <artifactId>testcontainers</artifactId>
    <version>1.20.1</version>
    <scope>test</scope>
</dependency>
その結果、 a ComposeContainer をインスタンス化し、テスト docker-compose ファイルを引数として渡すことができるようになりました。
@Testcontainers
class ModelBasedTest {

    @Container
    static ComposeContainer ENV = new ComposeContainer(new File("src/test/resources/docker-compose-test.yml"))
       .withExposedService("app-tested", 8080, Wait.forHttp("/api/employees").forStatusCode(200))
       .withExposedService("app-model", 8080, Wait.forHttp("/api/employees").forStatusCode(200));

    // tests
}
HTTP クライアントのテスト
それでは、サービスに対してHTTPリクエストを実行するのに役立つ小さなテストユーティリティを作成しましょう。
class TestHttpClient {
  ApiResponse<EmployeeDto> get(String employeeNo) { /* ... */ }

  ApiResponse<Void> put(String employeeNo, String newName) { /* ... */ }

  ApiResponse<List<EmployeeDto>> getByDepartment(String department) { /* ... */ }

  ApiResponse<EmployeeDto> post(String employeeNo, String name) { /* ... */ }


  record ApiResponse<T>(int statusCode, @Nullable T body) { }

  record EmployeeDto(String employeeNo, String name) { }
}
さらに、テストクラスでは、次の2つのサービスComposeContainerを作成するTestHttpClientsのに役立つ別のメソッドを宣言できます。
static TestHttpClient testClient(String service) {
  int port = ENV.getServicePort(service, 8080);
  String url = "http://localhost:%s/api/employees".formatted(port);
  return new TestHttpClient(service, url);
}
JQWIKの
Jqwikは、JUnit 5と統合するJava用のプロパティベースのテストフレームワークであり、さまざまな入力にわたってコードのプロパティを検証するためのテストケースを自動的に生成します。 ジェネレータを使用して多様でランダムなテスト入力を作成することで、jqwik はテスト カバレッジを強化し、エッジ ケースを明らかにします。
jqwikを初めて使用する場合は、 公式ユーザーガイドを確認して、そのAPIを詳しく調べることができます。 このチュートリアルでは API のすべての詳細を網羅しているわけではありませんが、jqwik ではテストする一連のアクションを定義できることを知っておくことが重要です。
まず、従来の@Testアノテーションの代わりに jqwik の@Propertyアノテーションを使用してテストを定義します。
@Property
void regressionTest() {
  TestHttpClient model = testClient("app-model");
  TestHttpClient tested = testClient("app-tested");
  // ...
}
次に、API への HTTP 呼び出しであり、アサーションを含めることもできるアクションを定義します。
たとえば、両方の GetOneEmployeeAction サービスから特定の従業員をフェッチし、応答を比較しようとします。
record ModelVsTested(TestHttpClient model, TestHttpClient tested) {}

record GetOneEmployeeAction(String empNo) implements Action<ModelVsTested> {
  @Override
  public ModelVsTested run(ModelVsTested apps) {
    ApiResponse<EmployeeDto> actual = apps.tested.get(empNo);
    ApiResponse<EmployeeDto> expected = apps.model.get(empNo);

    assertThat(actual)
      .satisfies(hasStatusCode(expected.statusCode()))
      .satisfies(hasBody(expected.body()));
    return apps;
  }
}
さらに、これらのアクションをオブジェクト内に Arbitrary ラップする必要があります。 ファクトリ デザイン パターンを実装するオブジェクトと考えることができ Arbitraries 、これは、一連の構成済みルールに基づいて、型のさまざまなインスタンスを生成できます。
たとえば、 returned by employeeNos() は、Arbitrary構成されたリストからランダムな部門を選択し、0 と 200の間の番号を連結することで、従業員番号を生成できます。
static Arbitrary<String> employeeNos() {
  Arbitrary<String> departments = Arbitraries.of("Frontend", "Backend", "HR", "Creative", "DevOps");
  Arbitrary<Long> ids = Arbitraries.longs().between(1, 200);
  return Combinators.combine(departments, ids).as("%s-%s"::formatted);
}
同様に、getOneEmployeeAction()指定されたArbitrary従業員番号に基づいてアクションを返しますAribtrary。
static Arbitrary<GetOneEmployeeAction> getOneEmployeeAction() {
  return employeeNos().map(GetOneEmployeeAction::new);
}
他のすべての Actions と ArbitrariesActionSequenceを宣言した後、 を作成します。
@Provide
Arbitrary<ActionSequence<ModelVsTested>> mbtJqwikActions() {
  return Arbitraries.sequences(
    Arbitraries.oneOf(
      MbtJqwikActions.getOneEmployeeAction(),
      MbtJqwikActions.getEmployeesByDepartmentAction(),
      MbtJqwikActions.createEmployeeAction(),
      MbtJqwikActions.updateEmployeeNameAction()
  ));
}


static Arbitrary<Action<ModelVsTested>> getOneEmployeeAction() { /* ... */ }
static Arbitrary<Action<ModelVsTested>> getEmployeesByDepartmentAction() { /* ... */ }
// same for the other actions
これで、テストを作成し、jqwikを活用して、提供されたアクションを使用してさまざまなシーケンスをテストできます。 タプルを作成し ModelVsTested 、それを使用してそれに対する一連のアクションを実行しましょう。
@Property
void regressionTest(@ForAll("mbtJqwikActions") ActionSequence<ModelVsTested> actions) {
  ModelVsTested testVsModel = new ModelVsTested(
    testClient("app-model"),
    testClient("app-tested")
  );
  actions.run(testVsModel);
}
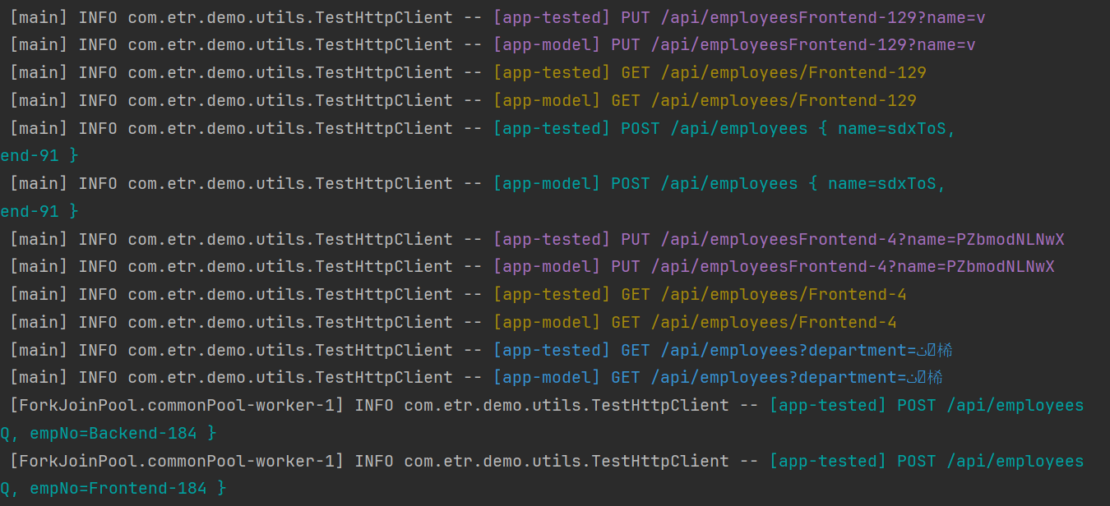
これで、ついにテストを実行できます。 このテストでは、モデルとテストされたサービスの間の不整合を見つけようとする何千もの要求のシーケンスが生成されます。
INFO com.etr.demo.utils.TestHttpClient -- [app-tested] PUT /api/employeesFrontend-129?name=v
INFO com.etr.demo.utils.TestHttpClient -- [app-model] PUT /api/employeesFrontend-129?name=v
INFO com.etr.demo.utils.TestHttpClient -- [app-tested] GET /api/employees/Frontend-129
INFO com.etr.demo.utils.TestHttpClient -- [app-model] GET /api/employees/Frontend-129
INFO com.etr.demo.utils.TestHttpClient -- [app-tested] POST /api/employees { name=sdxToS, empNo=Frontend-91 }
INFO com.etr.demo.utils.TestHttpClient -- [app-model] POST /api/employees { name=sdxToS, empNo=Frontend-91 }
INFO com.etr.demo.utils.TestHttpClient -- [app-tested] PUT /api/employeesFrontend-4?name=PZbmodNLNwX
INFO com.etr.demo.utils.TestHttpClient -- [app-model] PUT /api/employeesFrontend-4?name=PZbmodNLNwX
INFO com.etr.demo.utils.TestHttpClient -- [app-tested] GET /api/employees/Frontend-4
INFO com.etr.demo.utils.TestHttpClient -- [app-model] GET /api/employees/Frontend-4
INFO com.etr.demo.utils.TestHttpClient -- [app-tested] GET /api/employees?department=ٺ⯟桸
INFO com.etr.demo.utils.TestHttpClient -- [app-model] GET /api/employees?department=ٺ⯟桸
        ...
エラーのキャッチ
テストを実行してログを確認すると、すぐに障害を見つけることができます。 引数 ٺ⯟桸 を使用して部門別に従業員を検索すると、モデルは内部サーバーエラーを生成しますが、テストバージョンは 200 OKを返します。
Original Sample
---------------
actions:
ActionSequence[FAILED]: 8 actions run [
    UpdateEmployeeAction[empNo=Creative-13, newName=uRhplM],
    CreateEmployeeAction[empNo=Backend-184, name=aGAYQ],
    UpdateEmployeeAction[empNo=Backend-3, newName=aWCxzg],
    UpdateEmployeeAction[empNo=Frontend-93, newName=SrJTVwMvpy],
    UpdateEmployeeAction[empNo=Frontend-129, newName=v],
    CreateEmployeeAction[empNo=Frontend-91, name=sdxToS],
    UpdateEmployeeAction[empNo=Frontend-4, newName=PZbmodNLNwX],
    GetEmployeesByDepartmentAction[department=ٺ⯟桸]
]
    final currentModel: ModelVsTested[model=com.etr.demo.utils.TestHttpClient@5dc0ff7d, tested=com.etr.demo.utils.TestHttpClient@64920dc2]
Multiple Failures (1 failure)
    -- failure 1 --
    expected: 200
    but was: 500
調査の結果、この問題は、Postgres固有の構文を使用してデータを取得するためのネイティブSQLクエリから発生していることがわかりました。 これは私たちの小さなアプリケーションでは単純な問題でしたが、モデルベースのテストは、特定の反復ステップのシーケンスによってシステムが特定の状態に押し込まれた後にのみ表面化する可能性のある予期しない動作を明らかにするのに役立ちます。
まとめ
この記事では、モデルベーステストが実際にどのように機能するかについて、実践的な例を紹介しました。 モデルの定義からテストケースの生成まで、テストカバレッジを改善し、手作業を減らすための強力なアプローチを目の当たりにしてきました。 モデルベース テストがソフトウェアの品質を向上させる可能性を確認したところで、次はさらに深く掘り下げて、独自のプロジェクトに合わせて調整します。
リポジトリをクローン してさらに実験し、モデルをカスタマイズし、この方法論をテスト戦略に統合します。 よりレジリエントなソフトウェアの構築を今すぐ始めましょう!
ありがとうございました エマニュエル・トランダフィール この投稿に貢献していただきありがとうございます。
さらに詳しく
- モデルベースのテストプラクティスリポジトリを複製します。
- Docker Newsletter を購読してください。
- Testcontainers の Web サイトにアクセスします。
- 無料アカウントを作成して、Testcontainers Cloud の使用を開始してください。
- 質問がありますか? Docker コミュニティがお手伝いします。
- ドッカーは初めてですか? 始めましょう。


